Lab Work – Perhaps, the best way to show ‘work’ or work in progress; in most cases, the purpose is to highlight the struggle to find a solution, the test effort and the learning that takes place when fixing stuff. Or another way to share various phases of the problem solving process – hypothesize: test, learn and apply.

Quick Fix – Pool

theQuick Fix – Pool

Solve Water Pressure (Spikes) – Clean Filter, Pump/Pump Filter etc.
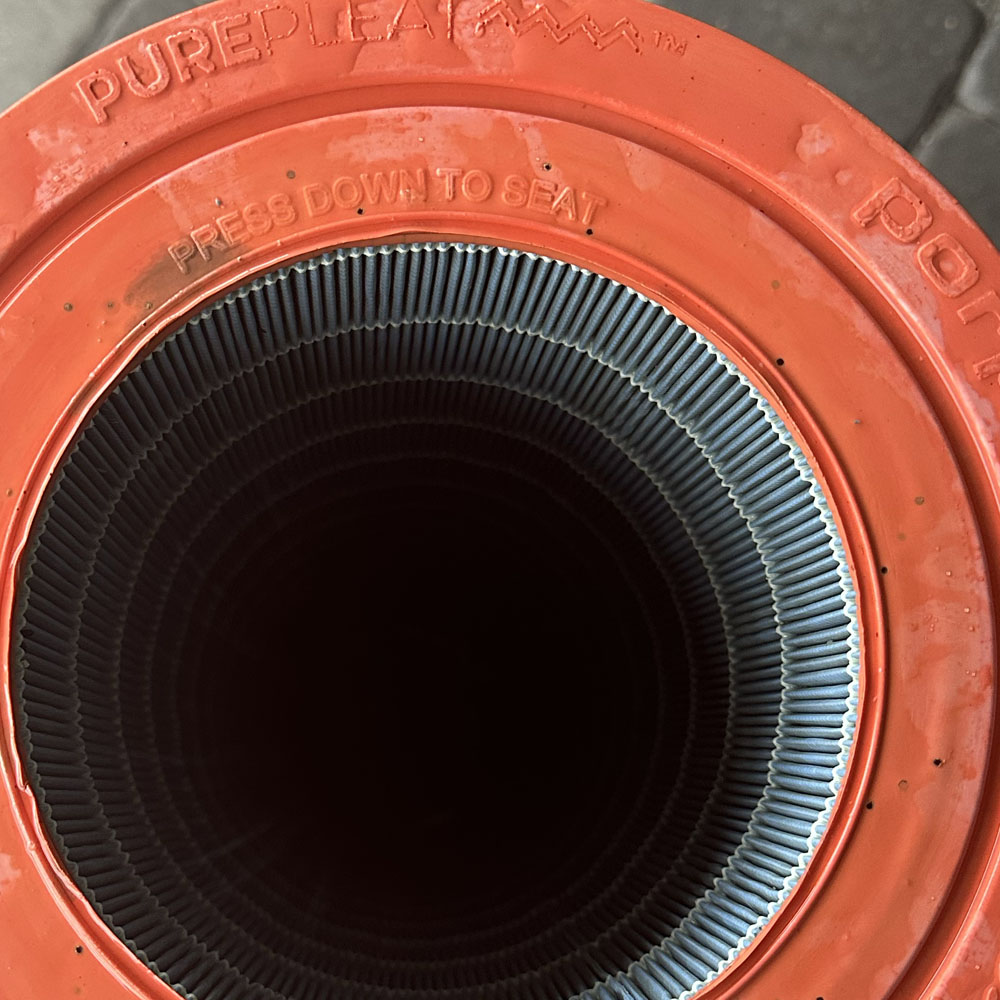
Filter Top

Inspect the equipment

On an ongoing basis, it is important to keep the pool filter clean. Additionally, it is crucial to address any leaks and replace parts as needed throughout the lifespan of the pool. Monitoring the filter housing gauge can be helpful in the process. To begin this maintenance task, perform a visual and physical. inspection of the Pentair system, which includes the filter, pressure gauge, and blow-off valve. Be vigilant for any sudden spikes in pressure, as well as any obstacles that may impede proper water flow.

Filter Housing, Filter Change, New Gauge and Blower
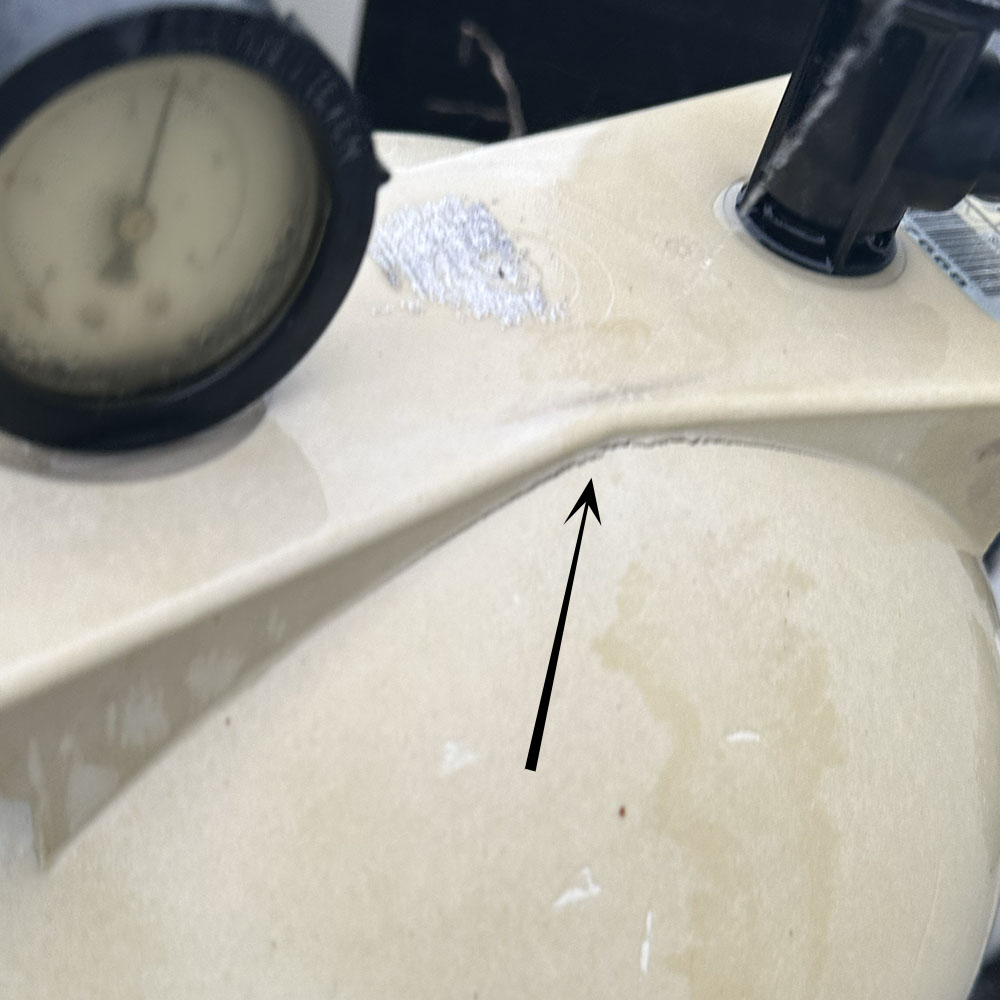
Filter Top Showing Crack

Housing Crack

Filter Change

Filter Change

Clean Filter Insert

Clean Filter Insert

Inspect Filter Bottom

Inspect Filter Bottom

Filter Housing, Pump – Water Cycle Ecosystem

Along with the filter gauge, proper filter cleaning is necessary. Keeping the pool clean and free of debris is one thing, but keeping the debris and ‘gunk’ out of the system is another. Let’s focus on the main drain(s), pump filter, filter, filter housing and the return.

Chemicals aside, simple maintenance is key. Keeping the main drain clear, the pump filter and the filter cleaned and free of debris is important (simple, right?). Not too often, but when it does, focus on the filter housing gauge. Pressure can build when the filter is not allowing the recommended ‘flow’ back to the pool via the return. The blow off valve, assuming a generic housing, will help eliminate pressure when needing to power down the pump unit to clean the pump filter and clean, remove or replace the filter.

New Parts
Clean Filter Housing

Clean Filter Housing

Place Filter

Place Filter

Infilter Insert

Infilter Insert

New Filter Top

New Filter Top

Filter Housing Issue

Let’s skip ahead to the filter housing issue in our quick fix – pool article. First, here is a generic video showing the process of turning off the pool, removing the filter housing top and gaining access to the filter. Unfortunately, the filter housing top deteriorated due to sun exposure, water, contaminants. Luckily, it didn’t turn into a lost top or a comical scenario where the filter top ends up in a neighbors yard.

After a brief conversation with the pool professionals, it became clear that this is a common point of failure. It can be temporarily patched with epoxy but this is not recommended  for this application. In a pinch, do what you can to maintain it, but most of the time, it’s best to get a new top. We will also replace the gauges (these are not due for another day or two, as we have chosen to purchase replacements online).

Going Back to the filter and solving problems along the way will help you better maintain the equipment you have. This has been our approach to working on electronics and technology for our 20 years. Once you’ve learned a your lesson, you typically won’t be to keep notes on your pool filter and make sure to buy the correct filter for your system. Prices will vary as you all know.

Physical and Visual Inspection

Check the filter core, gauges, blow off valve, filter screen (if applicable), and filter. Something is clogging up our filter, possibly algaecide or leftover water coloring solution. It is washable, but for the sake of time, it’s best to replace the filter. This task is not brain surgery, but it must  be done correctly. Inspect all parts, clean what you can, and replace the items that are beyond cleaning. Filters and parts deteriorate over time.

While you’re cleaning out the pool, filters and whatever else might be causing problems in and around the pool. Check out our series on pool robots, maintenance, care and more importantly, Maytronic Dolphin robot repairs! Don’t miss out on this series, whether you have a robot, looking to invest into one or have a bot out of order or a Dolphin Down in desperate need of assistance… More content on the way! 

In summary, these quick fix – pool tips can be used  to inspect all components of the pool pump. Conduct a visual inspection, clean the baskets, filter, filter core, filter housing bottom, and check the water. Balance the water with chemicals as needed, then deploy the pool robot to start the cleaning process.

Like the quick fix format? Check out other quick fix content here such as this disposal problems fix. Like the learn to descale your coffee equipment – pots and machines, fix a toilet float clean. Like this quick pool filter housing and filter fix, try a cell phone charging hack… Check them out!

Dolphin Nautilus

Nautilus CC Plus (Wired)

Pool Robots by Maytronics

Dolphin Nautilus Pool Robot

Dolphin Nautilus CC

The Dolphin Nautilus CC pool vacuum, made by Maytronics Dolphin, is designed to remove debris, brush, vacuum, and maintain pool clarity.

Everyday, the Dolphin Nautilus activates, moves around the pool, cleans, and maintains buoyancy upon completion. It comes with a price tag, so choose wisely! We received a recommendation from our pool guy, which was great advice – try the Dolphin Nautilus robot vacuum. The goal is to reduce water evaporation, maintain water and chemical balance, minimize chemical corrections and keep the system clean.

Drone Accessories
Nautilus Back

Nautilus Back

Nautilus Cleaning

Nautilus Cleaning

Wall Climb

Wall Climb

Clean Filters

Clean Filters

Nautilus Cart

Nautilus Cart

Now, lawn equipment can spread dirt, grass clipping, environmental debris, pet fur, and screens with holes. Various types of debris can become spoilers when found in the pool. I assume that most, if not all, of this debris is kicked up by mowers and blowers as they are the main vehicles for debris getting into the pool. For us, sand from the brick pad seems to wreak havoc on our pools ‘clarity’. So, the sand, bugs and debris from lawn equipment…

More Maytronics Product Information

The Nautilus is a great product that is not terribly expensive when compared to other devices in the same space. We chose this specific product because it lacks excessive technology. We simply wanted a low-maintenance clean that could operate in the water, clean effectively, run various cleaning cycles and be easily stored  on a cart when not in use. The cart allows for easy storage or movement, especially for pool usage.  It can simply move the robot away when swimmings are in  or around the pool. This means swimmers can splash around, stir up the water and not worry about damaging the robot. The universal cart works wonders, although it may be pricey for some. It makes tasks like bending down, lifting, and storing the robot a breeze.

Cost, cleaning time. The machine is easy to clean. Power down the machine, pull up the robot, open two doors, pull out the filters, unlock the filters with four clicks, and start the wash. Cleaning and maintaining the screens is much easier when considering the cost and cleaning time of the entire pool compared to a quick rinse under the faucet to remove debris. Moving back to the robot, snap the filters into the housing, replace them on the machine, submerge the robot, and power it on…

Quickly, I wanted to share some other Maytronics Dolphin content, newer content since the original Nautilus article  in reverse order, so the fix is first (up), issue second(down): Dolphin On and  Dolphin Down.

Moving on, no app for us, once again we opted for the Dolphin Nautilus robot in its manual version (corded, non-wifi enabled) to keep costs down. It suits us well since our pool remains uncovered year-round; the robot makes its way around the pool once or twice a day, providing low-maintenance, no-frills pool cleaning. Personally, I would prefer to cover the pool at night to  retain heat and reduce water evaporation. But for now, we’re happy with our choice. This recommendation came from our pool service, not a paid advertisement, so a big thank you to them!

Quick Tip – Float

Stop Running Water

Pesky Toilet – Fix Running Water Issue

Switch out the float and the flap

Toilet Running? Quick Tip – Check the Float, Stop the Water Flow Correctly.

Quick Tip: Is your toilet leaking or running? Start by checking for a few common issues. Is the water continuously filling the toilet? This could indicate a water shutoff problem. Is the flap broken, deteriorating, or blocked by debris like a tank cleaner puck or tablet?

Here are two simple steps to fix the problem we are trying to solve in this quick tip article regarding floats and flaps. First, check the flap. Is it the correct size and in good condition? If not, replace it. Adjust the flap sinker and chain as needed. Second, check the float. Make sure it is floating properly to shut off the water once the tank reaches the set float height. Fixing these issues can help stop your toilet from leaking or running.

Toilet Inspection, Repair
Visual Inspection

Visual Inspection

Unscrew Water Hose

Unscrew Water Hose

Tank Screw

Tank Screw

Replace Flap

Replace Flap

Water Pipe

Water Pipe

Screw Water Hose

Screw Water Hose

When it comes to toilet repair, there are few things you need to check, such as water height and water pressure. For a quick fix, start by turning off the water, draining the tank, vacuuming out any remaining water (having a bucket nearby can be helpful in tight spaces). Let’s loosen the plastic nut(which is a common material these days) that connects the tank to the water spout. Do the same  for the float nut, which is the other connection point under the tank for modern toilets.

Once the hose and float have been removed, along with the float assembly and hose connecting the ‘out flow’ pipe, which may be another potential leak point, replace what was removed with new materials and turn the water back on. And just like that, your toilet is fixed. It may not be a technical task, but everyone has a toilet, and appliances and fixtures can break down from time to time. Keep this handy tip in mind for the next time.

Like the quick fix format? Check out other quick fix content here such as this disposal problems fix. Like the learn to descale your coffee equipment – pots and machines. Much like this fix a toilet float article… clean and fixpool filter housing and filter problem or try a cell phone charging hack… Check them out!

Alpha Numeric Domain Salad

Solve Issues Finding A Domain Name

Use The Soup, Domain Soup

ICANN Helps with Alpha Numeric Domain Salad

Finding the right domain name

These days, it’s getting tougher by the minute. All the 3, 4, 5, 6 and some 7- letter combination domains are all gone (purchased). Now, what do I do?

A new year, a new you (business you). Move past the Alpha Numeric Domain Salad (or soup) and keep it simple and short. Questions, arise: Is it time to create a new domain or find an alternative? What’s a domain broker? Whatever the reason, the strategy might be more difficult than you think. With loads of questions, it’s time for a domain buying strategy. More and more our domain strategy is put to the test. Rankings, rage clicks, drops and more… all play a role in our evolving domain buying strategy. Keep ICANN handy, ICANN – stands for Internet Corporation for Assigned Names and Numbers; on second thought, get to know ICANN and NameCheap.

Try The Soup; Domain Name Soup

Try, the Domain Name Soup app, i.e the soup… I call it. Sometimes, the ‘soup’ is what you need to find a unique name, combination or similar sounding name. Do so with Domain Name Soup. It might help you move past the alpha numeric domain salad.

These days, with AI and old web tools like Domain Name Soup, you might find the trick you need to cover a client’s business name or a service provided in an area of expertise – all not a problem just a few years ago. Let’s start with domain brokers.  We’ve used them, and they are what they are ‘at a price’. Guess who wins in that transaction? Again, unless you’re trying to purchase an existing stable domain, coming out of pocket might be your best bet.

Try Alternative Top Level Domains

Tip: when trying to evaluate your next move, start by finding a registrar. Begin with a few words that you feel represent your brand or influence. Try different domain sub-categories, partial and combined alpha-numeric characters, country codes and more.

We tend to avoid .org’s, .co’s, and other similar options. This may be more of a personal preference, or perhaps a slight nod to nostalgia for early dot.com days. Above all, aim to find something you can truly own for at least a year. Jokes aside, all domains come with an annual expense, whether you like it or not. It’s not the 20s or early 2000s anymore; now it’s all about X (formerly Twitter) handles, IG accounts, TikTok, ChatGPT, and AI algorithms. Find a domain that resonates with you. Consider getting a D.B.A. if needed (consult a lawyer for advice), or simply choose a catchy domain that’s available.

Domains can be pricey and finding the right one isn’t easy, but just find something you can work with and give it a try! In addition to ICANN, which can assist with domain research, consider using domain brokers like NameCheap (a popular registrar) or any of the thousands of others in the market. They can help you find a domain at the best price, that makes the most sense for your needs. Be cautious, as some domain owners prefer to remain private and may not want to be contacted. Be patient and make best decision for your business of brand. 

Other Means of Support

While were fixing things today, let’s share a few other helpful tips. Such as cleaning up URLs, GoDaddy Bounceback services, email deliverability, knowing when to clear the cache, and how to Flush DNS on a Mac/Apple. Additionally,ipconfig /flushdns for Windows, and sudo systemd-resolve --flush-caches on Linux.

We’ll also cover how to maintain your digital footprint i.e. activity on the web and what to do when the interwebs are completely down; really down. Choose down detection. These tips are super handy when starting a new website from scratch because eventually, you will come across these issues in one way or another. It’s bound to happen.

Elden Ring Review

Let’s Catch Up, The Elden Ring Review

We Discuss @theRadBrad Conquer Elden Ring

Elden Ring Video Review

Lab Work – Review – Elden Ring content produced by @theRadBrad

FromSoftware is setting a standard and pace for the gaming market with the Elden Ring. In this we cover the video and more. Hidetaka Miyazaki has truly outdone himself and we applaud him for it. I recently discovered the SoulsBorne series on YT. For the definition, check out How-To Geek. Thanks to several YouTube creators, Elden Ring is considered the best game of all time. This game truly takes the cake, and may reason for purchasing it.

First, @theRadBrad takes us on an epic journey, through an open-world concept, where we fight and farm along the way. There are very few games that I would rank above this one. Brad makes a game look easy, emphasizing the importance of farming and leveling up during offline time.

Top 5 Games Various Consoles

Next, let’s briefly discuss the best game ever! Elden Ring. It definitely deserves a spot on the list for PS5 console, ranking in the top 2 at least. As a big fan of this game, I must say it is truly epic and out of this world. With over 30 years of experience in gaming, watching, playing, and reading, I can confidently say a lot for the Bandai team. My only hope is that the team continues to expand the  Elden Ring series like the Souls and Borne titles, which are revolutionary in there own or on there own.

Games At The Top, Topping Such a list as greatest game ever

Let’s continue on, treating this Elden Ring Review journey more as a comparative activity. Starting with console games, a few titles that stand out in my opinion are Tony Hawk on PS2, F-Zero, Golden Eye, Mario Kart, the Final Fantasy Series, Rad Racer, D&D, and Zelda. The list goes on, but I digress.

Let’s also consider some Arcade game titles such as TMNT, Simpsons, XMEN, NBA Jam, Golden Tee PGA TOUR, Street Fighter Tournament, D&D, Jurassic Park, and Galaga (I’m terrible at it, @DKOG73 does it right). Additionally, classic pinball games like Indiana Jones Pinball from 1993 by Williams, most SNES games and table tennis (Ping Pong) are worth mentioning. I have just started playing the game myself, and it’s on my list of things to do in my downtime, so stay tuned for additional commentary.

Let’s continue the Elden Ring Review, in my opinion, as a viewer, Elden Ring tops the charts. Elden Ring is definitely at the peak across the board. I’m not a hardcore gamer, but I follow games closely, both new and vintage. I wanted to share my thoughts on one of the top two games of all times. Elden Ring is top tier, especially in today’s market, 1. it excels in epic graphics, 2. fluidity of in game fighting 3. play and combat, narration and voice talent (check) and 4. game difficulty.

After playing for under 20 hours at home, I haven’t even come close to 1% completion. Shoutout to @theRadBrad who makes this SoulsBorne like EldenRing game look easy; it’s not. I’ve learned that the hard way, farming is key to success, similar to D&D where XP and complementary skills are crucial. It’s been a while, more than 6 months since I’ve played D&D.  Maybe it’s time to start up a solo, old school D&D game again.

Moving on, the dialogue and voice talent in Elden Ring are superb, with minimal player hiccups and NPC interaction. Frame-to-frame degradation is minimal, and game performance on the console appears flawless (except for some degradation around the ErdTree, but were not here to stare at the tree). Overall, from a viewer’s perspective, very few issues are noticeable.

Now that the DLC is out, check out the DLC video and DLC review. Thanks for all the support on this series, same for the Last Faith video and Last Faith Review out now. Just keep up all the likes, views and support. I’ll keep adding new games to the backlog.

Lastly, Honestly, this is something you need to check out for yourself. Here is where Brad does a great job with transitions and pace seemingly not allowing those ill-fated pitfalls to undermine the play-through. In conclusion, IMO (in my opinion), this is the most epic game ever, but take that with a grain of salt. We all come from various backgrounds, gaming styles, etc., so we can all appreciate the work Bandai and company put into this title. Compliments to the gamer here, Brad’s tempo and production cadence is a huge plus, providing easy-to-consume Elden Ring content. Finally, the game is truly a masterpiece, and Brad’s easy listening narration style, which complements the work load.

Like and Subscribe

Before we sign off, do you like what you see? Don’t forget to like or subscribe to the channel before you go and subscribe or join!

Explore Projects & Services

Projects & Services

Let’s Explore

Sallee Technology Web

Lab Work – Explore Services

Web Development, UX, SEO, Analytics and Hosting. Services and Clients – Supporting Long-Term Goals and Relationships

Trusted Partnership, Holistic Support

Let’s quickly discuss what you will find in this section. We will explore various projects, services, clients and customers that encompass a wide range of recent work and loyal customers. Highlighting customers with specific needs such as UX/UI work, consulting, full redesigns, back-end development or database work.

In short, a list of specific services and support provided includes: Website Design (Low-Fi & Hi-Fi) implementations, Development, CMS, eCommerce, UX, SEO/Ranking Influence, and Social Media Management.

Payment Systems include – PayPal and Stripe

Web Services and Hosting, options include Shared/Dedicated (On-Prem./Cloud)
cPanel, SSL-Certs, MySQL Databases, phpMyAdmin, Domain Management. New or Existing, Add-on Domains, Sub-Domains, Redirects, and DNS, Webmail, Redirects, and Back/Restore Services

Hosting providers include HostGator, BlueHost, SiteGround, DreamHost, Cari.net, GoDaddy, and more.

Long-Term Relationships

Although a full list of clients and services can be detailed here, those companies and brands can be presented upon request. We wanted to tease a few notable clients.

We focus on ongoing partnerships, exploring projects and services described above on a daily basis. Our goal is to build long-term relationships, brand loyalty and provide concierge-level service. Commercial, public and consulting contract customers will also be shared upon request.

We have worked with single-person entities, small businesses, Global Corporate Fortune 50 businesses and public services. Privacy is of great importance for our current and recent customers.

Special thanks to the following personal friends, business entities and organizations. Electrotek, Fortune Meadows + Cardinal Health + NBRAN Framework + Lynch Family Ventures + Virtual Hold Technologies + Harvard University Alumni + Sarasota Tsunami Swim Team + The Pedal Militia + Berkeley Alumni + Douglas & The Goodharts + Supreme Bar Review + The Xpat Desk + CILL + Cleveland Demons + Kennedy Lacrosse + Lefty Lacrosse + Greater Cleveland Lacrosse + RGWay Painting Contractor + Sallee Farms + Beachwoodlegal.com + ORC-DC + NEOUPA + AIGA

Other Services and Project Information

Looking for more information on Sallee Technology, interested in learning more about us and our services? Browse our servicing content, click to learn more: Our Trusted Services and Business Services.

Holiday ’23

Holiday Greetings, 4th Quarter

Happy Holiday

Happy Holidays'23 from Sallee Technology LLC

Marketing – Year End ’23

It’s that time of year, the 4th Quarter of the Year, Holiday ’23. This is the time of year we celebrate the year in its entirety; year end 2023. Share some holiday cheer with friends and family. It’s a special time of year to share, share with one another.

It’s a time to reflect and start a new. The 4th quarter marks the end of the year, with new creations, fixes, and cool tech coming in the new year. As we look back on the year, we take away some valuable lessons. We seek solid ground, new paths, and forward progression. Remembering our goals from last year, we continue to grow, improve our relationships with others, foster new connections, and carry on with our ongoing projects.

With new goals, and challenges in the New Year, I want to express my gratitude to my customers and those who support the business. How about some new merchandise? Don’t forget to treat yourself to some Sallee Technology merchandise!

Merchandise Update

We have added a few new items to the merchandise list for all you avid golfers out there. First, we have new golf umbrellas in navy with a large cover and white logo on the side. Second, we have a new trucker hat by Richardson Performance in navy.  It is a simple, smart navy cap with a modest logo in orange.

Third, we have Gildan SoftStyle T’shirts available in black and grey with a modest logo on the pocket side in orange. These new items complement the current offerings which include: Nike Hoodies, Gildan T’shirts, Zippo lighters, Yeti Travelers and Hats. There is something for everyone, provided the correct sizes are available at the time of purchase. We are now entering the third phase of marketing merch, so keep your eyes peeled for the next round of wearables in 2024.

Here’s to a great holiday season! Wishing you a happy, healthy Merry Christmas and a wonderful New Year. So, let’s celebrate the year end, the Holidays in ’23.

Looking to start the new year of right? Let’s begin on the right ‘foot’ this year! Give us a call we are currently working through our first and second quarter backlogs and are looking forward to the new year. Happy to help, reach out via email, phone. Connect with us through our online form.

Part 5

Part 5 – Rebuild And Upgrade

Sonic Pad Adjustments, Assembly

Part 5 Inputs/Outputs

Labwork – Upgrade Part 5

Finally, a moment to enjoy and success is here. Everyone has been eagerly anticipating a full print test of the Ender 3 Max Neo, Sonic Pad, and Creality TPU. The full print was successful without the need for a dreaded motherboard upgrade. 

No motherboard upgrade is needed at this time! We just need more time to print and tweak, print and tweak. Success! A fresh print, an end-to-end cube test print… just look at the ironing, ‘it’s alive, it’s alive’. It may seem like a small win, but it is a win nonetheless. The config/console appears to be correct, which is no surprise, I’m looking into a few more tweaks in the end.

Upgrade Continues

Let’s highlight a few things. An update was overdue, especially this one celebrating the print test win. Check. After a very early start this morning (the pictures are included below) we’ve got the Ender 3 Max Neo producing TPU test prints with minimal blips, blurbs, zits, stringing etc. All good things.

The key takeaway,  is that delta refers to extrusion setting, which controls the direct drive pressure on the filament. s… These settings can be found in the advanced settings under extrusion settings. A reminder for those using the Creality Sonic Pad interface: if you are using the onboard interface, you will need to look for something called  “steps” or a way to control the stepper. In layman’s terms, this refers to the ‘pressure in steps’ needed to  push filament through the extruder.

In Part 5, we highlights the success of the extrusion win, along with making other minor tweaks such as adjusting the heat at the tip, improving bed adhesion, and adjusting speed to match the Sprite Extrusion settings. We found that print temps between 220-240 C, depending on the filament type – Duramic or Creality TPU. Additionally, we increased the flow rate by an additional 25%, bringing it to 125%, and reduced the speed by 25% approximately 75%. Therefore, the settings are as follows: 220C – 240C Nozzle – 75C Bed – 75% Speed – 125% Flow Rate – Sprite Extrusion Settings Enabled.

Currently, some additional adjustments are being made to the movement settings in Part 5. The Z height appears to require some minor adjustments in specific areas, although the reason for this is unclear. It could be related to the differences between the initial layers and the subsequent layers. 3D printers enable users to control various settings throughout three stages of the printing process: the beginning, middle and end.

3D Printer Upgrade Inspiration
Evening Print

Evening Print

Halot Reflection

Halot Reflection

Sonic Pad

Sonic Pad

Adjustments

Adjustments

Spider Hot End

Spider Hot End

First Globule

First Globule

Test Cube

Test Cube

Failed Test Print

Failed Test Cube

One other thing to mention, which I failed to include in my previous post, Part 4 is that bed adhesion continues to be an issue. It could be the dark horse  among the issues at play.  A quick fix for bed adhesion is using alcohol and paper towels to keep the adhesion plate clear and clean! Make sure to throughly clean the plate by scrubbing away any oil residue, filament, blips, dust, stringing, dog hair (thanks, Zeus), and any other debris that might accumulate on the build plate in a typical office environment.

I don’t recall if keeping the plate clean actually made a difference when it comes to cleaning the bed, but we have tried a few different methods. We experimented with a clean bed, a taped bed (using Blue Painters Taps), and a sprayed/glue stick adhesive bed. All in an effort to find an alternative solution for prints shifting on the bed surface.  We will also be posting some build plate test and will be trying spray adhesives next. Could that be the answer?

More Adjustments

A few adjustments with the Hex (Allen) keys, resetting the rail wheels, and we’ve successfully completed Part 5. Looking back, I’m not sure if the build plate really needed to be cleaned between PLA prints. If you look closely a the picture, you’ll see that the Creality Sonic Pad is now operational as planned. Personally, I don’t think I would have kept the generic screen that originally came with the machine. The Wifi, Cloud Printing/Slicing, direct printing, and customizable settings are all key reasons to stick with the Sonic Pad.

One item to note, is that we have not been able to get the Wifi Box 2.0 to work in the upgraded sandbox. Furthermore, for the time being, we will set aside the Wifi Box 2.0 until we can determine the optimal print settings and ensure consistent adhesion. Despite this, we are staying positive and moving forward with larger format prints, including  some TinkerCad projects for a true test. Additionally, it is worth mentioning that we have relocated the printer from the workbench. The tabletop did not provide the necessary stability due to the incessant shaking, vibration, and back-and-forth motions of the printer assembly.

Overall, today is a win after having the printer on the bench for the past few weeks. Check out the previous series articles – Part 1 Teardown,  Part 2, Part 3 and Part 4. We are on an upswing, with new parts, new break-fix settings, slicing settings and a new location for the 3D printer to operate. For those interested in what’s coming next, I have a backlog of TPU Max Neo parts, including a new digital spool, some technology ‘smartphone covers’, and a unique locking mechanism for a cooler. More details on that later.

Rebuild Part 4

Rebuild Part 4LetPart 4 Continues

 Failed Prints, eSteps/Stepper, Filaments and More

Part 4 Internals

Lab Work – Rebuild Part 4

Fine tuning, break-fix, and reprints. Yes, break-fix steps continue, including fine tuning/recalibration, config adjustments, steppers, test prints and more. Largely, considered a failure so far…

Here in Rebuild Part 4, we cover the failures, not to worry! We will get this fixed with upgrades and all. A couple of cycles now, including – what I will call the ‘teardown-and-rebuild’ cycle – removal of most external upgrades such as the Creality Sonic Pad, Wifi Box 2.0, direct drive extruder, tubes and hot end…

The key is to isolate issues with the teardown and rebuild cycle, building up with neutral or known issues. Please note, the Sonic Pad interface, under the ‘advanced settings’, extrusion settings… the default extrusion type must be changed/modified to include the ‘sprite extruder’, this accounts for the upgrades and the most significant step forward.

Moving on from the Sonic Pad

Please note, there are four default settings – default, sprite, MK8 and manual or custom. Although we quickly tested each extrusion type, here, we focused in on the sprite extruder settings. It is also important to mention that we have not had a successful TPU print. The TPU prints have been bad to say the least, as you will see in the test photos, ranging from bad to worse in some cases.

In addition to misprints, under-printing has been a major issue. This is due to extrusion steps as mentioned above. Please check the Sonic Pad Settings – Advanced Settings – Custom Extrusion Settings – Spite Extrusion vs Onboard Interface ramping up eSteps ~ to around 500mm. Before we proceed, we have have experienced globules (large drops of melted TPU, similar in shape and size to the end of a q-tip) misprints, gummed up nozzles and so on.

Wifi Box and Motherboard

Beyond this point, I have considered a board swap, which will also be something to consider until the print issues can be ironed out. Yes, that would mean an effort in futility, involving a full swap which would be considered moot. For those who might not understand, this would leave only the base hardware/structure unchanged, changing out all components; which is not the goal. If a required motherboard change is confirmed – specifically Creality motherboard v 4.2.7 specifically, a new printer specifically used for TPU might be the answer. Not ideal, but necessary.

Below, you will find new images that have been posted, thought it would help to highlight the removal of the fans, changing out the heating element and sensor and Sonic Pad configs. Furthermore, I feel we are close to a successful print. Before I forget, the PLA prints run with little error, printing test cubes with minor blips or over printing… Beware, slicer/printer controllers do vary, Utlimaker Cura, Creality Slicers etc have varying results, some with no result at all as the print is shown outside the consoles ‘known print’ area. More on that later, we can share a few posts on slicer successes (failures in our case).

Rebuild Activities

Next, let’s cover some of the activities taking place during the rebuild:

  • Hot End
  • Assembly
  • Backplate
  • Sprite Extruder
  • Filament Tube
  • Filaments
  • Bed level, Adhesion Spray Glue and Blue Tape
  • Software – firmware and slicers (Creality Cloud, Creality Slicer, Ultimaker Cura)
  • Wifi Box, MicroSD Cards, Sonic Pad, Onboard Interface
  • OS – MacOS/Linux
  • Lot’s of cleaning, grab yourself a brass brush
  • E-stepper
  • Nozzles
  • Temperatures – hot end, bed
  • Homing Issues
  • Extrusion Settings
  • Homing Issues

Rebuild Part 4 continues with the addition of more nozzles, needles, upgraded plate screws, leveling, Capricorn tube, and the Spider 2.0/3.0 Pro hot end… motherboard? We will soon be facing a full swap! Ugh. While it may seem like a lot of work, it is all part of 3D printing. Don’t let that discourage you. The challenge, whether it’s a build problem or a technical issue, is what I enjoy the most. I thrive on finding solutions and working through those challenges, enven if it means testing and failing multiple times. I will share a video at some point, but for now, pictures and commentary will have to suffice.

New Sprite Extruder, Test Prints, and Sonic Pad Failure
First TPU

First TPU

Sonic Pad Failure

Sonic Pad Failure

Sprite Extruder Assembled

Sprite Extruder Assembled

Overview

Overview

Unplug Fans

Unplug Fans

Hot End, Sprite Extruder

Moving forward, I would like to address some items on the pending list. I believe there may be an issue with the heating element, thermistor, and nozzle. This could be causing problems such as incorrect temps and filament build-up on these components, leading to issues with filament adhesion to build surface. I have read that 424.9 degrees C temp, but we still need to determine the appropriate temp for our specific build. The hot-end and thermistor may be causing these issues, so we ned to investigate and eliminate them as potential factors. Additionally, we should keep some needles on hand to clear the filament path in the direct-drive assembly, as the accumulation of burnt filament can exacerbate the situation. This will be a priority for us to address this week.

New Sprite Extruder Assembly
Hot End Wiring

Hot End Wiring

Install Hot End

Install Hot End

Heat Sensor

Heat Sensor

Assembly

Assembly

Unboxing

Unboxing

Reassemble

Reassemble

New Hot End

New Hot End

We are skipping the motherboard for now in Rebuild Part 4 because they are not needed at this time. As mentioned before, the motherboard will be part of the full swap. Instead, we are focusing on the new sprite extruder and direct drive motor upgrades that were purchased at the beginning of this build. It’s worth nothing that there are extruders that do not require upgrades, specifically for the 4.2.7 motherboard. Fortunately, this upgrade will include the necessary 4.2.7 motherboard, which is not required for this build.

Following the items mentioned above, the next steps involve installing new screws, metal tension knobs, cushions, tubing and hot end. Ideally, the goal is to achieve a level and consistent bed/build plate temp, a clean adhesion plate, consistent hot end temp to reduce ‘leaking’ and hot end ‘heat creep”,  to use quality filament. By addressing these hardware issues, we hope to minimize or eliminate any problems. Assuming the hardware and upgrade components work, the final challenge will be the software adjustments.

Initial TPU Test Prints

TPU appears to be more challenging when testing and encountering failures, especially when failing more frequently than anticipated. However, I managed to successfully print a clean model by swapping filaments and using the old Bowden drive and PLA settings. This step back was necessary to ensure that the base product still prints as intended.

Honestly, the speed-to-market issue comes into play here (assuming you are looking to print commercially or in some professional fashion), as we are lacking the ability to print PLA at a low cost per print and TPU. Join us as we work to find a solution. The problem will be solved shortly, with more to come. 

Part of this process is maintaining a positive outlook, even when balls of filament build up on the hot end and nozzle for the 40th test. I know we are close, but as we eliminate or mitigate more pieces and parts, the solution will emerge. I might just need a few more mins to find the right combination of parts and software.

TPU Comments

Frankly speaking, this post, Rebuild Part 4 – TPU has been quite a ride. TPU isn’t too difficult to work with on newer machines, but we need to find a solution for the Ender platform that is budget-friendly for some or maybe not when compared to other very expensive printers that offer out-of-the-box solutions for various fulfillment needs. I will say this,  for those seeking an easy, out of the box 3D printer (crickets, crickets), time and budget will be major factors; it could if not the defining factor; make or break the decision. 

Finally, we will wrap up the series in part 5, let’s check out Part 5 – Rebuild – Rebuild, Sonic Pad Adjustments and assembly. Check out the new post content, see more, read previous articles in the series, Rebuild – Start, Rebuild – Progress, and Rebuild 3

Rebuild, Continues Part 3

Rebuild, Continues Part 3

Final Assembly, Boot, Config and Print

Ender - Middle

Lab Work – Rebuild Part 3

I encountered a bit of a snag, but I am rebuilding and continuing with part 3 – working through those challenges now. For the time being, please refer to the updates above/below for part 3 updates. We will be covering more of the  rebuild process, including the x/y axis bands, plate, direct drive issues, boot/reboot procedures, and reinstalling printer drivers. Additionally, we will discuss slicers, nozzles, extruder/heating element, and the latest issue, the onboard/external interface.

Breaking Through, Troubleshooting activities

As noted in the previous build, Part 2, we are likely around 80%-90% complete at this point. We will refer to this rebuild as Part 3. We have encounteered some filament burn and melt down, as well as blockers that we will address in Part 4. Nonetheless, Part 2 was successful, and now Part 3 is also going well, with all parts functioning as expected and the boards booting as they should. The new drive and extruder are working in tandem as intended. The ‘issue, as previously mentioned, lies between the Creality Sonic Pad, printer board and connecting software. Images will be included to illustrate the challenges faced during the rebuild, including manual updates made on the printer screen, main board, and the area where we are  currently stuck with the Sonic Pad. Two notable errors are the Klippy software and Sonic Pad physical connection failure, as well was filament recognition. 

Out next steps will involve installing/rebuilding  Klippy, testing, retesting print config files, reattaching the Sonic Pad, replacing extruder tubes, nozzles, adjusting e-Steps, home position and more, while also adding the Wifi Box 2.0. Once all of these tasks are completed and throughly vetted and tested, we will create a brief update of the build and active prints to mark these items of the rebuild list.

Got to love technology (or not), and office ‘helpers’ Zeus thought he would take a little snooze while the troubleshooting session continued throughout the day and night. The same can be said for discovery and testing, there’s no time like the present. Some folks call it the ‘grind’… I’ll leave that there for you to imagine. Is it painstakingly difficult? No. Time always plays a role, especially when speed-to-market is crucial. You have to be willing to work with what you have… Part 4 will be coming shortly, where we will cover fine tuning, steps, extrusion, adhesion and whatever else pops up in the meantime.

Drone Accessories
Print Video

Print Video

Tension Bands

Tension Bands

Secure Bands

Secure Bands

Waiting

Waiting

LCD SD Card

LCD SD Card

Clean Build Plate

Clean Build Plate

Install Firmware

Install Firmware

Power On

Power On

E Stepper

E Stepper

Connection Error

Connection Error

Firmware Selection

Firmware Selection

Extruder

Extruder

Hot End

Hot End