Weller soldering kits, solder 101, tools, accessories and more. More on the Weller Digital Soldering Station with 70W Precision Iron, 120V – WLSKD7012A

Weller 70w

Soldering Kit by Weller

Weller 70w Solder Kit

Weller Soldering Kit

Weller Tools

Needs must be had, time for a new Weller Soldering iron… with that in mind, the Weller 70w Solder Kit did just the trick. The Weller 70w Solider Kit.

Weller 70 Kit
Weller 70

Weller 70

Ready To Solder

Ready To Solder

Unboxing

Unboxing

Weller Features

Weller Features

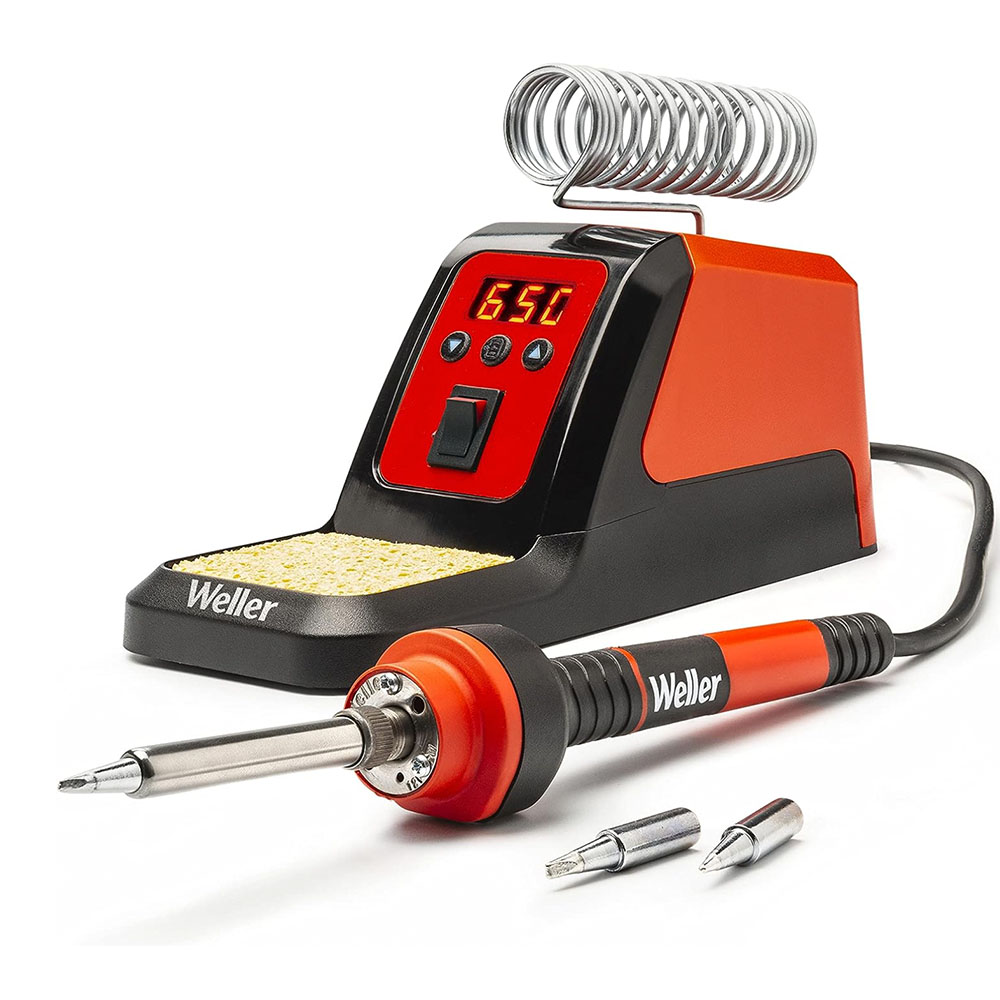
What’s in the kit? The kit includes the soldering iron, power unit, cord, tips, sponge and iron holder. It is a handy soldering kit to have in and around the office. Recently, there have been a need for more consistent power, temperatures, and overall better performance when comparing it to the original solidering iron/wood burning kit in the shop. Although the Weller 30w kit purchased many years ago has been helpful, its wood-burning capabilities have not been necessary.

For a hobby kit, that includes wood-burning and soldering tools, it is a useful tool to have around. Recently, there has been a need for ‘more power’ and ‘precise temperatures’ for a few items in the shop. For those following the 3D printer build, the Weller 70w was put to the test rewiring and replacing thermistor wires, fan wires and the hot end. I also tested the Weller 70w unit on an old hack, the 9V cell battery hack, and some car audio system wire for good measure. We will be soldering new wires into the guitar rebuild, including new wires, connectors, and more. Stay tuned for the guitar rebuild!

More On The Weller 70w

First impressions of the Weller 70W soldering iron are positive; it heats up quickly, is responsive, has a convenient housing, and comes with spare tips for small jobs. The responsiveness of the iron is impressive, and the tips are easy to clean. The digitized interface allows for precise soldering temps, and the housing coil protects the heating element. It is easy to use and gets the job done efficiently. 

When comparing the soldering kits I have used, Weller has consistently been my brand of choice. While i don’t use a soldering iron frequently, when I do I trust Weller to deliver. The original Weller 30W Wood Burning or Hobby Soldering Kit has met all my needs. I have used it for vaious tasks such as repairing vintage train parts, fixing drone boards and fans, and working on home audio speakers, and soldering car audio wires like battery wires, guitar wires, head unit power wires, and remote wires. The Weller 30w hobby kit was great, not ideal, but got the job done.

ReFit EMAX FC

Cut, Fit & Refit

EMAX THS & Flight Controller Board

EMAX Cut, Fit and Refit

Lab Work – EMAX Flight Controller

ReFit EMAX FC

I thought we could revisit the EMAX FC repair on the EMAX THS. I’ve want to follow up on the previous post, focusing more on the specific, showing the repair process and refitting the EMAX FC. Along the way, I’ll share additional photos of the process as well (in case you come across this article and are in a similar situation with a failing FC). Let’s cover the entire process from start to finish – disassembly process, cutting soldering, and test flight. Once again, soldering/replacing the EMAX AIO FC. Enjoy the photos.

Drone Repair Photos
New Parts

New Parts

THS

THs

EMAX FC

EMAX FC

Drone Frame

Drone Frame

Add Connections

Add Connections

Reattach Power

Reattach Power

Once you have all the parts, fitted, soldered and ready for flight, we will need to configure the FC. Rest, bind, configure and fly, in that order. Check out the EMAX FC and BetaFlight post for more information. You can also learn more about the repair, configuration process and in-flight troubleshooting. If you are having troubles, log into the EMAX Support Portal for assistance with your EMAX products. Lastly, I want to reiterate the steps to fix the FC – Support EMAX THS, remove EMAX FC screws from the Drone PC frame, Cut/Add Connection to Board, Re-Attach New Power Connector with the Battery Carrier”

As usual leave a comment below, let us know what you’re thinking?

EMAX FC and Betaflight

Update EMAX Flight Controller with BetaFlight

FIXED: EMAX & Configurators –

BETA FLIGHT

EMAX – Betaflight

Betaflight Config – Today, we (you and I) tackle some drone issues… make/model drone controller configs ((same drone, FRSKY controller profiles)), soldering/replacing EMAX AIO FC, and BETA config issues. Photos to follow.

In the meantime, sit back and relax, enjoy… enjoy the pain, the torment, cause I’ve been at this for days… Literally, days. Nothing but borrowed time; borrowed not wasted! Link above will get you your very own Betaflight configurator via Chrome extension.

FC And BetaFlight
Betaflight Receiver/Modes

Receiver/Modes

Betaflight

BetaFlight

Betaflight PID Mode

PID Mode

Betaflight Notes

BetaFlight Notes

Like most things, there are more ways to make your cake and eat it. The Chrome extension is helpful when bouncing back-and-forth between systems/releases/drones etc. I run Big Sur MacOS, Ubuntu Linux and a Win Server 7… it’s handy here, as the config remains the same, helps to maintain a certain sense of sanity. Especially when you’re a NOOB.

Two, from time to time, I run my Win7Server via MS Remote Desktop or Linux instance via Oracle’s Virtual Box. One advantage might be number of USB ports available… as you know, most MacBook Pros are limited to 3 of 4 USB-C ports. Unless you run usb ports, which I don’t care for (B.S. but that is for another day). Anyhow, regardless of how you run Betaflight, be aware of the nuances, versioning and pitfalls with each new iteration or release. T

ake notes, take screenshots, vlog about it… anything to help you remember the ‘deltas’ (change) over time. These will come in handy the next time you crash or repair your drones. Notes and support can be found here: Betaflight – Github Notes/Docs Moreover, issues came up when I swapped AIO boards, soldering power and reconfiguring modes. For more information, I posted more about the config, various configs like EmuFlight and BLHeli, look for 8/17/2020 post – Hack’r-A-Thon//

As usual leave a comment below, let us know what you’re thinking?

On The Bench: Tech Tools

Hemostats, Rosic Core Solder, Weller, Harris, Jakemy

Soldering Kit, Tech Tools, And More

Tech Tools On The Bench - Soldering Kits, Tech Tools and More

Lab Work – What’s On The Bench

On The Bench – Soldering Kits, Tech Tools, Open Source OS and More

At first glance, our pro-setup, includes a solder kit and all necessary tools. It does the job well – I  fixed the TinyHawk2 drone the other day. The nano was experiencing power issues with itsLEDs Having a soldering tool on hand is very useful. We use a Weller (soldering) tool for the job. Similarly, we have a Jakemy device care kit – which includes a tech screwdriver set, a essential for tech repair. I have used this set for repair. I have used this set for repairs, on Apple products, EMAX drones, tablets, and more. Eventually, we may upgrade the set but for now, Jakemy is the way to go based cost-effective choice.

RHEL/IBM

Secondly, the RedHat sticker is a memory I found, brought a found memory, brought to you by RedHat/IBM/RHEL (once an IBMer, always I guess). I have RHEL running in parallel with MACOS as I transition back into development and design. I am now working full-time on my own, thanks to those at IBM, ((a special shout out)) to Jim Whitehurst and the RedHat Cloud team working with them was a joy, open source Tech Titans.

I also have a few spools of Harris (solder) – Rosin Core .062″ made in the US. Harris solder is unbeatable. Next, I have a couple pairs of #Curved Hemostats, for repairs, which help keep pieces and parts in place.

The same goes for the coffee mug I’m using, filled with coffee from Heart Roasters. I also have a few other repair tools, including tweezers and a tool kit.

Oracle VBOX

Lastly, I have RHEL running on VBOX. The cropped image does not show the development setup, only the repair tools. I have my MacBook Pro running VBOX with RHEL (Red Hat) personal flavor and Ubuntu. I am relearning Linux Ubuntu, similar, but different from RHEL. As a dev type, I used a Lenovo Dev laptop running RHEL at work. Now, I am just running the operating system with the emulator as I switch it up and start building my own environment form home. Today, just running OS (version) with the emulator as I switch it up and start building my own environment for home.

As usual leave a comment below, let us know what you’re thinking?