A direct drive extruder drives filament through the extruder assembly and hotend/nozzle as a unit. Benefit, driving flexible filament for better extrusion.

TPU Direct Drive Support

TPU Is The Goal, TPU Direct Drive Support Build

New Assembly, Drive Drive Extruder, Support Back Plate and Rail Wheels

Lab Work – Building and Buying Parts On The Supply List

…A few more days folks, and we can start working on the TPU Direct Drive Support build. A new extruder support plate for the Ender 3 Neo Max is on its way. Not on back order, but waiting the last piece before the rebuild can begin.

Before we proceed with installing the new parts, we discovered an issue with the back support plate (including wheels and bolts) being misaligned. After the printer ‘meltdown’ a few months ago, you can see the results of that print here. The final piece needed for the rebuild is this support back plate. There is too much play and space between the assembly and guide rails. I don’t recall there being any movement between the parts. I would expect there to be little to no wiggle room in those items. However, I can almost light off the assembly housing, extruder, and back plate from the guide rails under tension. This  was a clear sign that it was time to replace the guide rails under tension. think there is no or very little ‘wiggle room’/tolerance in those items. However, I can almost lift off the assembly housing, extruder, and back plate from the guide rails under tension. This was a clear sign that it was time to replace the support plate, bolts, and wheels to ensure an improved upgrade and fix.

New Build

Anyhow, all the pieces and parts have been removed from the initial purchase. We will proceed with the TPU Direct Drive Support build. So, for picture sake, we’ve got the frame, base, and guide rails and that’s it. All parts have been removed for the moment. ~It’s been about 3 weeks now, awaiting the OEM support plate. Ultimately, we are looking at a clean rebuild using OEM parts with a few upgrades (direct drive, replacing the Bowden extruder) to allow for TPU, Wood/Bamboo, Carbon, Metal, Organics and more.

System upgrades might come later, with the goal being more power to compensate for the downforces on the extruder head in the direct drive case. Caution, there are differences between the Direct-drive and Bowden extruders, obviously advantages and disadvantages for both… maintenance and care being the most complex for the direct-drive variety.

More Filament Types

The goal with the direct-drive ‘pivot’ is to improve heat, extrusion pressure, retraction and expand the range of filament materials. For the sake of this article, I will focus on the updated advantages and disadvantages. The comparison is between more materials, heat, pressure, and variety versus maintenance which can be a lot. I personally use the break/fix method, as parts are less expensive to replace in the printer ecosystem. It may not always be the wised choice, but sometimes breaking something is necessary to understand the machine or engineering behind it. In conclusion, having spare parts on hand is helpful. Build yourself a parts bin and consider parting out used or gently used components to reduce out-of-pocket expenses. Learn how to maintain and reuse your gadgets. Remember to fail fast when working on such equipment. Short-term expenses for break-fix situations can save money in the long run when dealing with 3D printers, drones, computers, and more

Final thoughts: Parts can help you build yourself a parts bin. Need updates, board firmware, and Slicers? Download those items here for Creality Software Support.  Part out used and gently used parts to cut down on out-of-pocket expenses. Learn how to maintain and reuse your gadgets. Don’t forget to fail fast, when working on such equipment. Short-term break fix expenses go along way when dealing with 3D printers, drones, computers and more.

TPU Update

TPU Upgrades and Updates

New Assembly and Drive Drive Extruder

Creality Extruder, Full Assembly

Lab Work – Bolt On Upgrades

We are updating the extruder – TPU Update. Adding a bolt-on direct drive upgrade and replacing the Series 3 full assembly body.

The TPU update is a go. First, PLA is great. TPU is better for certain applications. However, we start with PLA. If you need flexibility over rigidity it is assumed that you want to test TPU filament. First, we will replace the existing assembly body on the MAX NEO and bolt on the new extruder to address the TPU issues*. TPU requires more force to drive the flexible filament through the assembly and out the nozzle. The direct drive will help with ‘refinement’ and focusing on pushing and pulling the filament more accurately and precisely.

Creality Accessories
Unboxing

Unboxing

Drive Motor

Drive Motor

Assembly

Assembly

Remove Extruder

Remove Extruder

Unscrew The Fans

Unscrew the Fans

Assembly

Assembly

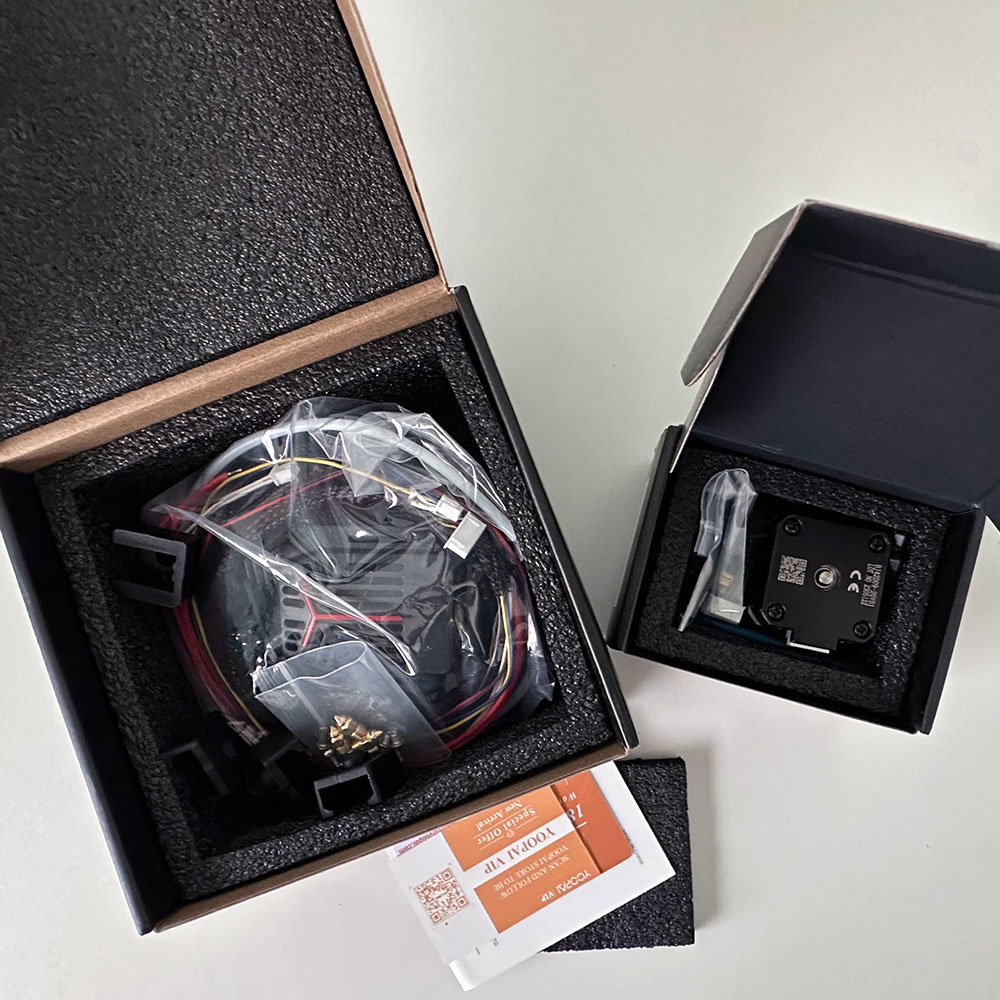
Again, in terms of next steps and the TPU Update, the update is not a *requirement,. However, after seeing enough test prints, it’s time to make the switch. Here is the bolt on solution from Creality for the Ender 3-Series, MAX NEO. Moreover, what do I mean by ‘requirement’ above? In my opinion, it would be extremely difficult to print TPU printables using a Bowden drive. I’ve tried, and it doesn’t work well. Finally, the Bowden drive doesn’t provide enough filament force and direct force to the filament through the hot end, hence the need for a direct drive motor. So, I want to emphasize that there’s no need to buy a new machine for TPU printing. Simply, do the swap and you can print both TPU and other high-temperature filaments as well.

Quick update: since this post was shared, we have received the parts for the TPU updates, allows us to begin the direct drive build. TPU filaments and prints can now be done without the necessary upgrades. Let’s get into the build and upgrade action! Side note, before we move off the direct drive action, I’d like to share other Halot updates including the Halot LCD fix and other break-fixes when adding a resin printer to your arsenal.

Stay tuned for additional photos and mini-clips covering the installation soon. In the meantime, here is a brief unboxing and assembly tear-down. Thanks!

Ender Filament and Adhesion Issues

Filament Challenges and More

Print Plate Surface Adhesion and Heating Issues

3D Printer Adhesion Issues with PLA and TPU

Lab Work – Ender Issues Defined

A few more weeks of Ender issues…

Ender Filament and Adhesion Issues, are causing a delay in the TPU Neo Max upgrade progress. I will be sharing more Ender ‘lite’ issues, as we continue the TPU trial and face filament challenges. The filament change was primarily for lab work on bait designs and future locking mechanisms where TPU will be more appropriate. Despite this tangent, core printing has not ceased, I am still facing challenges with PLA.

Ender Filament and Adhesion Issues

There are countless issues that seem infinite at the moment. Everything from  Creality Software to Ultimaker Cura, Sonic Pad issues, filament running temp, and new surface temperature problems… we have a lot of cover. I will break these down into 2 or 3 new posts over the next week. We will also revisit surface adhesion. Surface adhesion and surface temperature seem to be causing most of the issues on the Ender Max Neo. I must admit, tinkering doesn’t always result in perfect prints, even 60% to 80% of the time. I won’t argue, I’ll just focus on testing… the more runs, the better chance we have of increasing that 60% likelihood of successful prints.

Pictures will follow,  as they say, a picture is worth a thousand words. The pictures will be shared to specifically cover thickness, fragility and test prints. Let’s get to printing!

Ender 3 Max Neo Filament

Printer Base Stabilization, Adhesion and Print Heights

Ender 3 Max Neo Filament Solutions

Filament Everywhere

Lab Work – TPU Speed and Cycle Times

For this article on the Ender 3 Max Neo Filament, a typical print cycle might run between 2-5 hours, possibly more. While the standard range has been 2-5 hours, we are now looking at 12 – 16 hours. Recently, we have extended the top maximum run times to just under 12 hours for our test models. Surprisingly, both print tests resulted in the a mess.

For the record, a paper towel holder caused this issue twice. Upon initial observation, as the prints moved vertically (up the y-axis), the printing quality deteriorated. Somewhere between the 4″ and 5″ mark, both test prints went awry. 

I’m starting to think there is shaking issue with the table or even a stabilization issue where the printer. is located. Both issues might be addressed by printing the base slices, holder ends, screws, rods, and washers in a single print. These items should be printed separately to attach the towel roll and the rod. The rod that is slung between the holders can be printed in a secondary or tertiary step, This is mitigation issue number one, or we could address the stabilization directly. The printers are currently positioned where they stand, so there is not much I can do to move them around.

Once I received the new filament, we will print the rod. If it works, great. If not, then step two will be more tedious. The issue is mostly a space problem in the office. The filament should arrive later today, and I will post a quick summary once I finish printing the rod slice, assuming it is successful.

Ironically, a similar issue was occurring when I ran TPU through the machine. So we can conclude the Ender 3 Max Neo Filament post with this. Although I don’t think they are related, adhesion was the issue with TPU. Which we will address in a future post once we determine the correct nozzle temps, print speed, and adhesion setup. I have heard/read about using adhesion spray or glue stick. Another day, we will tackle those 3d printer issues/phantom printing phenomenon.