Robot, robots, like Drones, iRobot Roomba’s, Maytronics Dolphin Robots, and many more etc. Electronics that do work, with our without help.

Dolphin On

Maytronics Nautilus CC Plus Repair Update

Dolphin On
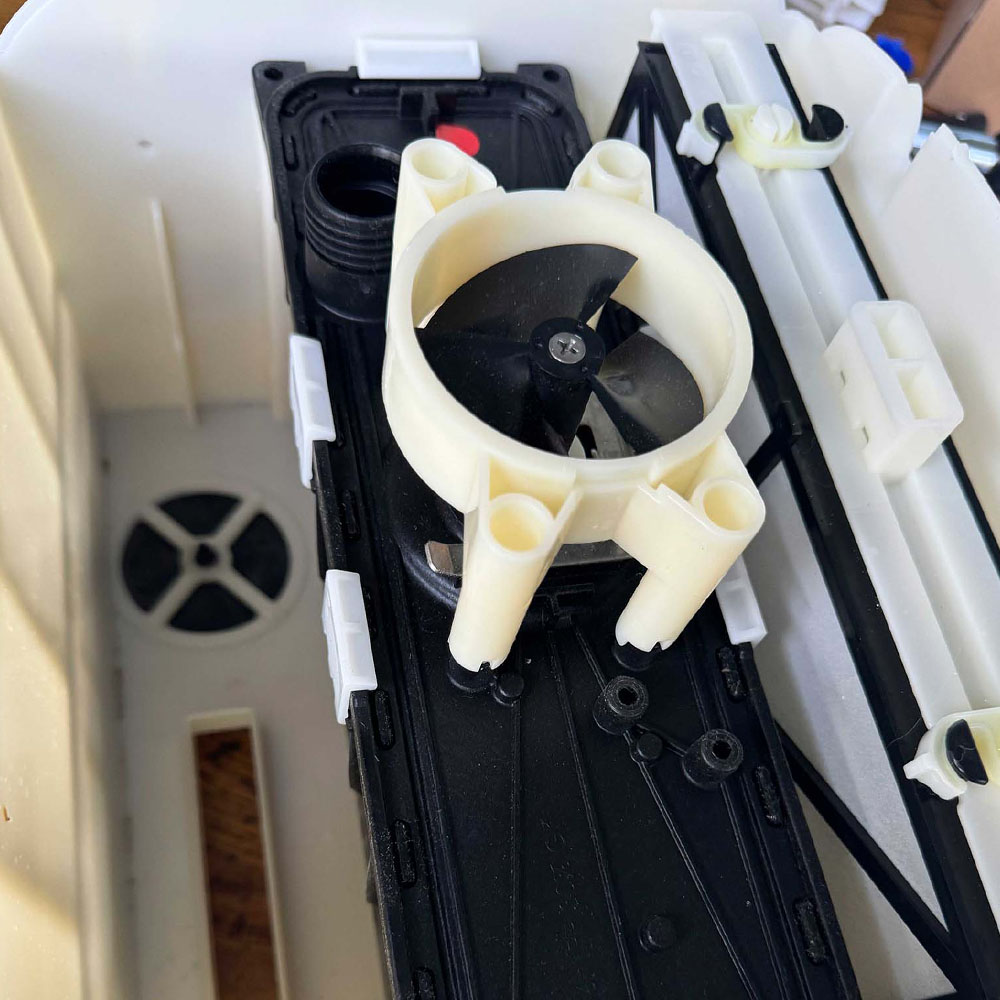
Dolphin Motor Unit Exchange

Lab Work – Maytronics Repair, Dolphin On, Post Hurricane

Parts are in, Dolphin Has Been Repaired, Cleaning Away

Let’s take a closer look at the process. Upon further inspection, I found corrosion around the motors. The seal around the power cord also appears to be in poor condition. So, I proceed with a teardown, replacing the power unit, and tread ball bearings to restore the robot back to full capacity with genuine OEM parts. A self-test  was performed as need, I conducted a number of in-water and out-of-water tests which worked perfectly. As it should, under normal power. Next, I replaced all parts and picked up where we left off on the last article “Nautilus Down” (check that out if you missed it).
Pre-Check, Install and Test

Check all cogs, ball bearings, drive pin, and wheel/hub parts. Make sure ball bearings are moving freely and free of rust or degradation. Replaced any parts showing degradation or major rust. Filled electronic parts and pressure seals with pool lube and reconnected parts, careful to screw-down fasteners and plastic nuts with appropriate tension. Dolphin On. Additionally, both out-of-water and in-the-water tests performed as expected. Time for a swim! Cinched down any screws, or screens, package up the robot and ran the clean cycle.

Robot Build
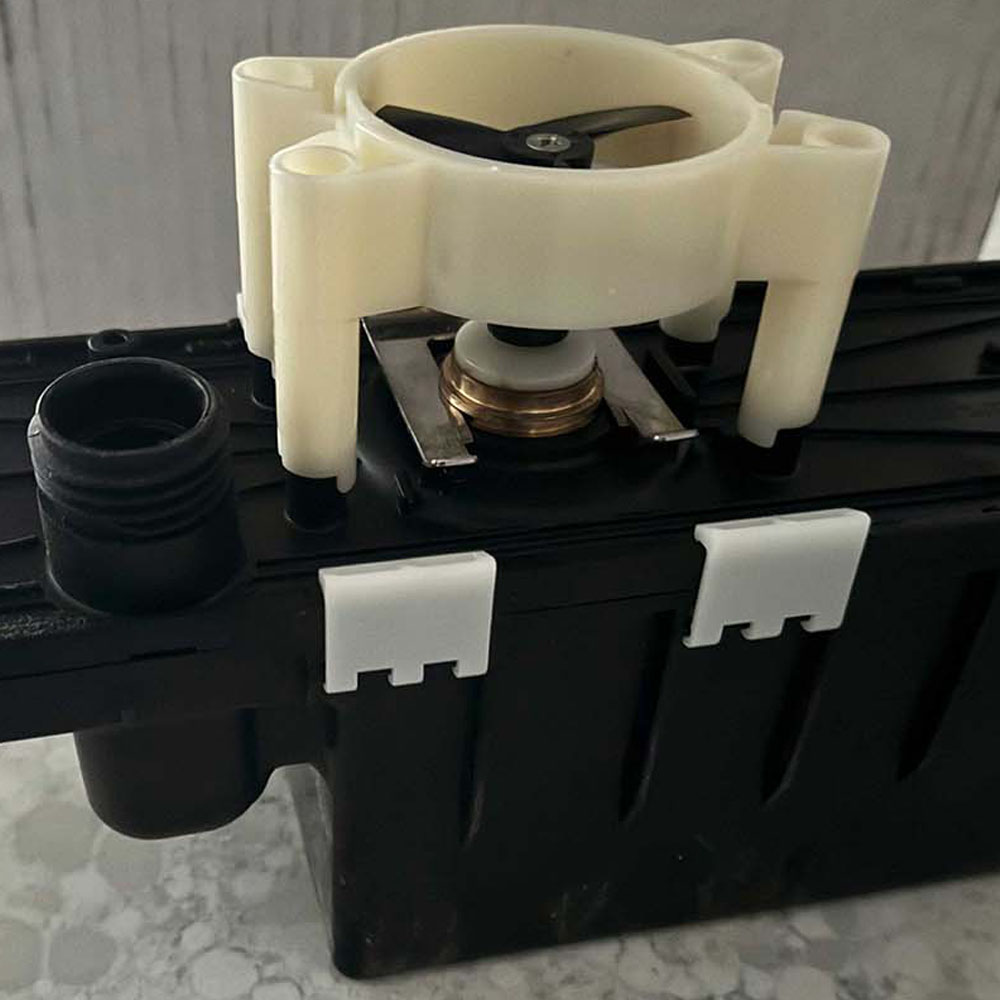
New UnitNew Unit
Unit Connector

Unit Connector

"Dry Fit
Tread Check

Tread Check

Proper FitProper Fit
Motor Check

Motor Check

Dolphin on Dry Test

Dry Test

Post Test

Post Test

Brush Down and Toggle The Dolphin On

If you can’t tell, the pool has sand, debris and dragonflies. Before we toggle the Dolphin On, let’s do a quick brush down of the pool to encourage removal.  You can kind of see here the pool was a bit dirty,  as the hurricane kicked up enough debris for the Dolphin to clean. There was no pool cage carnage, or aluminum part failure, which is great. Minor screen damage only.

Maytronics Documents and More

Finally, following the test cycles, Dolphin on, put in the water and cleaned the pool well. In most cases, the vacuum actively cleans on stage 1, please the Maytronics manuals. Find Stage 1 testing and more robot testing features under the Nautilus CC Plus section. I hope this information helps, how to get your pool robot fixed and Dolphin On. If anyone out there needs assistance, please contact me I am happy to help. Thanks! As usual leave a comment below to let us know what you’re thinking!

Dolphin Down

Maytronics Nautilus CC Plus Repair

Dolphin Down, Waiting On Parts

Nautlius Motor Troubles

Lab Work – Maytronics Repair, Dolphin Down. Let’s fix the Nautilus CC Plus

Looks like a new motor unit is required. Full teardown ahead.

Exciting news! A new series, Dolphin Down, is coming soon. This series is related to the repair of the Maytronics Dolphin Nautilus CC Plus. Currently, we are awaiting the arrival of a new motor unit. In the meantime, we are in the process of dismantling the Nautilus CC Plus robot in search of a malfunctioning drive motor.

The fan motor is functioning properly, passing both tests passed – underwater and out-of-water tests. The multimeter has confirmed that the drive motor is not working. The circuit board appears to be in good, working condition confirmed by the blinking green LEDs. The LEDs indicating that it is functioning as expected. This a positive sign for our robot and the repair diagnosis. 

Robot Teardown
Housing

Housing

Screen Key

Screen Key

Prop Screen

Prop Screen

Cord

Cord

Internals

Internals

Motor Unit

Motor Unit

Remove Prop

Remove Prop

Prop Residue

Prop Residue

Sealed Cord

Sealed Cord

To begin the teardown process, find a safe spot and grab a multi-tool with pliers, flathead and cross bits (Phillips bits). Start by removing the power cord from the unit and unplugging the unit from the wall if necessary. First, on the Dolphin, unscrew the four screws under the filter doors to remove the top. Use the transparent or white flathead key or knob to pop open the propeller gate, which is easily accessible once the filter doors are open.

Next, slide the cord out from under the blue, body cover after removing the four main screws. Adjust the cord, remove the floats and be careful when removing the side panels. These panels should just pop off top down.  Just be aware of the tabs on the bottom of the panels, this is what hold the body shells in place. Use the pliers to unscrew the blue cord connected to the power unit, as well as the four screws holding the two yellow cord strips to the unit. Unscrew the four unit screws holding the motor unit in place and it will be free.

Robot Teardown
Drive Bearings

Drive Bearings

Motor Unit

Motor Unit

Motor Case

Motor Case

Remove Unit

Remove Unit

Board Check

Board Check

Drive Motor

Drive Motor

Finally, check all cogs, drive belts, and wheel/hub parts. Ensure that the ball bearings are moving freely, unobstructed and are free of rust or degradation.  Replace any parts that showing degradation, wear or significant rust. Fill with lubricant and reconnect parts, being careful to screw with appropriate tension. Test the robot out of water first, followed by half-submerged and fully submerged underwater tests. *Updated – Check out the repair – Dolphin On for more information on troubleshooting, maintenance and repairs. More information will be provided in the next *5 business days, as we will be receiving the new motor unit packaging up the robot and running the cleaning cycle. Thank you.

As always, feel free to leave a comment below, let us know your thoughts!

Dolphin Nautilus

Nautilus CC Plus (Wired)

Pool Robots by Maytronics

Dolphin Nautilus Pool Robot

Dolphin Nautilus CC

The Dolphin Nautilus CC pool vacuum, made by Maytronics Dolphin, is designed to remove debris, brush, vacuum, and maintain pool clarity.

Everyday, the Dolphin Nautilus activates, moves around the pool, cleans, and maintains buoyancy upon completion. It comes with a price tag, so choose wisely! We received a recommendation from our pool guy, which was great advice – try the Dolphin Nautilus robot vacuum. The goal is to reduce water evaporation, maintain water and chemical balance, minimaize chemical corrections and keep the system clean.

Drone Accessories
Nautilus Back

Nautilus Back

Nautilus Cleaning

Nautilus Cleaning

Wall Climb

Wall Climb

Clean Filters

Clean Filters

Nautilus Cart

Nautilus Cart

Now, lawn equipment can spread dirt, grass clipping, environmental debris, pet fur, and screens with holes. Various types of debris can become spoilers when found in the pool. I assume that most, if not all, of this debris is kicked up by mowers and blowers as they are the main vehicles for debris getting into the pool. For us, sand from the brick pad seems to wreak havoc on our pools ‘clarity’. So, the sand, bugs and debris from lawn equipment…

More Maytronics Product Information

The Nautilus is a great product that is not terribly expensive when compared to other devices in the same space. We chose this specific product because it lacks excessive technology. We simply wanted a low-maintenance clean that could operate in the water, clean effectively, run various cleaning cycles and be easily stored  on a cart when not in use. The cart allows for easy storage or movement, especially for pool usage.  It can simply move the robot away when swimmings are in  or around the pool. This means swimmers can splash around, stir up the water and not worry about damaging the robot. The universal cart works wonders, although it may be pricey for some. It makes tasks like bending down, lifting, and storing the robot a breeze.

Cost, cleaning time. The machine is easy to clean. Power down the machine, pull up the robot, open two doors, pull out the filters, unlock the filters with four clicks, and start the wash. Cleaning and maintaining the screens is much easier when considering the cost and cleaning time of the entire pool compared to a quick rinse under the faucet to remove debris. Moving back to the robot, snap the filters into the housing, replace them on the machine, submerge the robot, and power it on…

No app for us, once again we opted for the Dolphin Nautilus robot in its manual version (corded, non-wifi enabled) to keep costs down. It suits us well since our pool remains uncovered year-round; the robot makes its way around the pool once or twice a day, providing low-maintenance, no-frills pool cleaning. Personally, I would prefer to cover the pool at night to  retain heat and reduce water evaporation. But for now, we’re happy with our choice. This recommendation came from our pool service, not a paid advertisement, so a big thank you to them!

iRobot Roomba 900 Series Teardown

iRobot Refurb Process

iRobot Roomba 900 Series Teardown

iRobot Roomba 900 Series

Lab Work – iRobot Back At It

Got a broken robot? We can help! Some might say that’s the worst, but fear not – the iRobot – 900 Series is here to save the day. 

Let’s start by fixing this thing with an iRobot Roomba 900 Series Teardown. The great thing about iRobot/Roomba products is that they are easy to fix! Unless the board is fried, the main housing is smashed, or the plastics are destroyed. Even in those cases, parts are fairly easy to find. The key is to source, clean, install, and maintain what you have. Most, if not all, of this particular Roomba was fine. A good cleaning at the end of the repair was worth its weight in gold.

Robot Teardown and Repair
iRobot Roomba 900 Series Teardown

Teardown

iRobot Roomba 900 Series Teardown

Battery

iRobot Roomba 900 Series Teardown

Cleaning Bars

iRobot Roomba 900 Series Teardown

Bin

iRobot Roomba 900 Series Teardown

Repaired

iRobot Roomba 900 Series Teardown

Test Run

For those of you who don’t regularly electronics, robots etc. weekly, monthly or ‘NEVER’… friendly reminder, whatever the electronic device may be, they do yeoman’s work if you take care of them after every one or two uses. Additionally, the more you maintain them, the less you will have to throw. Remember, no pain, no gain.

A few tools to mention below, reiterating the previous comment, these are fairly simple to fix… for now. Learn the art of robot care, become a ROOMBA master sensei. This is a huge advantage for iRobot:

  • iRobot Home App
  • Philips Screwdriver (Rechargeable Drill* DeWalt 20v)
  • iRobot – Brushes, collector rollers, caster wheel and filter
  • Cleaner – Windex
  • Cleaner – Sprayway
  • Compressed Air
Links, Conclusion and More Repairs

In closing, I’d like to share some other articles, more recent articles on robot repair, 3D printer upgrades and drone repairs, check out these articles.

Moreover, let’s look at a Bench Power Supply – Matrix Bench Supply, the need to power on electronics when the damaged robot or device is on the bench in pieces. Next, and one of my favorites, the Maytronics Dolphin On repair, explore water intrusion and effects of water intrusion, water damage and power unit swap. How about the Ender Direct Drive Upgrades – TPU Post Processing Update, a 5 part series on filament types, application of filaments, upgrades, troubleshooting and more.

Final link, check out the EMAX TinyHawk Repairs… more fixing, soldering, and flying. There are more articles in the TinyHawk series, approximately 6 or 7. Be sure to check those out, as well as the iRobot series continues. More recent work, but it helps tie in ‘process’ and troubleshooting unknown errors and testing. As usual, please leave a comment below and let us know what you’re thinking!

ROOMBA Master Sensei

The Art of Robot Care

POWER UP: ROOMBA Master Sensei

Roomba Fix

Lab Work – Roomba Series

Become a ROOMBA Master Sensei, solve many Roomba Issues – iRobot Roomba 900 Series

Ring that bell, promoted to iRobotRoomba900 Master Sensei… tune up complete. Assuming extra pieces, swap parts as you clean…

Maintenance complete. A strong a WIFI signal is helpful when rebooting the machine use the iRobot Home app where applicable. For a thorough clean, keep all the bits, bobs, lasers, sensors, and treads clean daily and monthly. It’s imperative that maintenance is performed early and often, starting with the debris bin. Keep debris off the sensors wheel hubs, wheels and sweeper arm. Pet hair, small, fibers, and sand can  cause issues and reduce the efficiency and effectiveness of the cleaning robot.

Jokingly, this is how you earn your ROOMBA Master Sensei service belt. Don’t forget to keep the charging pads clean and rust-free. Contact pad degradation means longer charge times and less efficient charges.

iRobot – Roomba 900 Series
Power On

Power On

iRobot App

iRobot App

Hi, do you like what you see? Engage with us! Leave a comment below and let us know what you’re thinking? Do you have an iRobot vacuum, cleaner or succeeding series bot? Have a different robot cleaner brand, style, make or model? Share your experience with us!