A part, or many parts, builds etc, this is a reference to parts of a build, or rebuild, parts 1 – 5 as an example for the M1 Refurb.

GTRacing Update

GTRacing Repair Update

GTRacing Chair Frame Blunder

GTRacing Update Frame Fixed

Gear – GTRacing

So, here is the GTRacing Update. GTRacing Chair Parts Replaced.

It may be premature, but, good on you GT Racing! Dare I say GTRacing made it right? The chair is back together, holding weight as it should. No lean, squeezing, bending-feeling or crash. That’s good, we have a fix. In hindsight, while being desk chair free for a week or more, is not ideal.

The second ‘chair part’, the one not broken will be relegated to the game and electronics drawer. It goes with the other unused cables, plugs, charges, wires, random batteries etc.

While we have your attention, we will be trying other GTRacing parts, chairs etc,. A full listing will come, however, a sneak peek may serve its weight in gold here… Check out the latest merchandise after the GTRacing Update, and give us a shout if you would like to purchase our gear – new products next quarter.

Side note, with the GTRacing gear, we are looking to sort out some USB devices, stickers and magnets, depending on demand. Let us know what you think about the merch, or if you’re looking for something special, a one off, special order on GTRacing – https://gtracing.com/.

SPOILER – Fast forward, gear adjustment, learn about our new GTRacing Mesh back chair with the lounging feature and footrest posted 6/2024… enjoy!

As usual leave a comment below, let us know what you’re thinking?

iRobot Roomba 900 Series Teardown

iRobot Refurb Process

iRobot Roomba 900 Series Teardown

iRobot Roomba 900 Series

Lab Work – iRobot Back At It

Got a broken robot? We can help! Some might say that’s the worst, but fear not – the iRobot – 900 Series is here to save the day. 

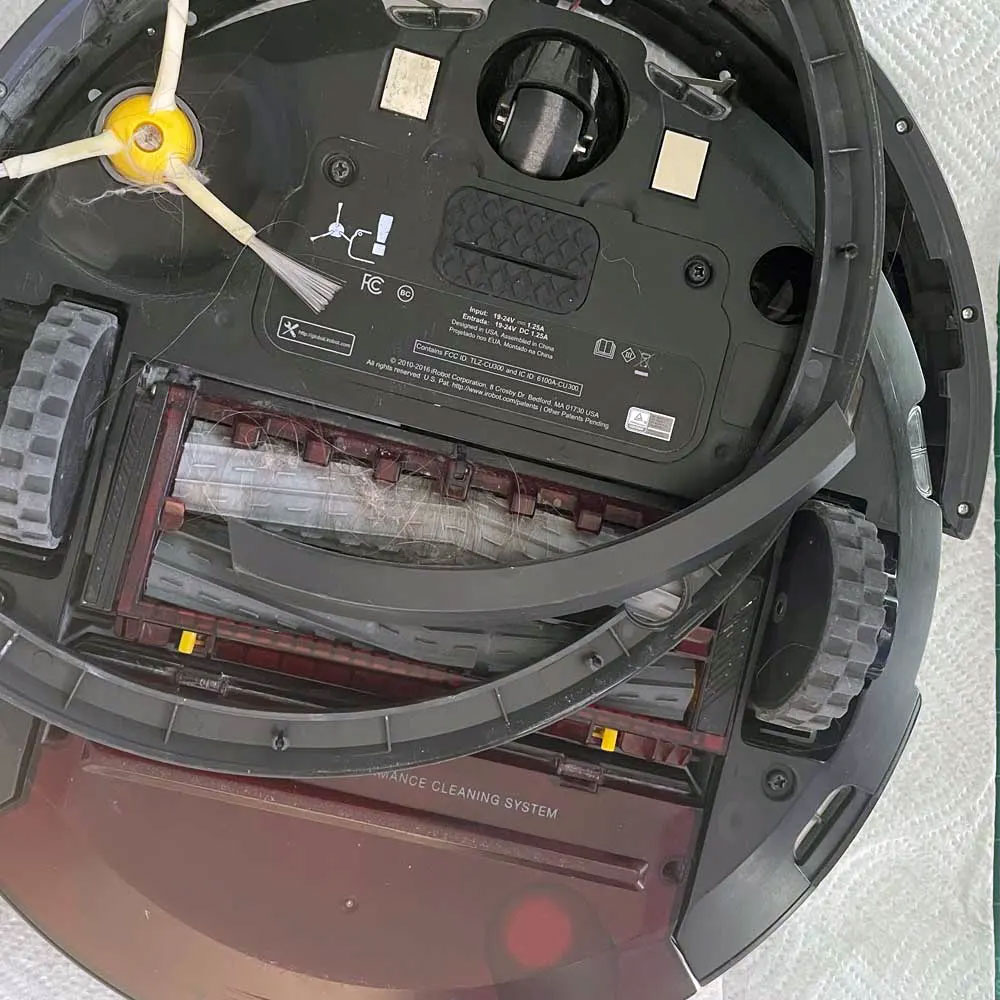
Let’s start by fixing this thing with an iRobot Roomba 900 Series Teardown. The great thing about iRobot/Roomba products is that they are easy to fix! Unless the board is fried, the main housing is smashed, or the plastics are destroyed. Even in those cases, parts are fairly easy to find. The key is to source, clean, install, and maintain what you have. Most, if not all, of this particular Roomba was fine. A good cleaning at the end of the repair was worth its weight in gold.

Robot Teardown and Repair
iRobot Roomba 900 Series Teardown

Teardown

iRobot Roomba 900 Series Teardown

Battery

iRobot Roomba 900 Series Teardown

Cleaning Bars

iRobot Roomba 900 Series Teardown

Bin

iRobot Roomba 900 Series Teardown

Repaired

iRobot Roomba 900 Series Teardown

Test Run

For those of you who don’t regularly electronics, robots etc. weekly, monthly or ‘NEVER’… friendly reminder, whatever the electronic device may be, they do yeoman’s work if you take care of them after every one or two uses. Additionally, the more you maintain them, the less you will have to throw. Remember, no pain, no gain.

A few tools to mention below, reiterating the previous comment, these are fairly simple to fix… for now. Learn the art of robot care, become a ROOMBA master sensei. This is a huge advantage for iRobot:

  • iRobot Home App
  • Philips Screwdriver (Rechargeable Drill* DeWalt 20v)
  • iRobot – Brushes, collector rollers, caster wheel and filter
  • Cleaner – Windex
  • Cleaner – Sprayway
  • Compressed Air
Links, Conclusion and More Repairs

In closing, I’d like to share some other articles, more recent articles on robot repair, 3D printer upgrades RC (radio controlled) and robot repairs, check out these articles.

Moreover, let’s look at a Bench Power Supply – Matrix Bench Supply, the need to power on electronics when the damaged robot or device is on the bench in pieces. Next, and one of my favorites, the Maytronics Dolphin On repair, explore water intrusion and effects of water intrusion, water damage and power unit swap. How about the Ender Direct Drive Upgrades – TPU Post Processing Update, a 5 part series on filament types, application of filaments, upgrades, troubleshooting and more.

Final link, check out the EMAX TinyHawk Repairs… more fixing, soldering, and flying. There are more articles in the TinyHawk series, approximately 6 or 7. Be sure to check those out, as well as the iRobot series continues. More recent work, but it helps tie in ‘process’ and troubleshooting unknown errors and testing. As usual, please leave a comment below and let us know what you’re thinking!

FAA Drone Safety Update

FAA Drone Safety Update, Flight Over People And Flight At Night

Flight Awareness, Times and Resources Now Available

FAA Safety Warning

Materials – Flight At Night

FAA Drone Safety Update – Notice Number: NOTC1758

FAA Drone Safety Update it’s time for some training for you Part 107 license holders. What about the waivers? The waiver deadline is April 21, 2021, so please make note of that date. Requirements for flight at night and/or over people, moving vehicles still require FAA waivers that date. Moving forward, waivers and requirements will need additional information, especially for flights over people and/or at night.

My assumption, after speaking with the FAA, is that the traditional licensing examination and process will change. It is likely that licensing for unmanned aircraft will be more similar to the boating license process in Florida. This may involve a classroom environment, quizzes, and tests on practical knowledge and safe flying. Let’ wait and see what updates and regs. are implemented. I am not comfortable speculating on the matter, how they will happen and when. You can be the judge!

Side note, FAA Drone Safety Updates are on going, so continue to use and test Airmaps  for the latest updates. As described on Airmaps some forum responses were lost in the purge due to a spammer attack. It will help you stay informed about regulations and rule updates.  

FAA Drone Update
B4UFly

B4UFly

DroneZone

DroneZone

Check out the FAA’s Low Altitude Authorization and Notification Capability (LAANC) B4UFLY App, FAA DroneZone or give the FAA a call or email for clarification. It’s pretty straight-forward. As always, feel free to leave a comment below and let us know what you’re thing! Fairly straight forward. As usual leave a comment below, let us know what you’re thinking?
EMAX FC and Betaflight

Update EMAX Flight Controller with BetaFlight

FIXED: EMAX & Configurators –

BETA FLIGHT

EMAX – Betaflight

Betaflight Config – Today, we (you and I) tackle some drone issues… make/model drone controller configs ((same drone, FRSKY controller profiles)), soldering/replacing EMAX AIO FC, and BETA config issues. Photos to follow.

In the meantime, sit back and relax, enjoy… enjoy the pain, the torment, cause I’ve been at this for days… Literally, days. Nothing but borrowed time; borrowed not wasted! Link above will get you your very own Betaflight configurator via Chrome extension.

FC And BetaFlight
Betaflight Receiver/Modes

Receiver/Modes

Betaflight

BetaFlight

Betaflight PID Mode

PID Mode

Betaflight Notes

BetaFlight Notes

Like most things, there are more ways to make your cake and eat it. The Chrome extension is helpful when bouncing back-and-forth between systems/releases/drones etc. I run Big Sur MacOS, Ubuntu Linux and a Win Server 7… it’s handy here, as the config remains the same, helps to maintain a certain sense of sanity. Especially when you’re a NOOB.

Two, from time to time, I run my Win7Server via MS Remote Desktop or Linux instance via Oracle’s Virtual Box. One advantage might be number of USB ports available… as you know, most MacBook Pros are limited to 3 of 4 USB-C ports. Unless you run usb ports, which I don’t care for (B.S. but that is for another day). Anyhow, regardless of how you run Betaflight, be aware of the nuances, versioning and pitfalls with each new iteration or release. T

ake notes, take screenshots, vlog about it… anything to help you remember the ‘deltas’ (change) over time. These will come in handy the next time you crash or repair your drones. Notes and support can be found here: Betaflight – Github Notes/Docs Moreover, issues came up when I swapped AIO boards, soldering power and reconfiguring modes. For more information, I posted more about the config, various configs like EmuFlight and BLHeli, look for 8/17/2020 post – Hack’r-A-Thon//

As usual leave a comment below, let us know what you’re thinking?

EMAX Fix – Part 1

EMAX Repair Start

Hack-A-Thon Part 1

eMax TH2

Lab Work – EMAX Fix – Part 1

On The Bench – TH2

Assess The Damage, Teardown

Back from the airfield, EMAX Fix – part 1. Be sure to check out the rebuild of in this series in the EMAX Quad Motor Rewire Video posted just before.

The airfield was clear, with no traffic, especially over in the helicopter and quadcopter area, so we were good to go. I unpacked the TH2 from its flight bag, got it out and up in the air with no problems.  After a final check of the batteries and controller, we were ready to go. The weather was clear, and according to the flight radar, it was a clear day with mild temperatures and wind gusts of around 2-5mph. So, up we go!

Teardown
Reattach Antennae

Reattach Antennae

Solder Antennae

Solder Antennae

Antennae Position

Antennae Position

Lift is good, strong, and perhaps the easiest part of controlling the drone in flight. These drones when properly tuned , offer a smooth and vanilla flight experience. Be sure to check out the binding process using BetaFlight to bind/connect the flight controller to the remote.

There are a lot of things happening at once when flying the EMAX drones. You have to be mindful of your location, both as you ascend and descend. The flight went well, as planned/expected. I did a few loops, full power, turns, and hard bankings just to set the pace. Don’t forget to check the battery warning before your flight.

Power Leads, LED’s
blank

Clip Leads

blank

Resolder Leads

blank

Clean Power Leads

blank

Set Leads Properly

blank

LED Seated

Now, at this point it was time to bring the TH2 home safely. As you can imagine, trouble came knocking. Damage report, minor issues included 2 LED strips out, severed antenna, severed power leads loose (+positive lead), and burned or malformed poly-frame. We fixed the issues by clipping and prepping for new wires, ordering new LED strips and poly frame, replacing the antenna, re-soldering leads, and shrink-wrapping wires where applicable.

Similar Emax status update, time has moved on since the original article and I wanted to share additional Emax content where applicable. If you’re looking for Emax content,  give these a shot (in reverse order from this postings date) – ReFit Emax Flight Controller, Emax Fix Part 1 (this article) and Part 2, Quadcopter Rewire, and the TinyHawk 2

Wrap Up Part 1

Find EMAX parts, and more, through our Amazon Affiliate links, or visit the  EMAX – US Store. For additional reference, check out the UAV Performance software used to update and run the EMAX TH and FRSky Taranis QX7s controller or more from the devs of Betaflight. Own it and have fun!

Airfield Bound

Venice Airfield Bound

Drone and RC Airfield

The PH4 At The Airfield

Lab Work – PH4V2 Gimbal

Airfield Bound – PH4V2 FIXED

Fixed Gimbal, freshly removed from the DJI packaging and repacked in the field case. Off to the club airfield in Venice… We are off to fly the drones! Re-posted.

Fresh Upgrade
Refreshed

Refreshed

It’s nice to see the drone back in working order, taking to the sky. Two, completed the requirements to fly professionally, completing and passing FAA 108 test for Part 108 Licensing. Must do, if you plan to fly professionally, beyond a hobbyist, or to take in an income based on flight. In the meantime, let’s get the drone up and push it through its paces…

Those of you who are interested in videography and flying drones, check out the drone shot article below. I don’t normally call out manufactures content or help videos, however, added a few drone shots, The Reveal, Panning, Orbit and Overhead Flight. DJI has nice article on drone shots, and how you might incorporate those shots into your flying arsenal. For more Airfield Bound articles or information on the gimbal issues, or other airfield flight tests, learn more.

As usual leave a comment below, let us know what you’re thinking?

eMax Quad Motor Rewire Video

Drone Rewire, Resolder Power On

Hack-a-thon, Patching eMax TH2

Lab Work – eMax Quad Motor Rewire Video

After the crash, the eMax TH2 needed a new Flight Controller (FC) or FC Board, motors and fan blades. A quick peek underneath, revealed that everything was good as new with the new FC, motors, copper leads, LED’s, and alarms all working as expected. 

Time has  moved on since this original video post, I wanted to share other Emax content where applicable. If you’re looking for Emax content,  give these a shot (in reverse order from this postings date) – Emax FC, Emax Fix Part 1 and Part 2, Quadcopter Rewire video (this post), and the TinyHawk 2 mini project. More to come, stay tuned. 

FRSky Taranis Q

FrSky Taranis Q Transmitters

Taranis QX7S

FRSky Taranis Q On The Bench

Tech | Tools – FrSky Taranis QX7S

FrSKY TARANIS QX7S

First, I picked up the FrSky Taranis Q series transmitter after spending some time at the @GetFPV shop in Sarasota, Fl. I always appreciate the help from the good people there and the endless options for drone hobbyist and enthusiasts. After a few clicks, a few questions, and some tinkering around. I added the @FrSkyRC Taranis Q X7S + Hall Sensor Gimbals to my drone arsenal. 

Secondly, after dropping the remote (bummer). I added a new switch pretty easily by buying a switch removal/replacement kit. I also purchased a few extra Ni-MH remote batteries for this particular model. The remote comes with a battery and Ni-MH charger and the QX7S specifically has a charging port on board. This allows access to the battery through the remote or transmitter housing without having to remove the battery. 

By avoiding accidents and not needing to remove the battery pack to charge it, I can keep the battery protected at all times. This is really handy and reduces the risk of accidents occurring between charges.  It was a bummer to have to fix the switch, but it was good to get under the ‘hood’ and take care of it. If you need to tighten or loosen the gimbal pressure clips, you might want to do that while the cover is off. 

Taranis
Cover On

Remote Transmitter

Blown Top

Repair Toggle

Finally, our goal is to achieve price, serviceability, and scalability for 1-to-many, fixed wing and hybrid drones, including the – FV-31 Cypher micro quads from EMAX. There may also be other options such as Diatone Cinewhoop, tiny whoops or quadcopters that you can bind to this remote. With the success of our goal, the FRSky Taranis Q has been repaired, and now it’s time to fly. Although it’s been months since we posted anything related to the Taranis Q RC transmitters… Let’s check out the latest Drone Updates – Taranis Q Camo, Drone accessories and more Also, if you’re interested in more Emax lab work this two part Emax Series – Part 1 and Part 2 is a great place to start. In order would be best to explore this content, or if you want to jump to the conclusion click on Part 2 for the fix. Enjoy.

As usual leave a comment below, let us know what you’re thinking?

Flight Test

PH4 On The Bench

Full Flight Test, Gimbal Fixed, New Lens Filters

DJI Phantom4 Gimbal Issues

Lab Work – Gimbal Issues

DJI Gimbal FIXED

Quiet morning, a great day for a flight test. We are here at the airfield to see if the recently fixed gimbal passes the test. Pop opened the box, placed a battery, retrieved the transmitter and headed to the launch pad. The goal is push this Phantom 4Pro, test the gimbal mechanics at flight speed and put the drone through its paces. We take the DJI Phantom 4 out for test run following its time ‘in the DJI shop’ for repair. See our previous post specifically on the gimbal issues. Unfortunately we were not able to capture video of the gimbal issues.

Drone Shots At The Airfield
Flight Test - Lens Installed

Lens Installed

Flight Test - Take Off

Take Off

45 Degree Angle

45 Degree Angle

Flight Test Air Strip

Air Strip

Flight Test Pad, Overhead

Flight Pad

Let’s move on. Here are a few photos that will have to do in lieu of the video. The same goes for a quick snap of the new lens filters. You can find information on PolarPro and specs on those here. Anyhow, if you have similar issues, its best to reach out to DJI if the device is still under warranty. If not, give me a shout.

As usual leave a comment below, let us know what you’re thinking?

DJI Fix

Gimbal Issues 

Gimbal Motor Replaced, DJI Fix in for now

Gimbal Issues Resolved

Lab Work – DJI Fix

Back To The Field FIXED. After 25+ days 

I received some good news today, and even better news is that I got my DJI Phantom 4 ProV2 back from the repair shop. After waiting for roughly 30 days, it’s finally time to fly! The shipping and return process was a hassle, but I leave that for another post. Today, I finally received the PH4 in the mail, so it’s time to fly. I now have the package in my possession and am working on unboxing the drone as the excitement builds. Let’s see if the drone gimbal is ready for flight.

Gimbal Issue Resolution

Does the drone fix meet your expectations? This is the follow up article on the DJI Gimbal Issues. Sounds like the gimbal assembly was replaced, not sure about the camera or if the assembly is self contained, one unit; meaning the camera, gimbal and housing are all considered one replaceable unit. How long would it take to get the drone fixed? ~30 days. ReviewDJI P4ProV2 specs, make sure its your drone and in working condition.

At the airfield we pushed the drone hard, making sure the motors were good to go, a number of gimbal checks, gimbal, motors and lens filter changes. We can wrap up with a positive day at the airfield, nothing of significance to report. Just photos and videos to clean up, and clean out.

Update to come, will include video of the airfield, highlight different maneuvers and views. Or just check the above post…

Now that we have your attention, let’s delve into the DJI Phantom 4, gimbal issues, flight testing at the airfield, video and photography capabilities, and more. The same for our other drones, learn-to-fly drones, racing drones as well as maintenance and tips and hacks to ensure these drones stay airborne.