Sallee Technology Merchandise

Sallee Technology Gear and More

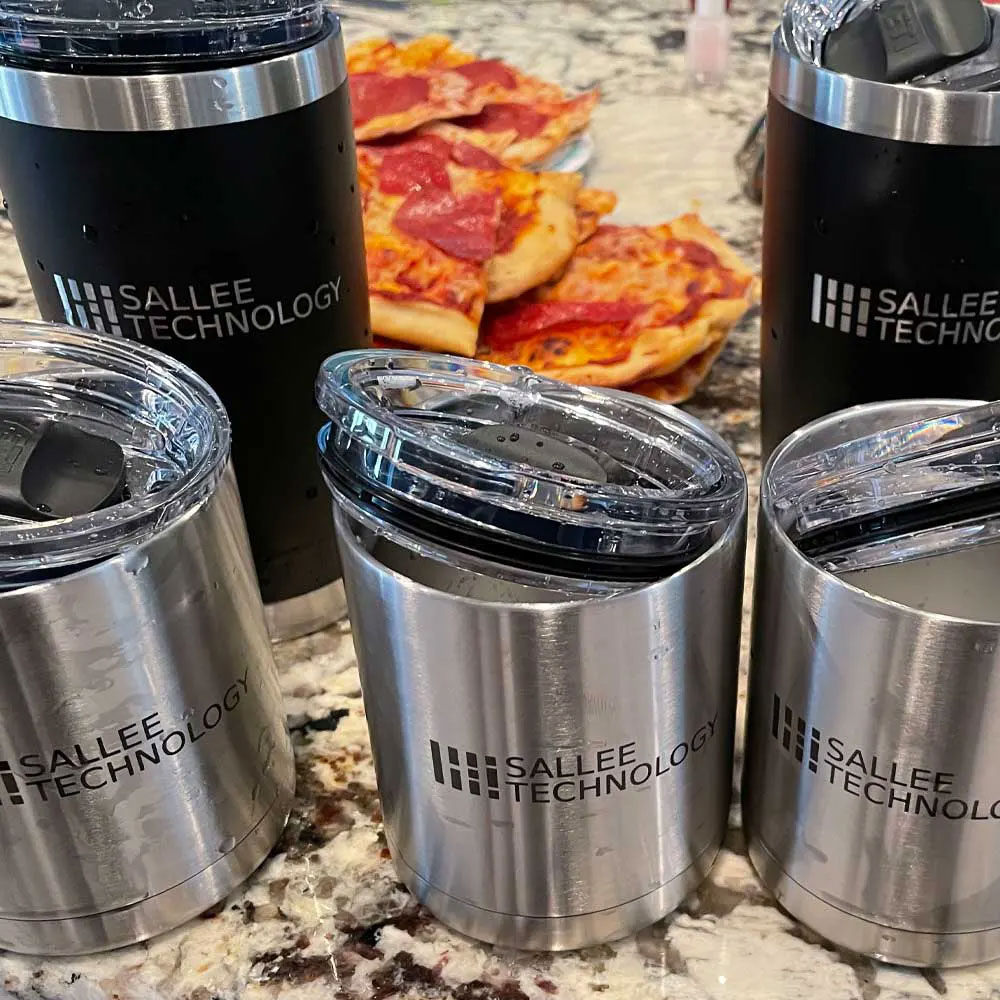
Yeti™ Mugs, Columbia™ Fleeces, FlexFit™ & Champion™ Hats
Get Sallee Technology Merch Today

Gear – Sallee Technology Merchandise

View or Purchase Sallee Technology Merchandise

More on the way, I still have a few items left in the merchandise bin. What are your thoughts on hats? Should I do a new run of mugs, maybe some Yeti® mugs? Want one? If you’re interested, let me know via email. Right now, the 20oz Tumblers are $42.

Sallee Technology Merchandise
Yeti Mugs

Yeti Mugs

Yeti Tumbler

Yeti Tumbler

Champion Hats

Champion Sports Hats

Champion Hats

Champion Golf Hats

Trucker

Trucker

Fleece jackets fresh off the embroidery press, are now available. We have Columbia™ – Dark Blue jackets with Sallee Technology for $80 each (only two left). All other swag is currently being ordered and will be up on the site soon. We do have a few jackets on hand, so feel free to reach out if you’re interested.

Please note that the Velcro 110 FlexFit™ Hats are currently out of stock, but we are working on replacing them with the Champion™ hats soon. As for the tumblers and other items, they are still in stock. We have a variety of merchandise available, so check out the listing below:

Merch & Gear Listing
  • Yeti™ 20oz Tumbler – $42 Black/Steel (raw) Logo
  • Columbia™ Fleece, Full Zip – $80 Dark Blue Logo: S, M, L, Xl, XXl
  • Champion™ Jersey Material – $25 Black/Orange Logo: One Size, Velcro Back
  • Champion™ Sport Material – $25 Black/Orange Logo: One Size, Velcro Back
  • Flexfit (Yupoong™) Mesh Trucker – $20 Faded Salmon Logo – Black: One Size, Fitted
  • 110 Flexfit (Yupoong™) – $20 Faded Salmon Square Logo w/o text – Black: One Size, Velcro Back out of stock

As usual leave a comment below, let us know what you’re thinking?

borg2borg v7

Twitter Bootstrap v7

Borg2Borg Unit

Borg 2 Borg A Bootstrap Framework

Lab Work – Web Work

Bootstrap’n Journey number 412 version 7

I’ve been wanting to share this for awhile now, especially since version 5 has been out for some time. Borg2Borg v7 is now available and ready to use. It has been posted on the web. out and ready.

The sites mentioned above are intended for reference. Please treat those links as such; reference materials. The goal is to provide working templates for anyone to use and help others learn various coding languages, such as PHP.

Please Excuse Our Work, Iterative Work in Progress

PLEASE NOTE – we are in the process of moving code code from Github to a hosting space. Please excuse the dust as some sites may require rework during the transition to the new space… However, we are transitioning away from Github. Therefore, website references like Borg2Borg v7 or reference materials will also be published on each specified domain. Additionally, we have started the conversion process, and all public/private/secret Ghists will be used as code references. Our goal is to assist people in learning code, such as Python, PHP, jQuery, JS, etc., for public consumption in the near term. We aim to meet and exceed our goals by providing code reference materials, coding examples, educating, and sharing language challenges and techniques with the masses. You will see coding examples presented in the following format or treated with Bootstrap HTML Treatment.


<h1> - PHP Print Example<h1>
<h3> - Calculate and Print<h3>

<?php print(1 + 2) * 3; }?>
Here is a quick PHP print statement, utilizing the Bootstrap code treatment for the purposes of an example, the console will calculate and print the calculation to the browser.

Again, for probably 2 months now or so, we’ve converted all Github/Ghists to a companion file within the site folder. Next step will include a conversion to a database. At least that is the goal, assuming time is available.

Same for Django, this might be ‘jumping the shark’ as I want to get a working version of Django up on the ole’ web-server and see what we can do from there. I guess the overarching goal is to offer language/code reference material and Bootstrap examples. Local examples, jQuery – Astrononymous, BurmPy and 1Fyr.

So, lots of work out there, ton of things to do, clearly… not enough time in the world to work on side projects. We will get there one day at a time. Enjoy!

1fyr Bootstrap

Versioning Update, 1Fyr.com

1fyr Bootstrap v3

1FYR, 1 Fire, once a month

Lab Work – 1Fyr

**UPDATED** 1FYR.com – 1Fyr TWBSv3 Update

It’s time, time to update the version for 1Fyr, 1Fyr Bootstrap v3. Like many things in this world, it was time for a  tune up, we are moving 1fyr.com to Bootstrap v3. So, what does that mean?

Tune up includes, code clean up, the removal of any deprecated elements, code and/or elements no longer being supported moving forward. WP jargon went out with the ‘bath water’ as did some of the bloat.  V3 added a framework of sorts, adding Bootstrap framework to this site. With the code change, we’ve made some website improvements: show/hide div’s on the latest fire, archived videos presented in a more favorable fashion and the Jumbotron…

While the yard is being worked on per say, (2 months now) the fire concept has been put on ice to say the least. Again, which aloud me to refocus on the site, code tweaks and more. We kept it simple using TWBS v3. Once we get the backyard up and running again, we will post videos…

While we wait, or in the meantime. For the sake of historical reference and ultimately, how we got here. More information can be found here, about campfires and family time  on 1fyr.com. Or, you can stay here, and read about the 1Fyr build and/or 1Fyr updates.

As usual leave a comment below, let us know what you’re thinking?

Calc Rework

Let’s Get A Fix In Place For This Calculator

Calc Rework,  Fix, Rework and Repair

Calculator Work, Fixing the old calculator

Lab Work – Fix the Calc, Calc Rework

Broken Calculator, Let’s fix it. Don’t want to keep this little piggy waiting!

Calc rework started a few months ago. We’ll keep this post short and brief… This calculator showed up on the work bench with minor issues. Connections all busted, it looks like an animal, a vacuum, nature or something was able to get to the calculator and internals.

Anyway, after fixing a few connections and installing a new CR battery, this little piggy is like new again! Easy work, no major issues with the main board, keys, case or display. Quick fix.

Calculator Fix
Battery/Resolder

Resolder

Look Here

Look Here

Lastly, I decided to keep little ‘piglet’ sticker on the old calculator because it gives it a new look. It’s a great office calculator with big keys and a large display, making it easier to use than those tiny digital smartphone keys. I reminds me of the  old Printing Calculators, kind of like this Sharp Printing Calc. It brings back memories of my parents having used one around the house when I was a child. If you enjoy reading repair articles, consider learning more about robots, remotes, drones, and computers. Wiring guides like this ADT Touch Screen quick reference, keep this handy for future needs, power outages or battery replacement. Or, you might be interested in the Nano Whisk Fix, the M1 MBP Repair, or the latest Dolphin Pool Robot Fix. Feel free to leave a comment below and let us know your thoughts!

iRobot Roomba 900 Series Teardown

iRobot Refurb Process

iRobot Roomba 900 Series Teardown

iRobot Roomba 900 Series

Lab Work – iRobot Back At It

Got a broken robot? We can help! Some might say that’s the worst, but fear not – the iRobot – 900 Series is here to save the day. 

Let’s start by fixing this thing with an iRobot Roomba 900 Series Teardown. The great thing about iRobot/Roomba products is that they are easy to fix! Unless the board is fried, the main housing is smashed, or the plastics are destroyed. Even in those cases, parts are fairly easy to find. The key is to source, clean, install, and maintain what you have. Most, if not all, of this particular Roomba was fine. A good cleaning at the end of the repair was worth its weight in gold.

Robot Teardown and Repair
iRobot Roomba 900 Series Teardown

Teardown

iRobot Roomba 900 Series Teardown

Battery

iRobot Roomba 900 Series Teardown

Cleaning Bars

iRobot Roomba 900 Series Teardown

Bin

iRobot Roomba 900 Series Teardown

Repaired

iRobot Roomba 900 Series Teardown

Test Run

For those of you who don’t regularly electronics, robots etc. weekly, monthly or ‘NEVER’… friendly reminder, whatever the electronic device may be, they do yeoman’s work if you take care of them after every one or two uses. Additionally, the more you maintain them, the less you will have to throw. Remember, no pain, no gain.

A few tools to mention below, reiterating the previous comment, these are fairly simple to fix… for now. Learn the art of robot care, become a ROOMBA master sensei. This is a huge advantage for iRobot:

  • iRobot Home App
  • Philips Screwdriver (Rechargeable Drill* DeWalt 20v)
  • iRobot – Brushes, collector rollers, caster wheel and filter
  • Cleaner – Windex
  • Cleaner – Sprayway
  • Compressed Air
Links, Conclusion and More Repairs

In closing, I’d like to share some other articles, more recent articles on robot repair, 3D printer upgrades RC (radio controlled) and robot repairs, check out these articles.

Moreover, let’s look at a Bench Power Supply – Matrix Bench Supply, the need to power on electronics when the damaged robot or device is on the bench in pieces. Next, and one of my favorites, the Maytronics Dolphin On repair, explore water intrusion and effects of water intrusion, water damage and power unit swap. How about the Ender Direct Drive Upgrades – TPU Post Processing Update, a 5 part series on filament types, application of filaments, upgrades, troubleshooting and more.

Final link, check out the EMAX TinyHawk Repairs… more fixing, soldering, and flying. There are more articles in the TinyHawk series, approximately 6 or 7. Be sure to check those out, as well as the iRobot series continues. More recent work, but it helps tie in ‘process’ and troubleshooting unknown errors and testing. As usual, please leave a comment below and let us know what you’re thinking!

iPad Mini4 – Screen Swap

iPad Mini4, Let’s Replace the Screen and Digitizer

Digitizer Screen Swap

iPad Digitizer Swap

Lab Work – Digitizer Replaced

iPad 4 Mini – Digitizer Swap

Take a peek under the hood and check out the iPad Mini4 – Screen Swap timeline. From start to finish, it only takes a quick 20-30 minutes to complete. Just remember to remove the power flex connector before the screen/digitizer flex connections. We have included a followup picture in the timeline that demonstrates the recommended tools and method for removing those flex connections. Additionally, when dealing with the button assembly housing and home button, be sure to handle them with precision and care. Taking care of the button and its connections will make a significant difference in the long run.

  • Packing Tape
  • Heating Element – Water Based, or Heat Gun
  • Pryor triangles
  • Suction Cup/Pry Clamps
  • Tech Screwdriver set
  • Curved Tweezers
  • Pressurized Air
  • Anti-static Wipes
iPad Screen Repair
iPad Mini4 - Screen Swap

Tap Screen

iPad Mini4 - Screen Swap

Heating Glue

iPad Mini4 - Screen Swap

Start Removal

iPad Mini4 - Screen Swap

Shim Screen

iPad Mini4 - Screen Swap

Unscrew Shield

iPad Mini4 - Screen Swap

Gain Access

iPad Mini4 - Screen Swap

Digitizer Connector

iPad Mini4 - Screen Swap

Digitizer Cracked

Let us know your thoughts on the moderate difficulty of The iPad Mini4 – Screen Swap if you are knowledgeable in this area. More Apple tear downs and repairs, like this Late ’18 MBP Battery Swap  or M1 Chip Touchbar swap. There are more, like this Mini 4 digitizer repair, which takes approximately 20 minutes from start to finish. If you encounter any problems,  Apple Self Services options are available, as well as Apple Parts – https://selfservicerepair.com/en-US/home – case you encounter any difficulties or obstacles. Feel free to reach out to us, as we are more than happy to assist you!

As usual leave a comment below, let us know what you’re thinking?

D90 Firmware 1.1

D90 Maintenance and Firmware Updates

Update – Firmware v2.0

D90 - Nikon

Materials – D90

D90 Archived Update

First, it’s time for an update. It has been a few years since I last updated the software on my Nikon D90, so the time has come to do do. Since the camera itself has been archived by Nikon, we will treat this article as a reference materials as well. While the D90 is a cool piece of gear, we also want to assist those who are looking to preserve their cameras. Therefore, the focus of this article has shifted a bit. It is now centered on firmware, where to find the downloadable content, and how to continue maintaining the D90.  Let’s make sure we update the D90 firmware from version 1.1 to version 2.0.

The D90 has been archived by Nikon, and you can find more details on the  Nikon D90 Website. Check out the archival pages for more information. I am sharing a few photos of the D90 a.k.a “Dub9” DSLR. Can I call it a “Workhorse” still? It may not have been at the top of the market in its day, but with a little love, care and a few minutes, you can bring your D90 up-to-date with the D90 Firmware version 1.1 update. When updating, make sure to use the correct SD cards to protect your memory cards and camera equipment.

D90 Update
Update Camera

Update Camera”

Covers On

Covers On

Updated

Updated

Don’t forget to leave a comment! Also, be aware of a few “gotchas” during the process. Backup all photos and video before starting. It’s best to back up before beginning. Remove any add-ons and modifications where applicable, especially any aftermarket parts and accessories that are attached. We want to have a common baseline before the firmware update. Reinstall aftermarket parts and accessories after the update process is complete. Test out anything you think might need a few extra minutes. Otherwise, after the firmware update, you should be good to go!

As usual leave a comment below, let us know what you’re thinking?

Late MBP Battery Swap

Check out the Late MBP Battery Swap and Repair

MBP 15″ Swap

MBP'13

Lab Work – Late MBP Battery Swap

The teardown and do the Late MBP Battery Swap Repair

Let’s get it! Before we begin, below are photos of the repair process. We are working on a 2013 MacBook Pro “15 Retina laptop with a new battery. Please ensure that you have selected the correct replacement parts, preferably OEM battery parts.

Find The Right OEM Parts, Find Primary and Secondary Parts

First, it is recommended to use OEM Parts, and even a second-hand OEM battery may be a better choice than non-OEM part in this case. OEM parts can be purchased from various websites such as eBay, Apple Parts, Apple Self Service Website, and iFixIt. When performing the repair, it is important to be cautious and take your time. Power and grounding are crucial, so be careful not to energize parts once the case has been unscrewed and removed. Additionally, it is helpful to have a few other items on hand for the repair.

Tools and Repair Kit for the Late MBP Battery Swap

Some other tools to have around the shop might include the Jakemy screwdriver kit, which  contains Torx, hex and star bits. These are key for newer technology bolts and screws used in the assembly process or to hold hardware to the board. Additionally, it’s important to have glue tech adhesives and glue release, gloves, safety glasses, and a welding/soldering mat. These are all useful bare minimum tools to have, including glue release, a tech screwdriver set, and glue adhesive. 

MBP Swap
Late MBP Battery Swap - Macbook Pro Battery Replacement Unscrew, Pull-back battery cover, Pop-off Battery Connection

MBP Unscrew

Macbook Pro Battery Replacement - Un-glue Battery process

Battery

Late MBP Battery Swap - Macbook Pro Battery Replacement - Un-glue Battery process 2

Remove Glue

Macbook Pro Battery Replacement - Un-glue Battery process clean up

Glue Remover

Late MBP Battery Swap - Macbook Pro Battery Replacement

Remove Battery

Macbook Pro Battery Replacement

Swap, Replace Battery

Late MBP Battery Swap - Macbook Pro

Ubuntu

Apple Certification, Apple MacBook and Robot Repairs

At this point, I’ll assume you are interested in repairs and may want to learn more? Equally as important are the OEM parts as the knowledge to do the repair yourself, intelligibly. Are you searching for parts for your own device? For more detailed information on the Late MBP Battery Swap and the power on and boot process. Check out IOS certification Apple Certs. Lastly, have a look at this particular MacBook Pro “15 Retina tear-down via IFixit MacBook Pro “15 Retina Late ’13 Tear Down.

In conclusion, more tear-downs and repairs, check out the iPad Mini Fix, Roomba 900 Series Fix or some of our latest MBP Screen & Keys and MBP Touch bar fix. Enjoy! As usual leave a comment below, let us know what you’re thinking?

1FYR Update

Updates, Website Moves and Outdoor Fun

1Fyr.com And More

1Fyr

Lab Work – 1FYR Update And Other Work

Update: The move to Bootstrap V3… in coming soon. Stay tuned for that.  But for now, back to the test case, SOLVER. Let’s get you up to speed…

(<< REWIND) We were exploring ways to play around with our cameras, light/exposure, and enhance our film during dusk. Dusk, after twilight, is being the most challenging time. You might not know,  but some of the best light is during twilight . The sunset light here on the coast offers dramatic colors, landscapes, shapes, and textures to capture in images or videos. Texture refers to the subtle and stark contrasts of color. (>> FF) Our experiments continue as we have some fun along the way. Campfire, music, food… what more could you want?

As you will see, fires can be unpredictable, especially at dusk. We enjoy the process of building, stoking, enjoying and extinguishing a fire every month or so. We cook up some burgers, grilled sandwiches, hotdogs, and s’mores if we’re lucky. And there you have it – INTERNET CONTENT!

1Fyr Updates
Fire At Sunset

Fire At Sunset

Islane Fire

Islane Fire

S'mores Time

S’Mores Time

I’d like to see us get to a point where we can post more videos, more often, weather permitting. Anyhow, the goal of this test was to capture and correct lighting affects. We use Adobe Premiere (Not A Sponsor) and share with you via the interwebs. We’ll post some Premiere content in next quarter or so. That might make some good content as the video/editing process is hit or miss as a noob. You know the sunlight, sun angle, twilight and how/what device captured the subject; meaning what device or camera was used to capture said subject. 1FYR Update, we chose fire, of course. A caveat, (loophole) we don’t see snow here in the South… Snow can be fun to film. All too often I forget/fail to mention the rainy season as well. Pre/post rain storms can create dramatics, drama that’s what we need! Before I move onto the subject of this post (yes, side tangent…) Don’t forget to check out 1fyr.com.

The next test case will include steel, torches and welders, yet to be purchased… Still trying to iron out what that might look like on ‘film’. But we have a few contenders to start, need to fix the campfire tool set. Specifically the shovel has all but worn through its welds and sits in two. The campfire brush is worn out to say the least, adding that to the refresh pile. The campfire grilling surface (an old repurposed baking rack) might need a little attention as well. There are more, but hopefully we’ve captured your attention.

Lastly, we will probably review some gear, welders, torches, protective clothing etc etc. Leaving you with a cliff hanger of sorts. More to come…

As usual leave a comment below, let us know what you’re thinking?

FAA Drone Safety Update

FAA Drone Safety Update, Flight Over People And Flight At Night

Flight Awareness, Times and Resources Now Available

FAA Safety Warning

Materials – Flight At Night

FAA Drone Safety Update – Notice Number: NOTC1758

FAA Drone Safety Update it’s time for some training for you Part 107 license holders. What about the waivers? The waiver deadline is April 21, 2021, so please make note of that date. Requirements for flight at night and/or over people, moving vehicles still require FAA waivers that date. Moving forward, waivers and requirements will need additional information, especially for flights over people and/or at night.

My assumption, after speaking with the FAA, is that the traditional licensing examination and process will change. It is likely that licensing for unmanned aircraft will be more similar to the boating license process in Florida. This may involve a classroom environment, quizzes, and tests on practical knowledge and safe flying. Let’ wait and see what updates and regs. are implemented. I am not comfortable speculating on the matter, how they will happen and when. You can be the judge!

Side note, FAA Drone Safety Updates are on going, so continue to use and test Airmaps  for the latest updates. As described on Airmaps some forum responses were lost in the purge due to a spammer attack. It will help you stay informed about regulations and rule updates.  

FAA Drone Update
B4UFly

B4UFly

DroneZone

DroneZone

Check out the FAA’s Low Altitude Authorization and Notification Capability (LAANC) B4UFLY App, FAA DroneZone or give the FAA a call or email for clarification. It’s pretty straight-forward. As always, feel free to leave a comment below and let us know what you’re thing! Fairly straight forward. As usual leave a comment below, let us know what you’re thinking?