
Nintendo’s Baseball
Lab Work – Baseball
It’s been awhile since I posted some of NES updates, I’ll be posting some of my favorites from the mid 80’s, through the 90’s. Same with a focus on todays online games, such as Alan Wake 2, Raft, and Spiderman 2 etc. So more online games, hisotry, favorites and commentary.
Starting with Baseball, great game… easy to play, from start-to-finish. Shout out to @worldoflongplays… Hopping into the game, once a team is selected, it’s ‘game on’. Bat, Pitch and Field, fairly straight forward. It’s funny to hear the ‘out’ sound bit, same for some of the other sounds you might hear throughout the game. Anyway, the ‘out’ sound, sounds very much like the opening sceen for ‘Mike Tyson’s Punch Out’; a little easter egg for those paying attention. Not much you can do with 8 bit.
You’ll find that it’s hard to find a game these days that didn’t make my favorites list. Maybe Gyromite? Or Megaman 2, cause I could’nt beat “Heat Man”, California Games, specifically the hacky sack game, Double Drago 2 or even Contra for that matter. Especially, before the 40 lives cheat – (up, up, down, down, b, a, select, and start for two players) or Game Genie in that same breath… now, the Game Genie, that is a topic we need to touch on.
Let me drive home the point, Baseball is up near the top of that favorites list, same with Contra and Mario World. Anyhow, an easy to bat, field, pitch, hit homeruns and more game. Again, probably not as difficult as the games made today… great game for late ~1983.
Baseball, Another Nintendo classic.
Rebuild, Continues 3
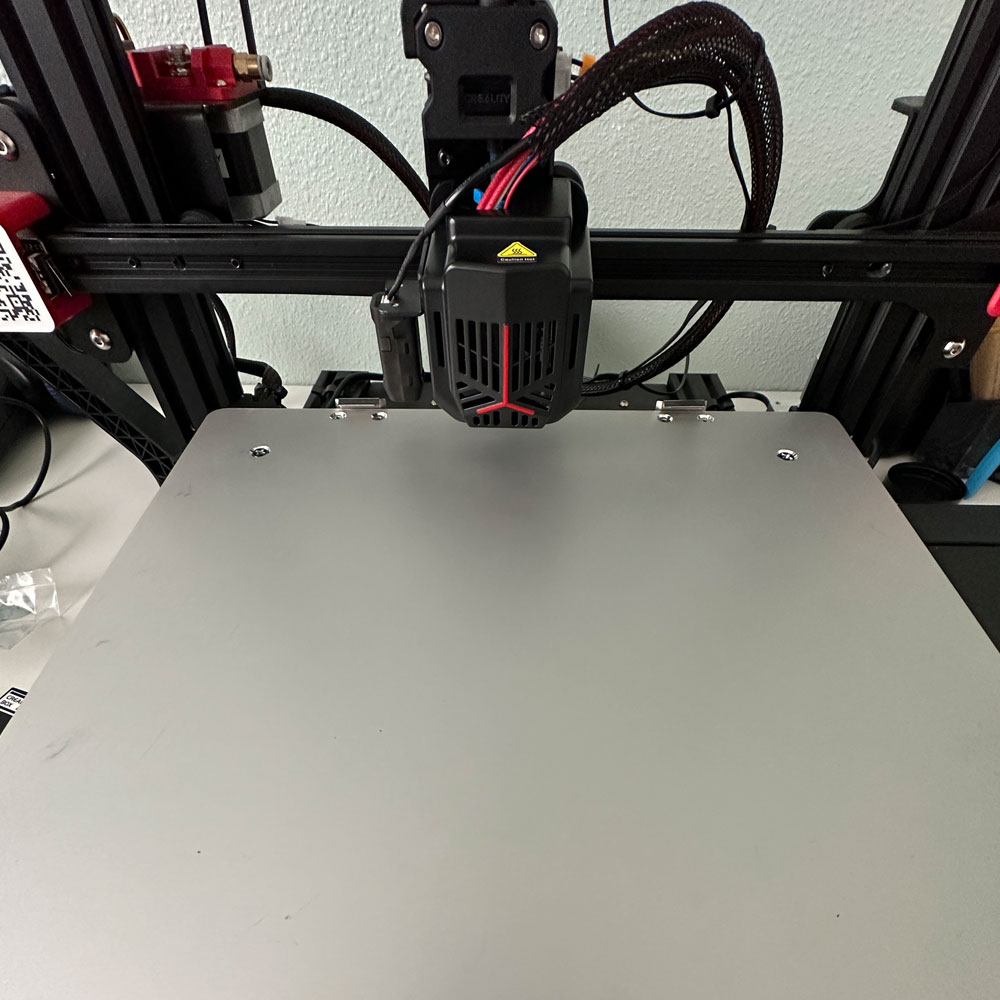
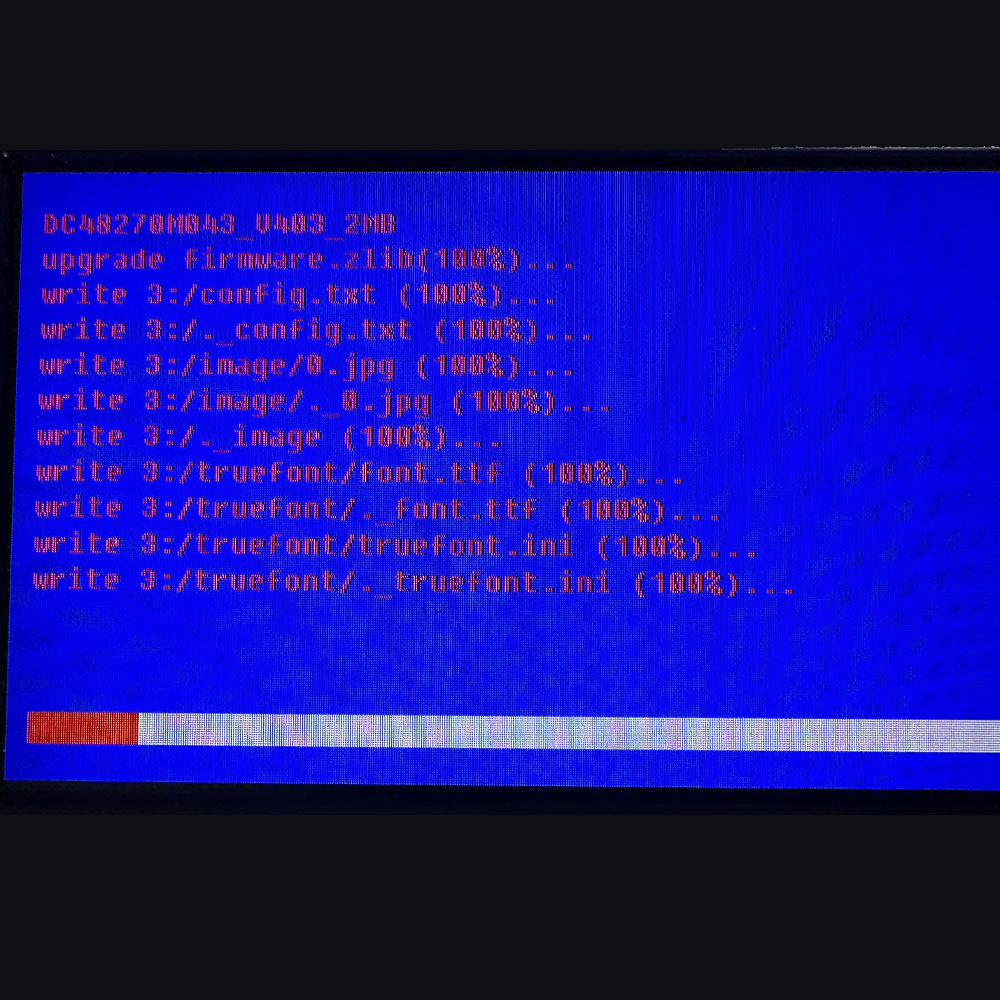
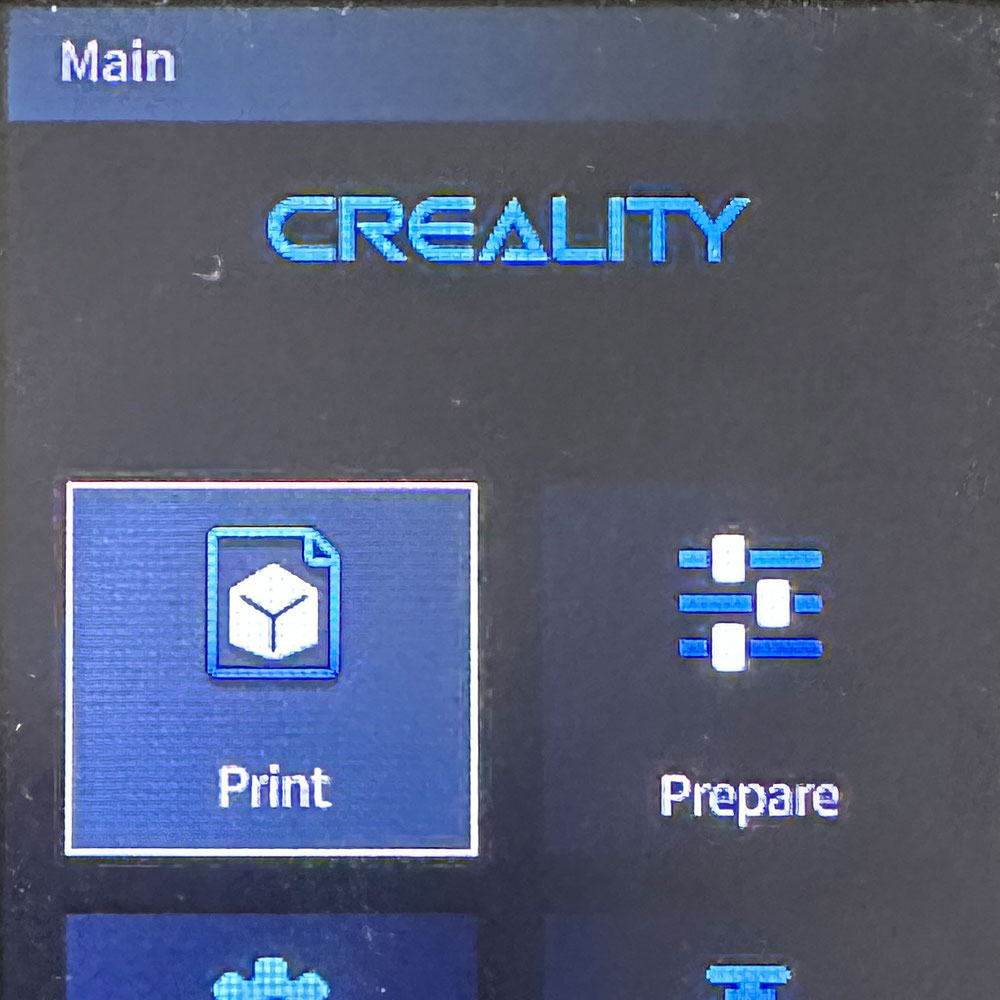
Final Assembly, Boot, Config and Print
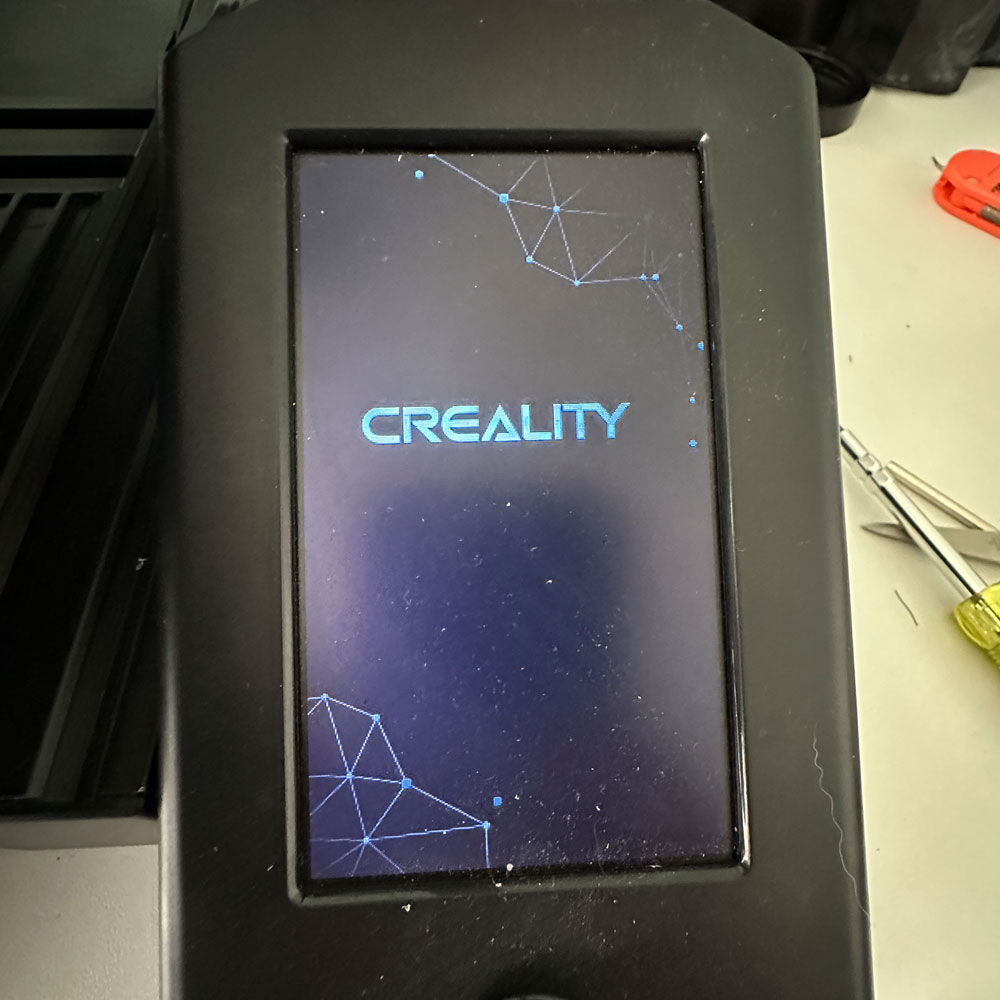
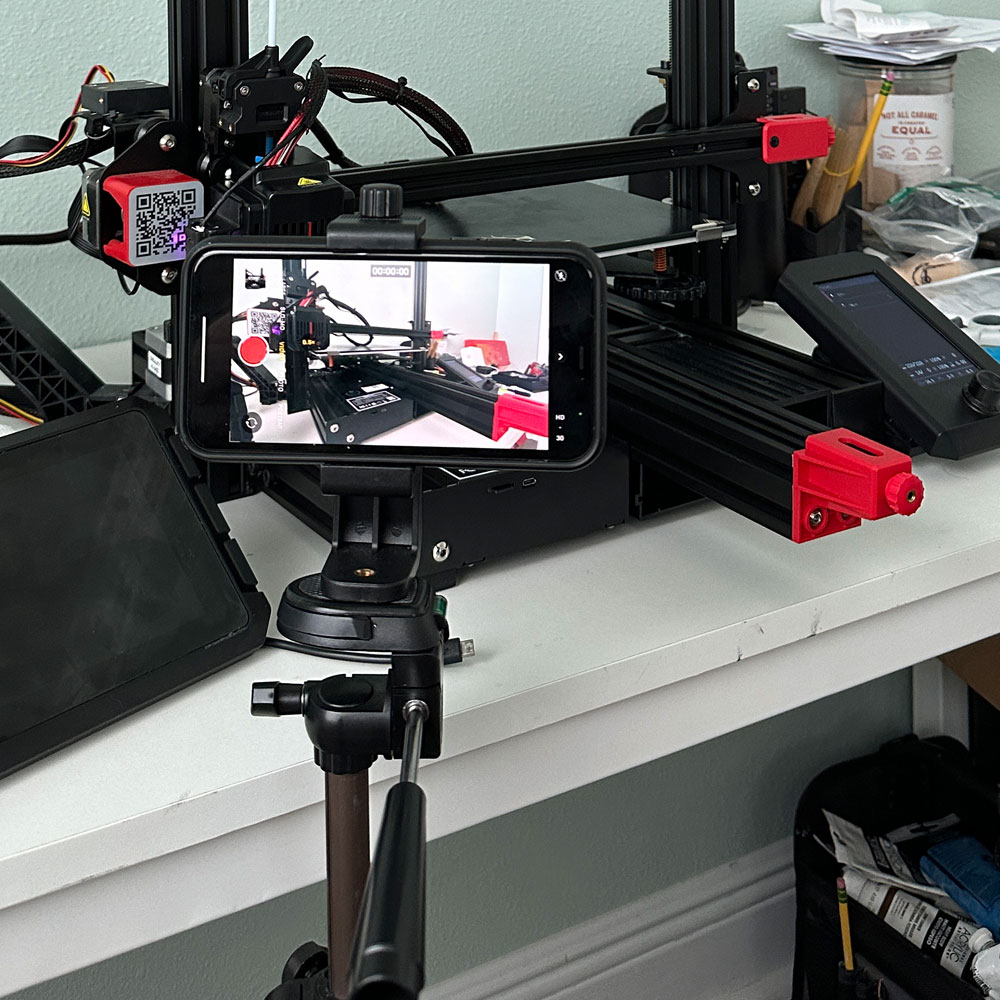
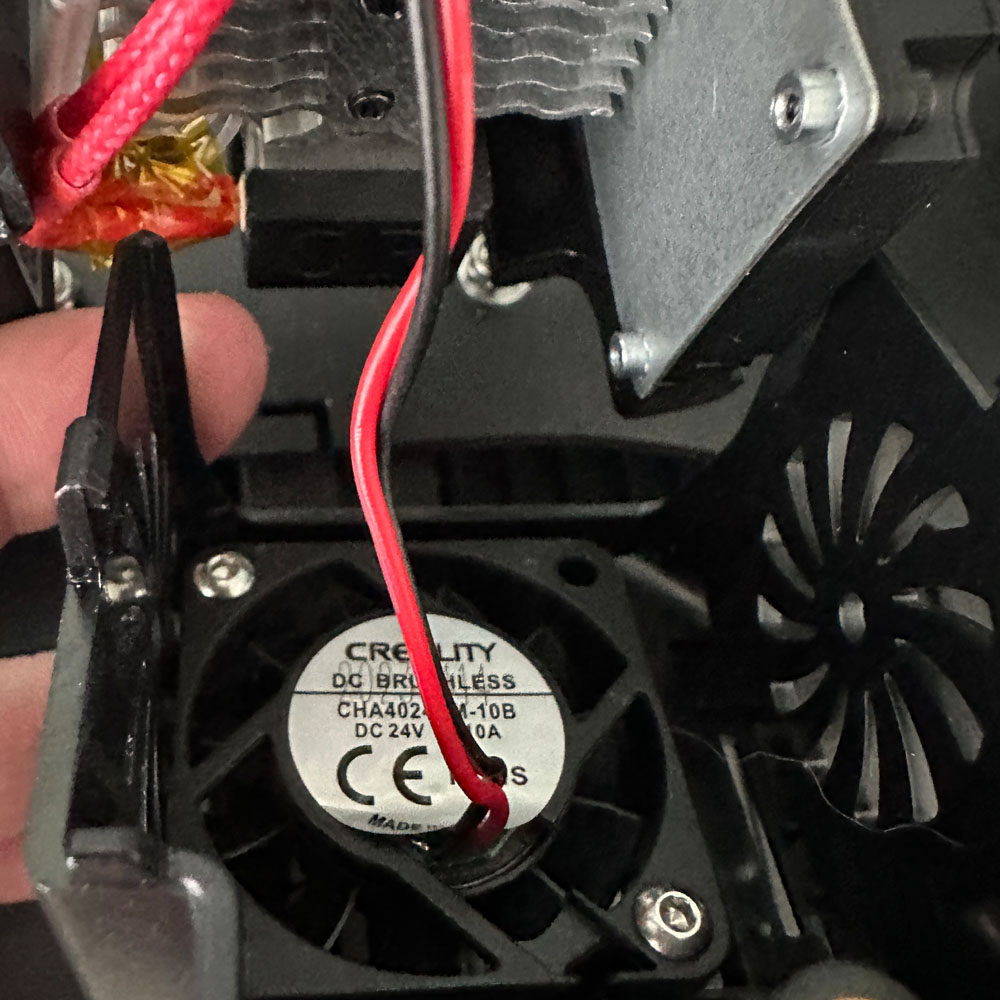
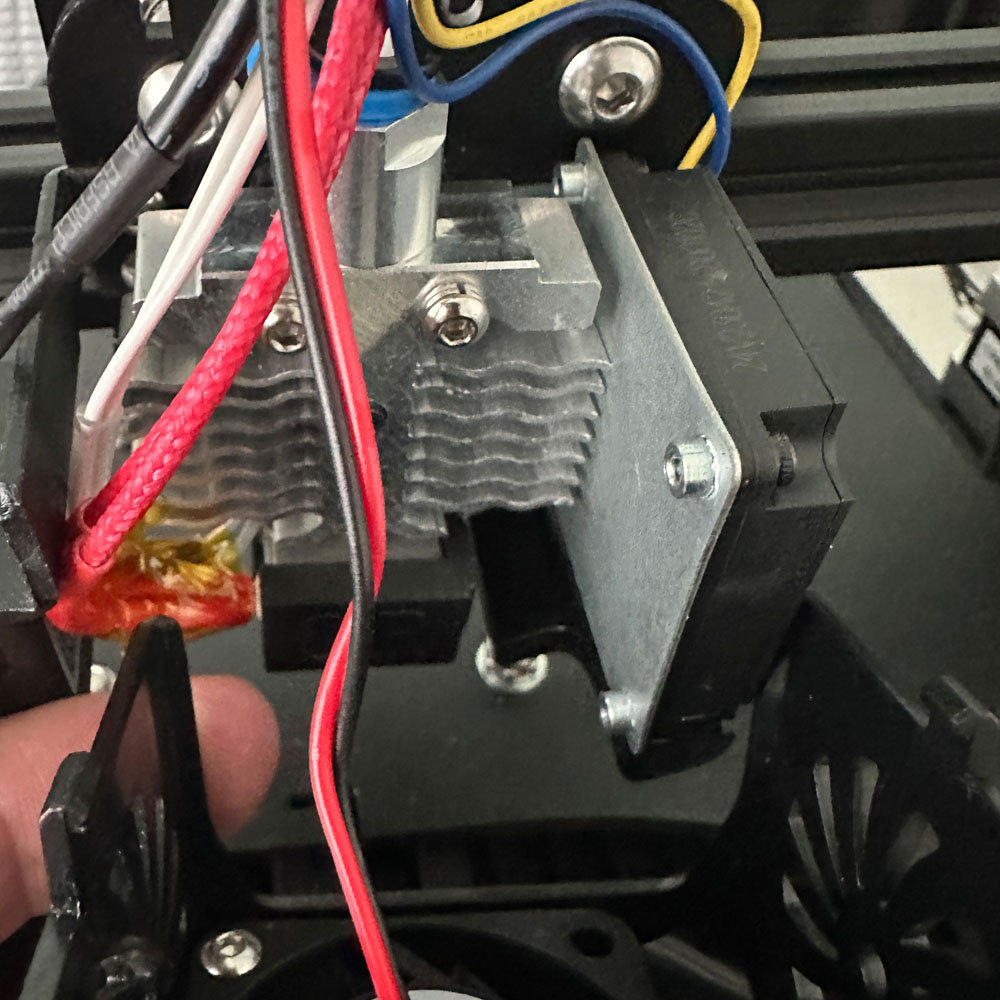
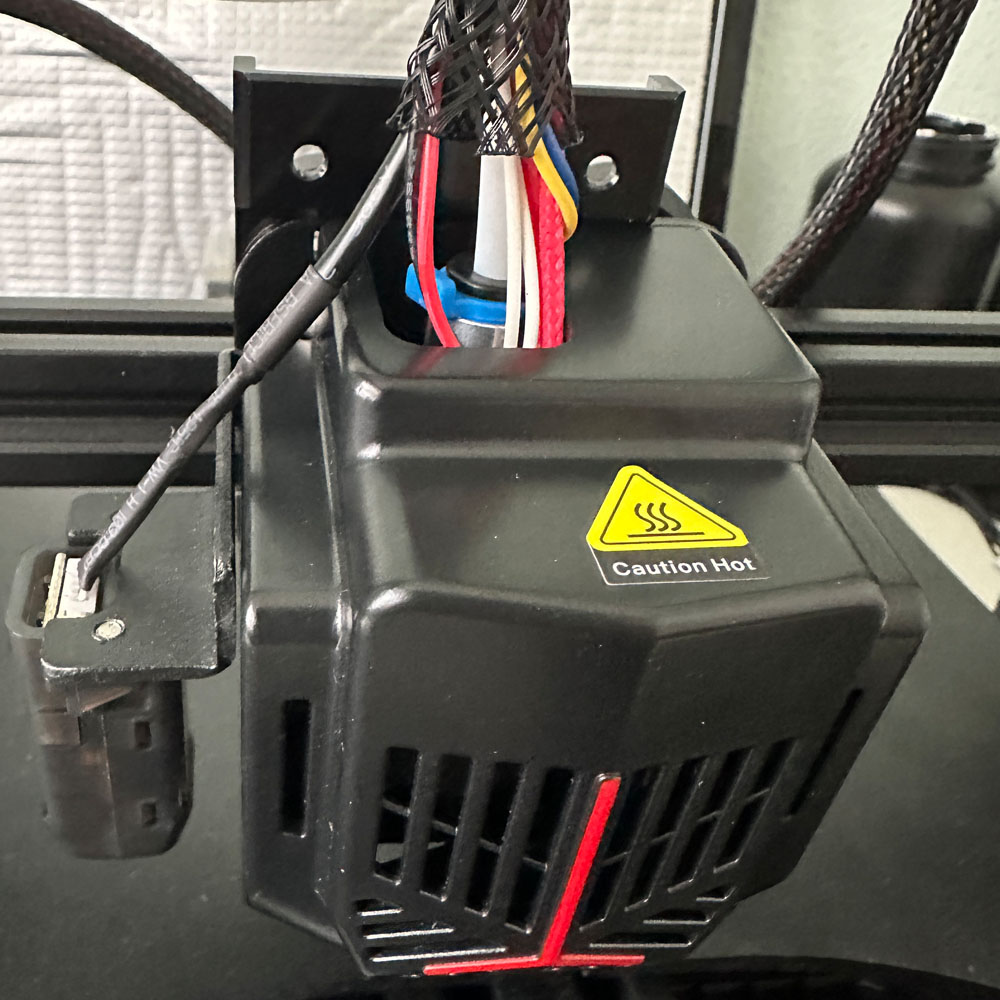
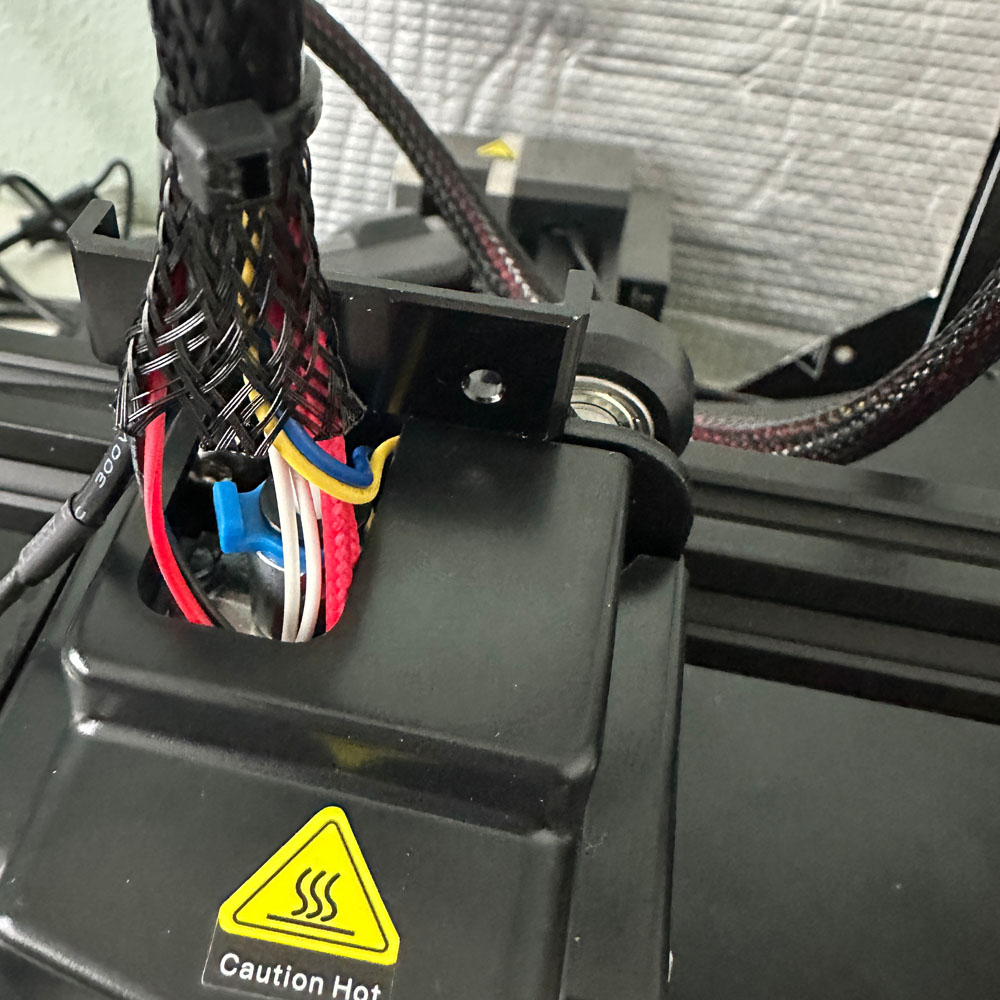
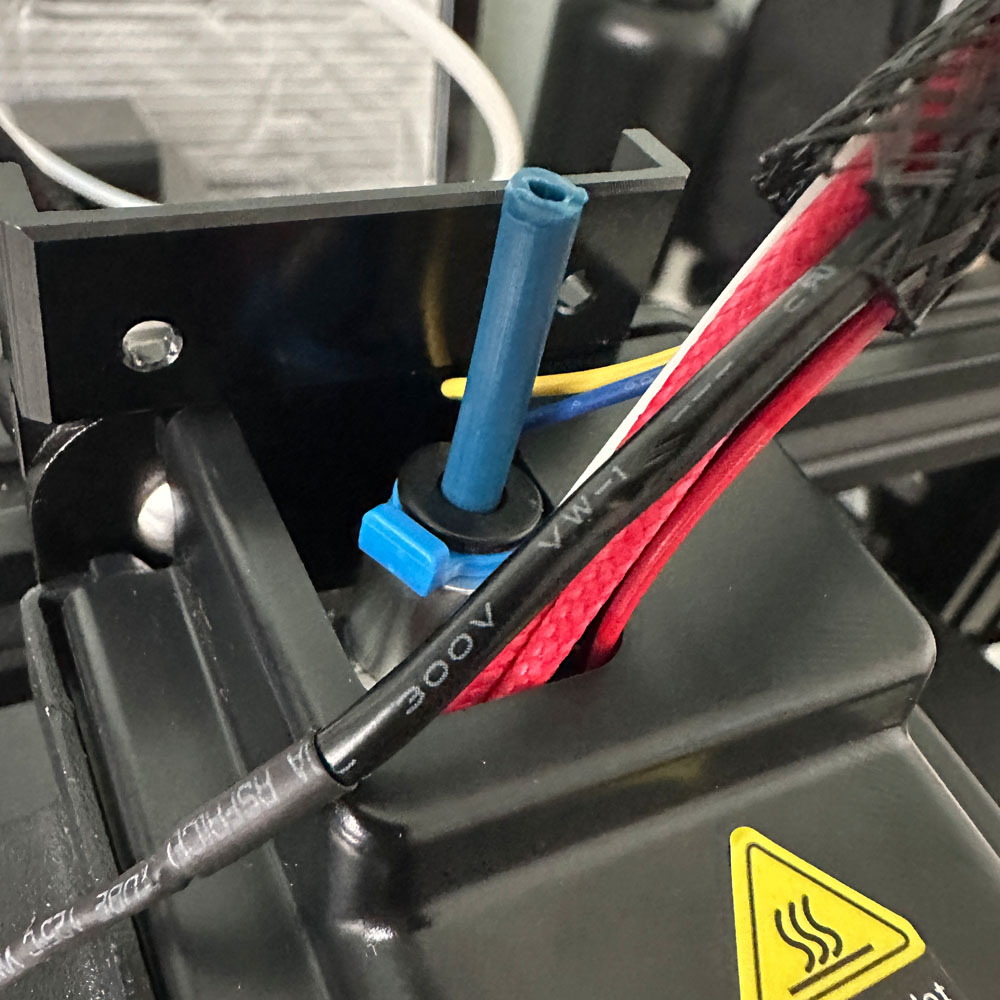
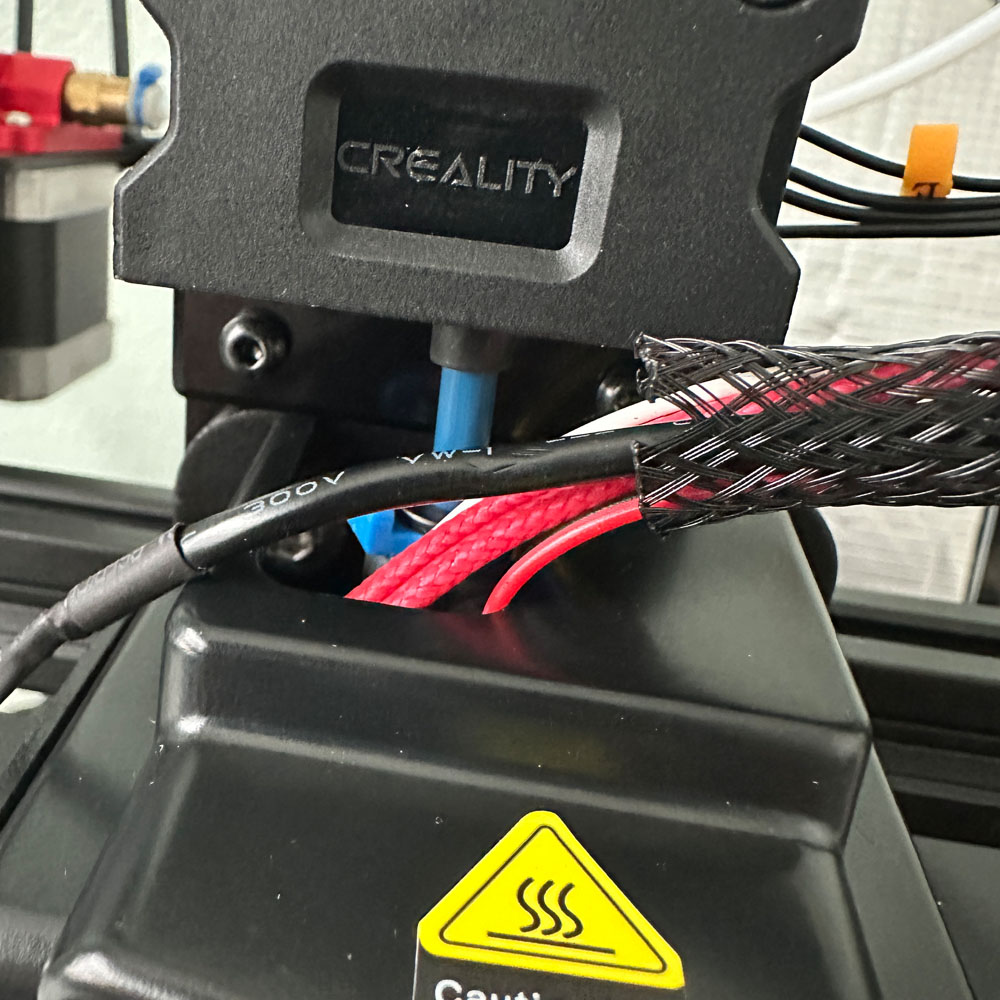
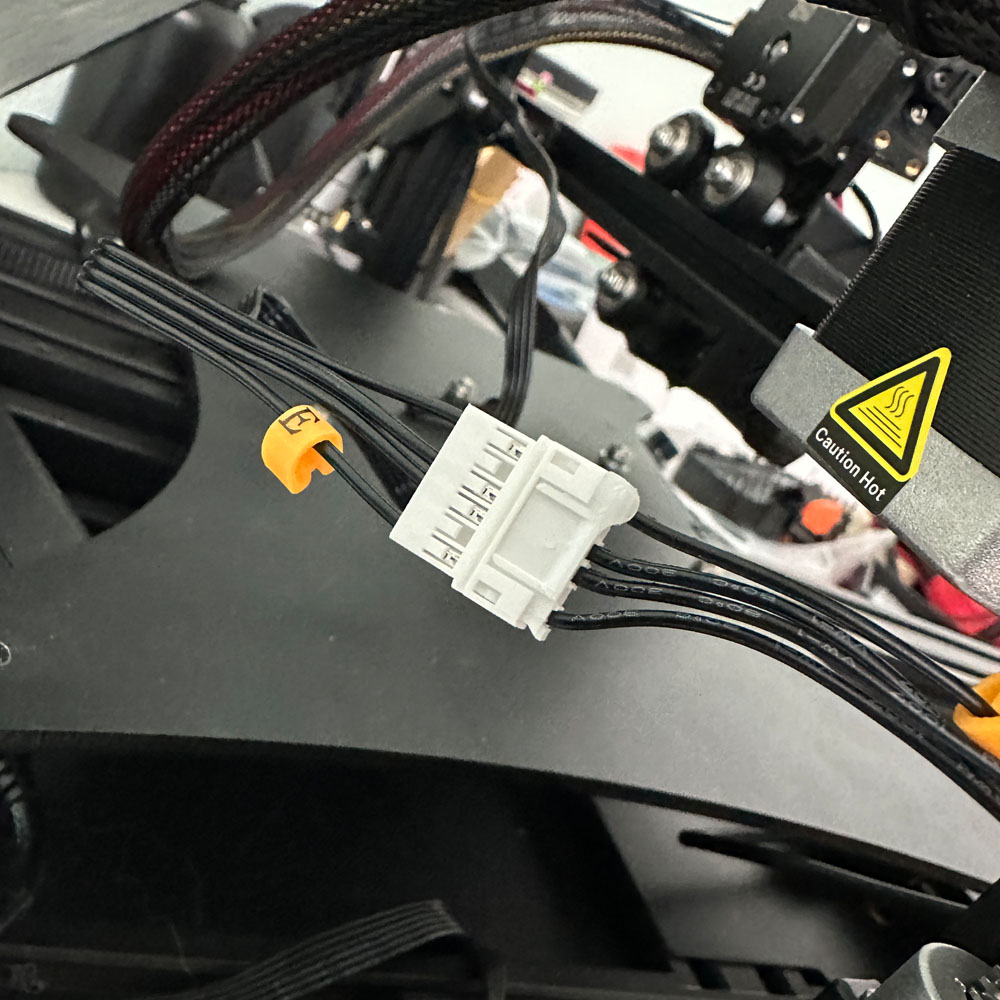
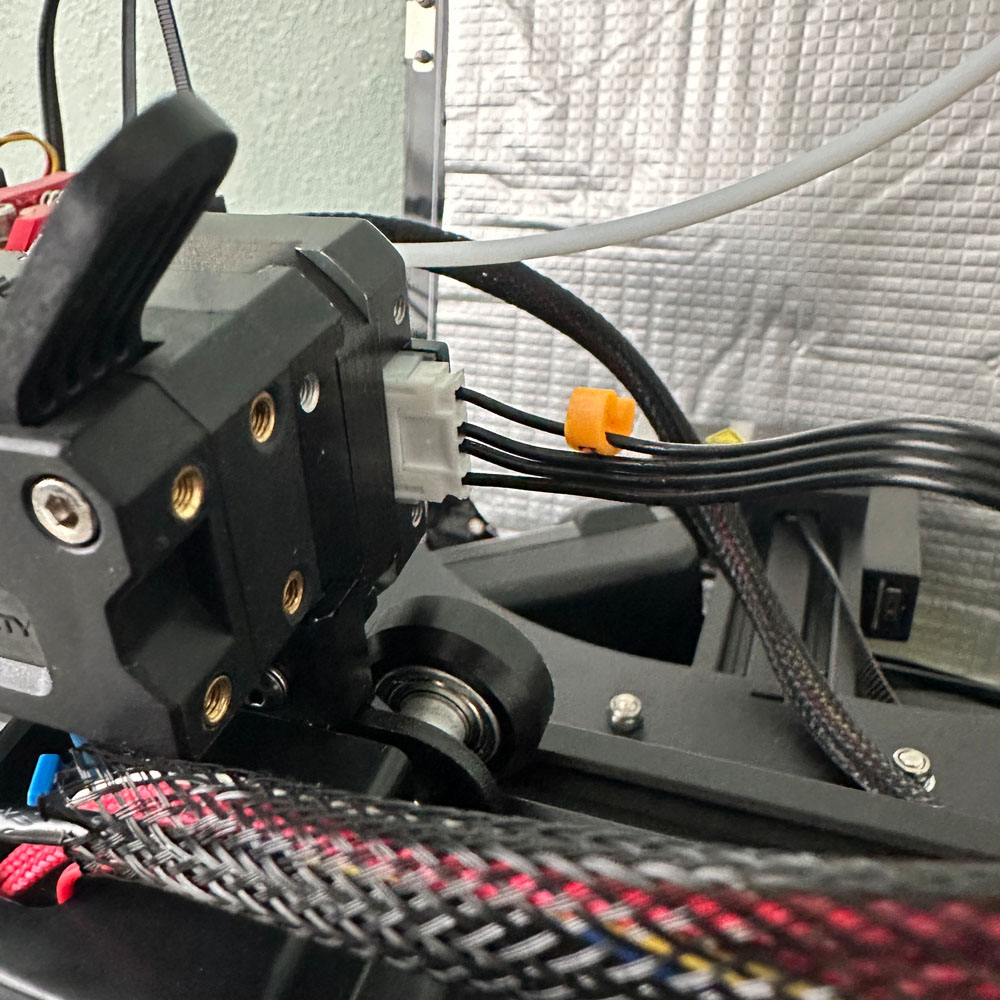
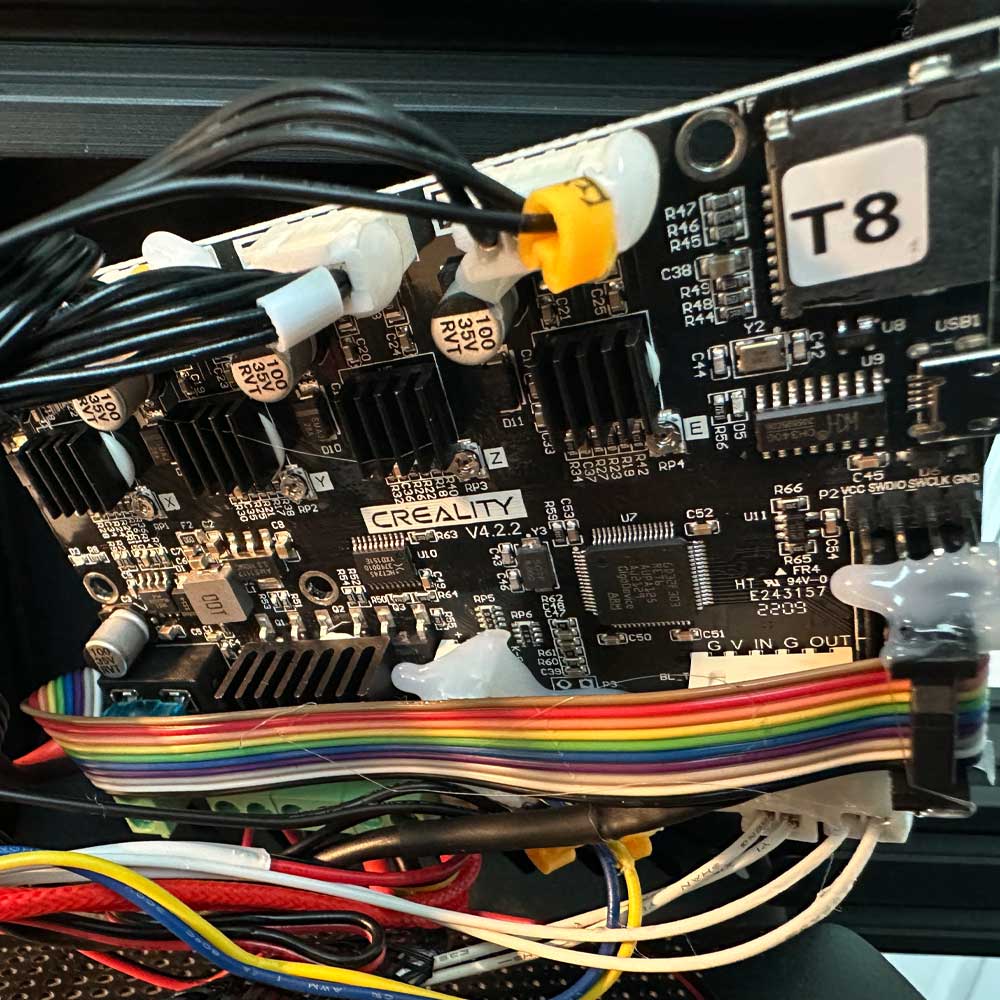
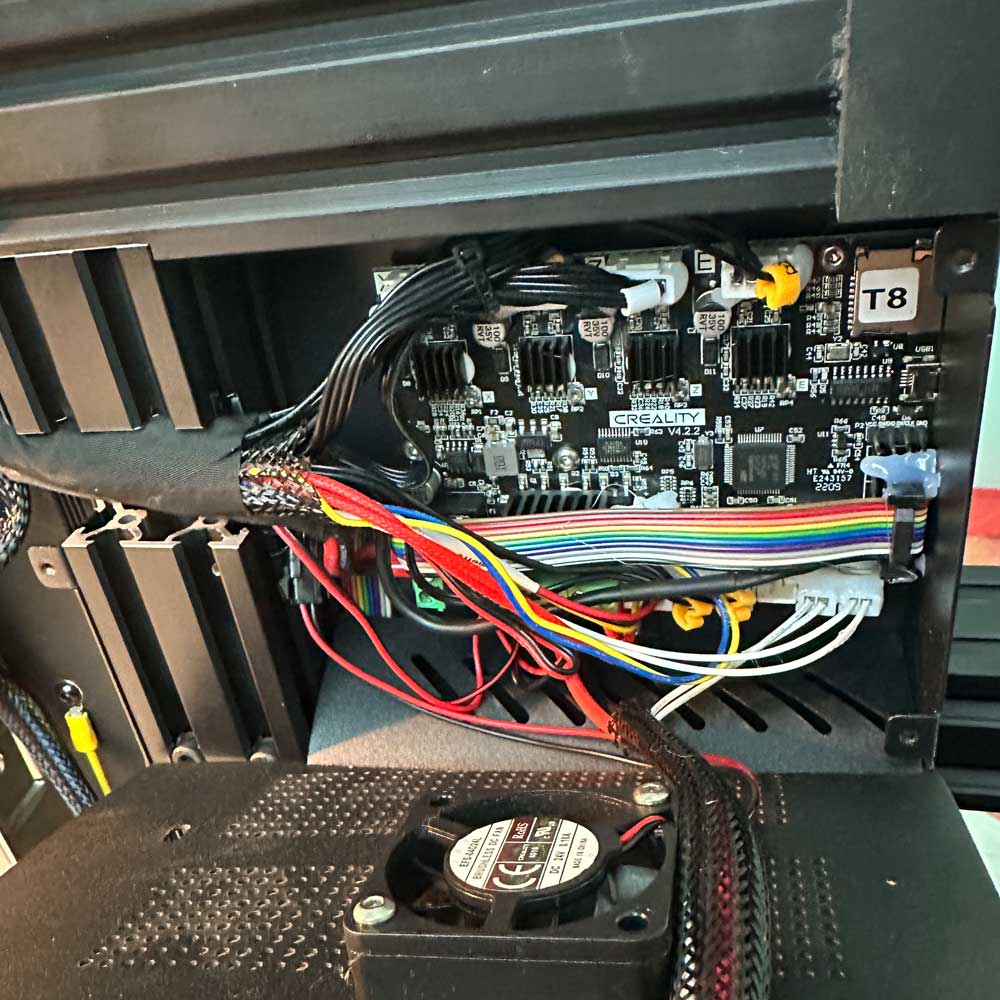
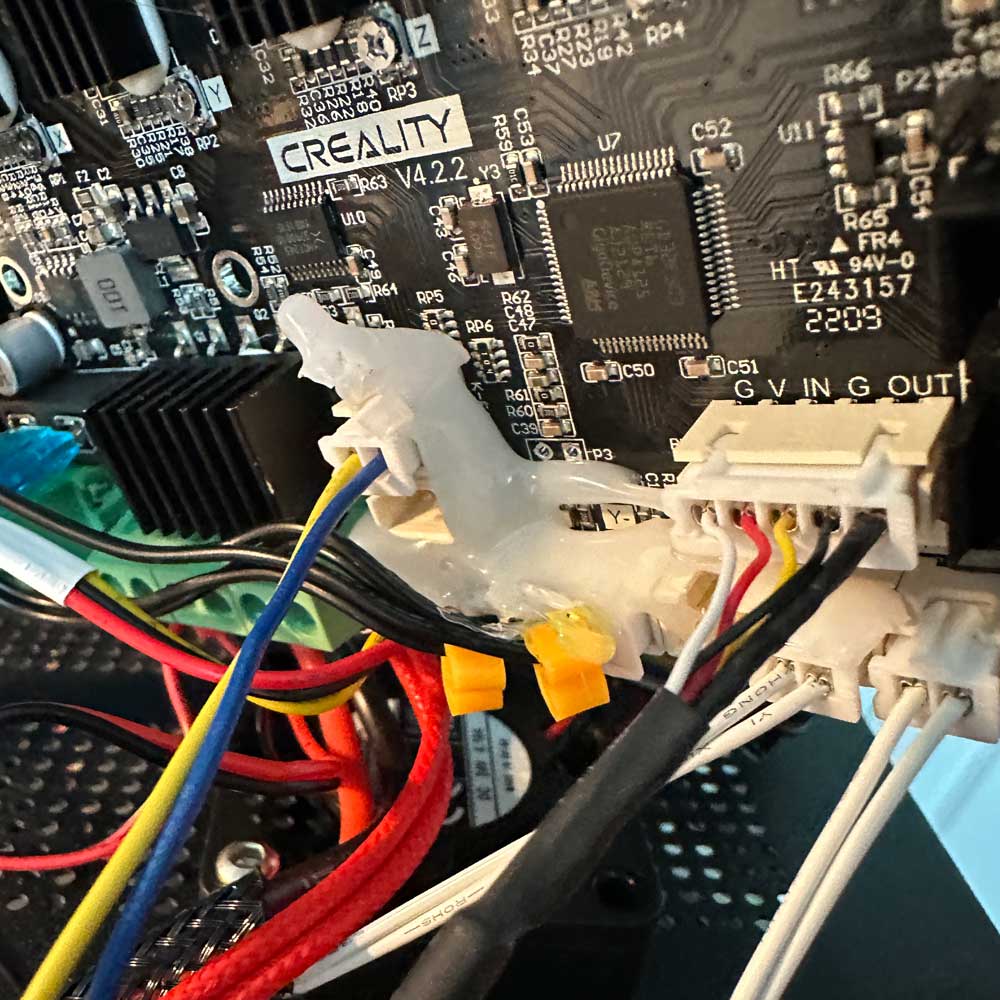
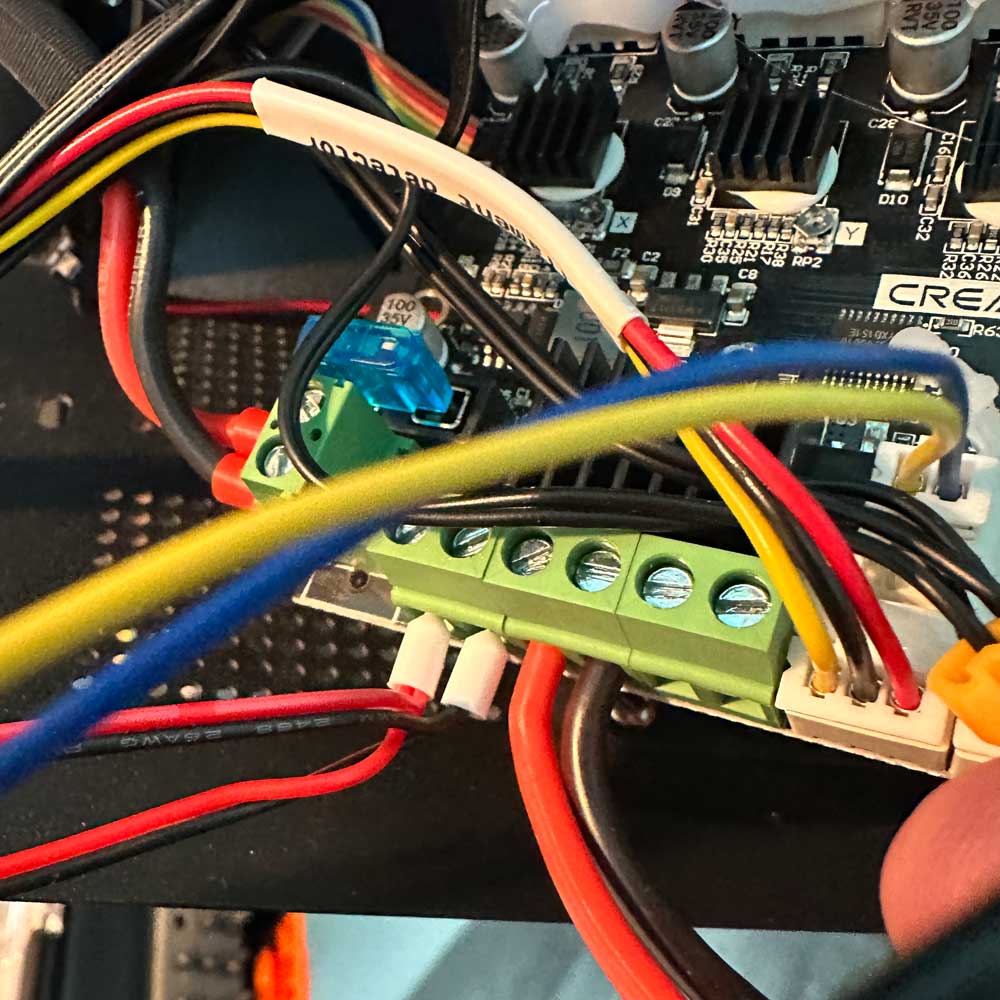
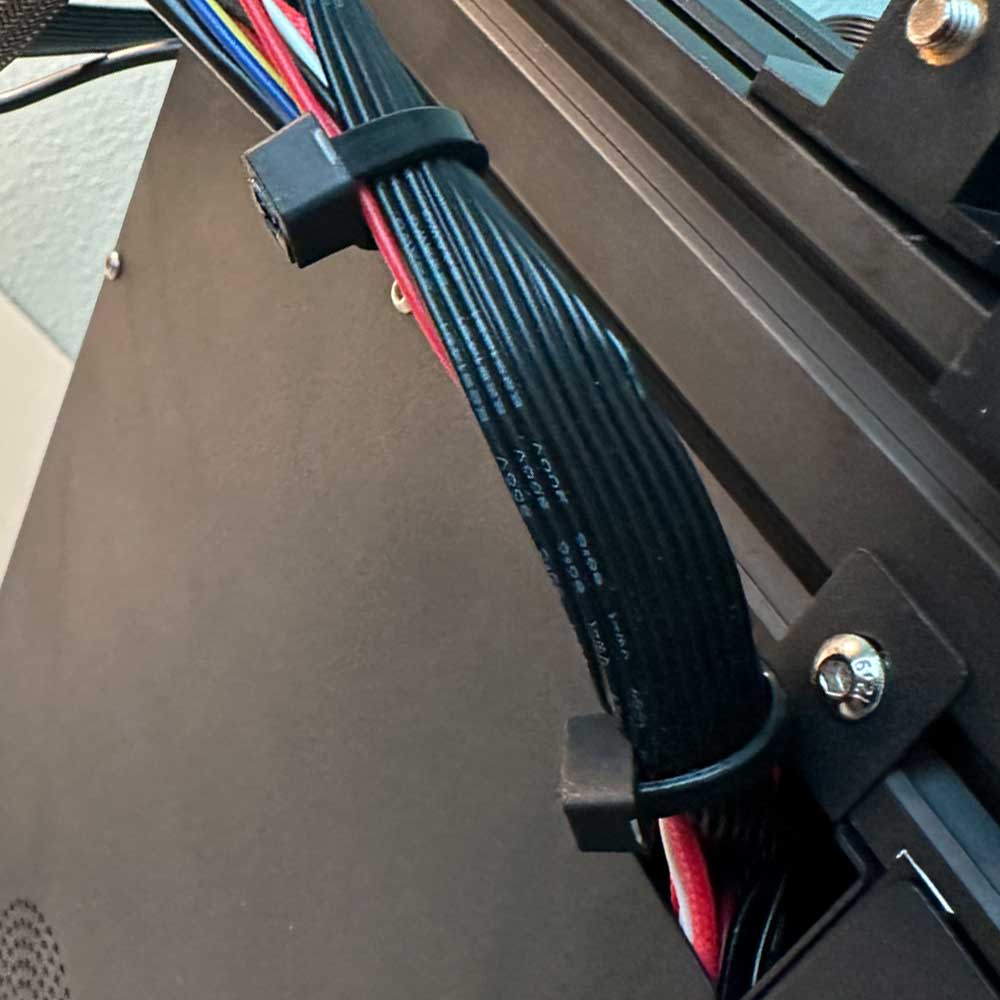
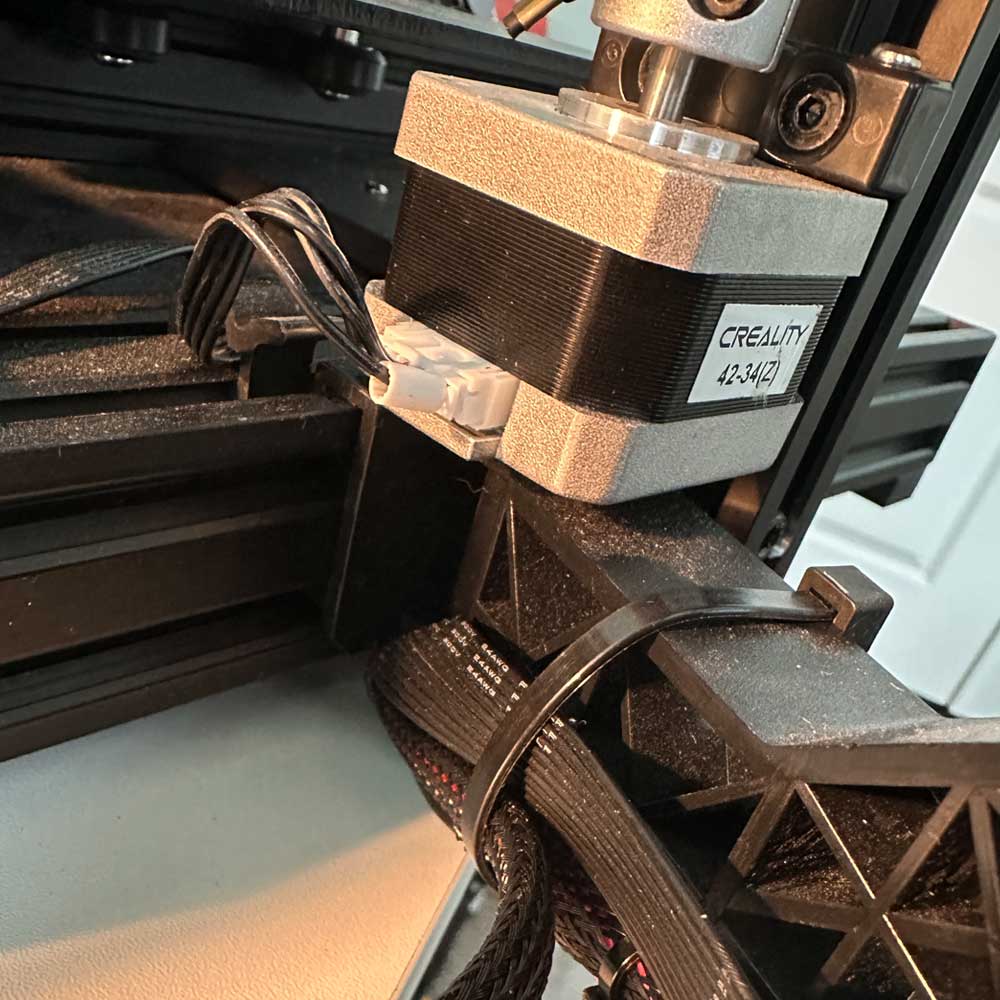
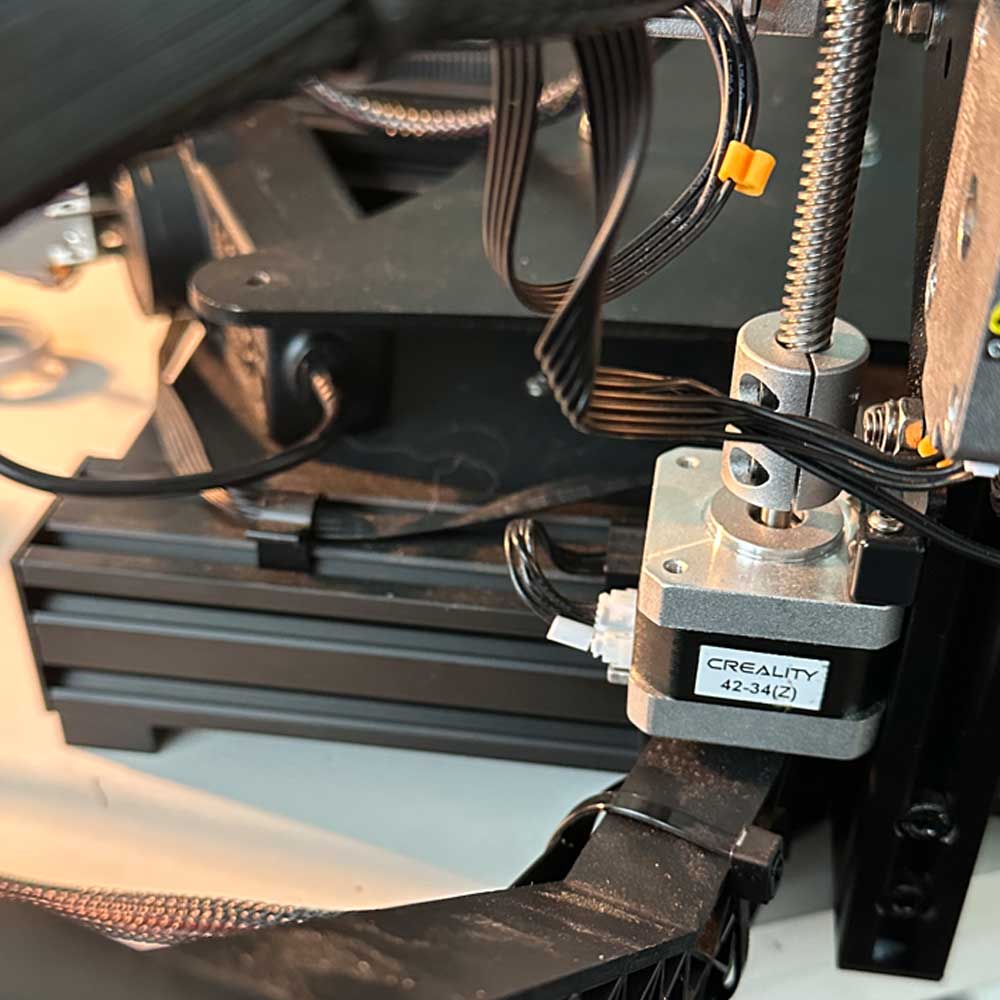
Labwork – Rebuild Part 3
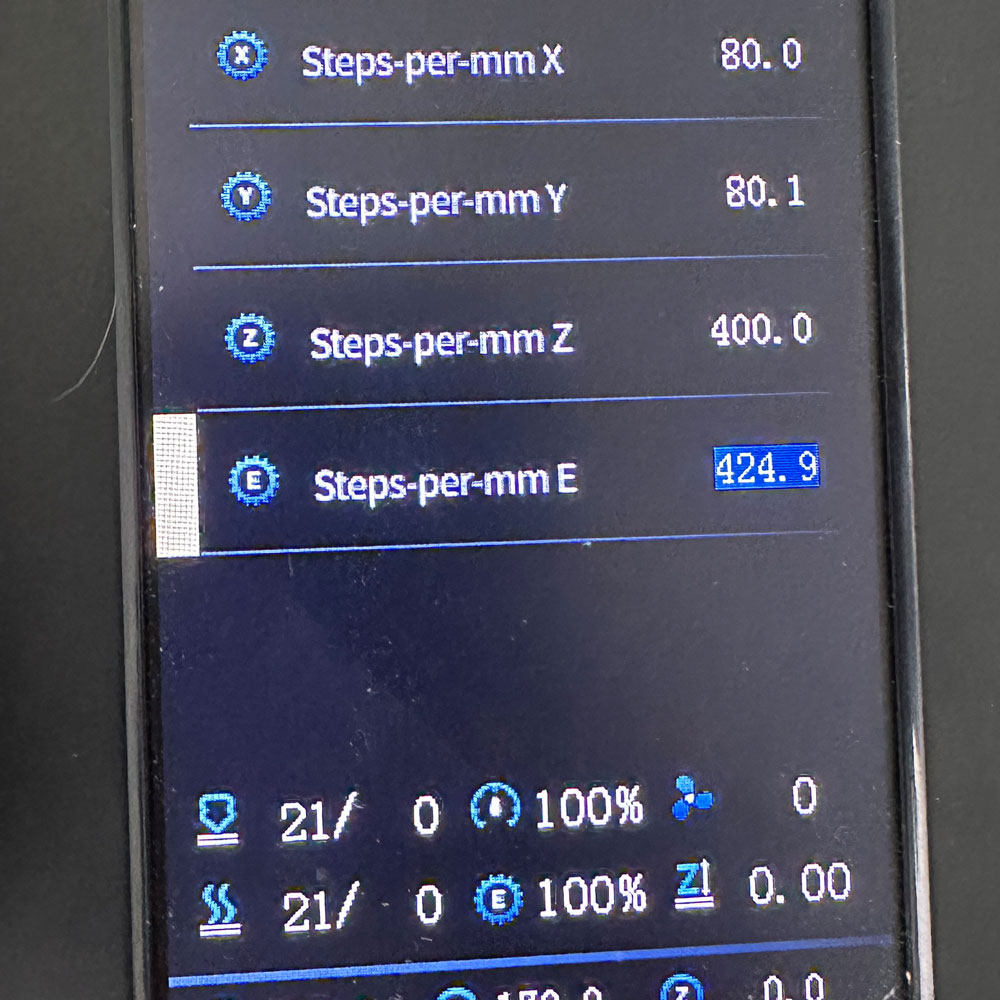
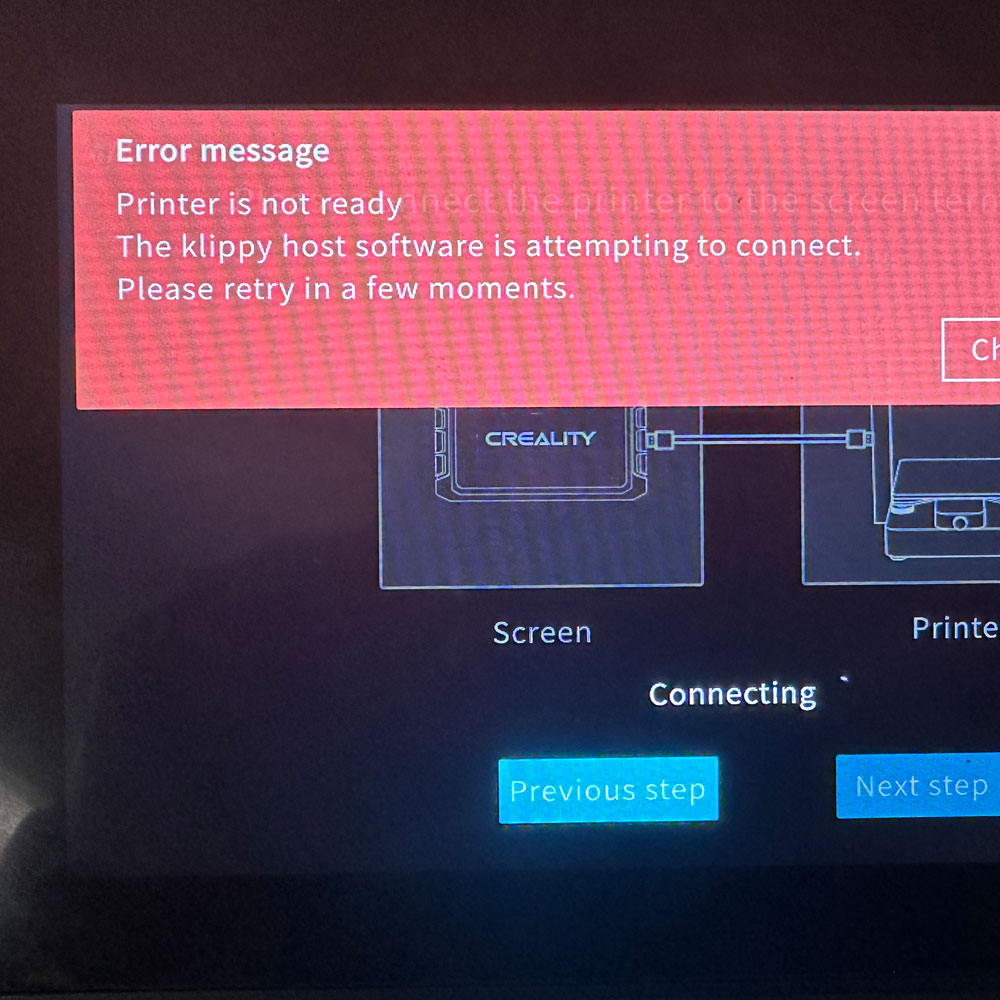
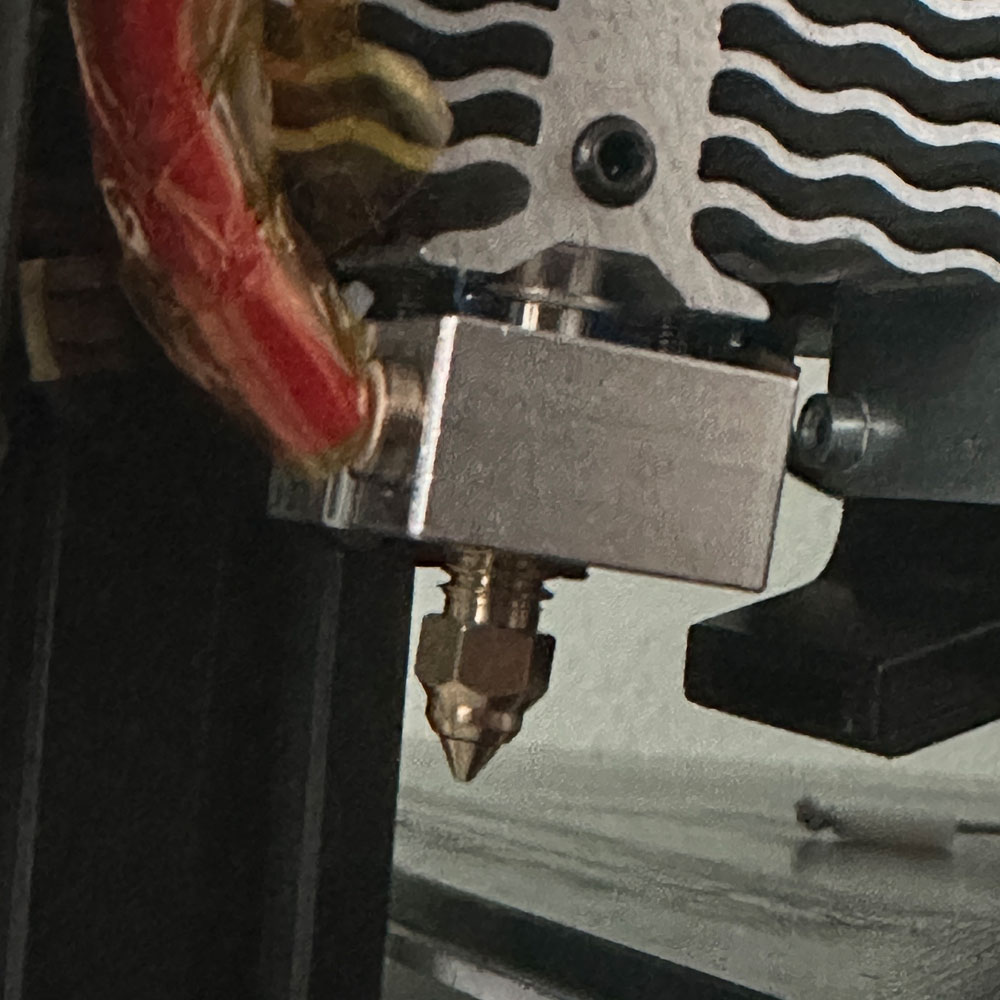
Hit a bit of snag, working through those challenges now. For the time being, see above/below for part 3 updates… We cover rebuild – x/y axis bands, plate, direct drive snafus, boot/reboot, reinstall printer drivers, slicers, nozzle change, a bit of troubleshooting on the extruder/heating element and the latest snag below, the onboard/external interface.
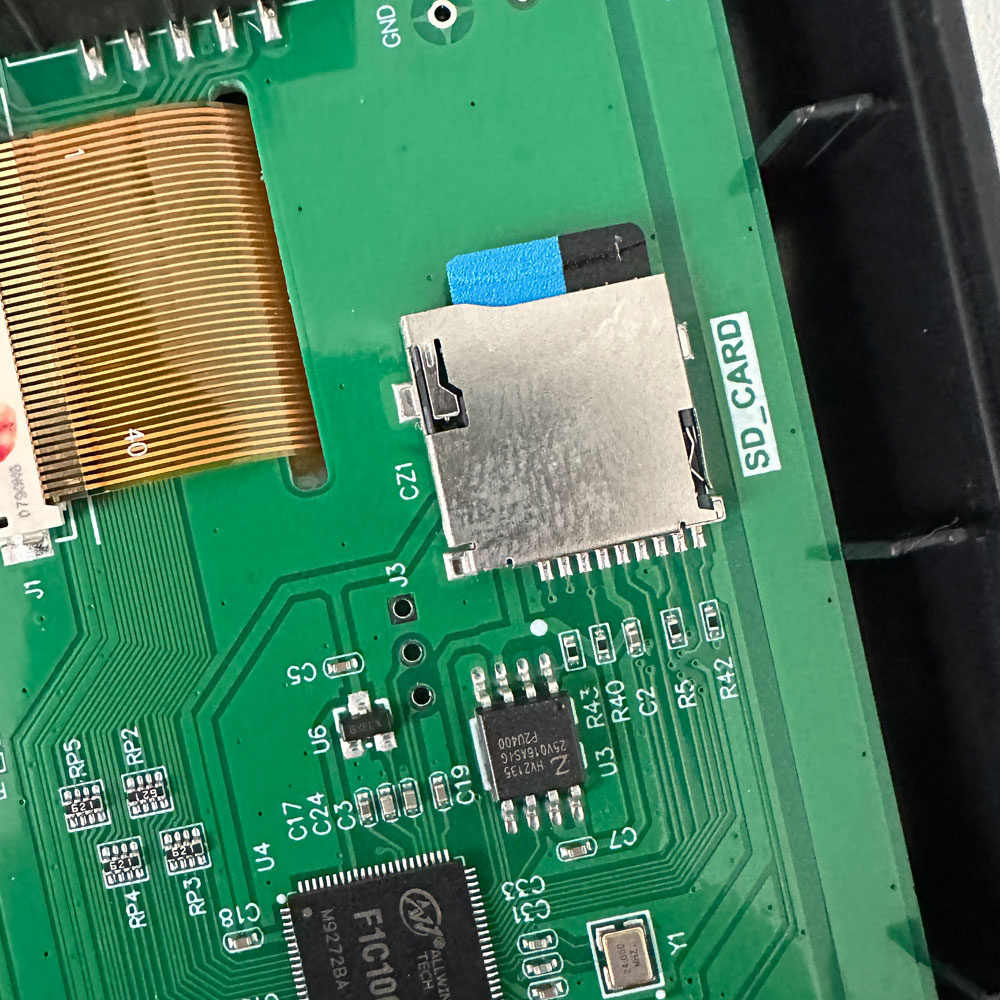
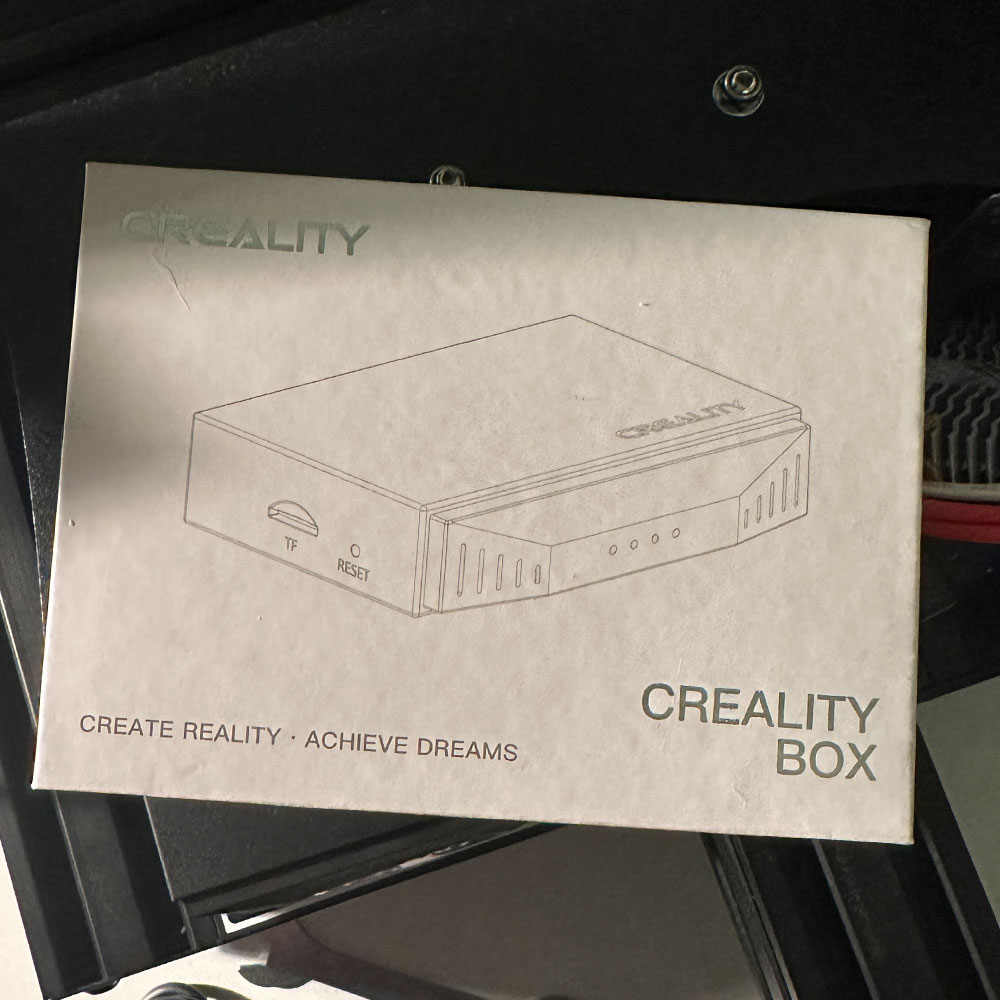
As noted in the previous build, part 2, we are probably a good 80%/90% complete at this point. We have some filament melting out, with a few hiccups here and there to mention. We will cover those in part 4. However, Part 2 was successful, Part 3, all parts are working as expected, boards boot as expected, and the new drive and extruder work in tandem as expected. The ‘snafu’ as I mentioned is between the Creality Sonic Pad, printer board and software to connect the two, unfortunately. Images will help clarify rebuild challenges, you’ll see manual updates performed on the printer screen, main board and where we are ‘stuck’ on the Sonic Pad. Two errors to note, Klippy, Sonic Pad physical connection failure and Filament recognition.
Next steps will include reinstall/rebuild Klippy, test/retest print config files, reattach Sonic Pad, replacing extruder tubes, nozzles, e-Steps, home position and more, while adding Wifi Box 2.0. Once we have all this in place, tested/retested, we will capture a quick video summary of the build and active print as those items are ‘ticked off our rebuild list’.
Got to love technology (or not), and office ‘helpers’ Zeus thought he would snooze a little while the troubleshooting session continued throughout the day/night. Same can be said for discovery and testing, no time like now. Some folks call it the ‘grind’… I’ll leave that there for you to imagine. Is it painstakingly difficult, no. Time always has an impact where speed-to-market might be a big deal. It’s always there, you have to be willing to work with what you have… Part 4 coming shortly, where we will cover fine tuning, steps, extrusion, adhesion and whatever else pops up in the meantime.
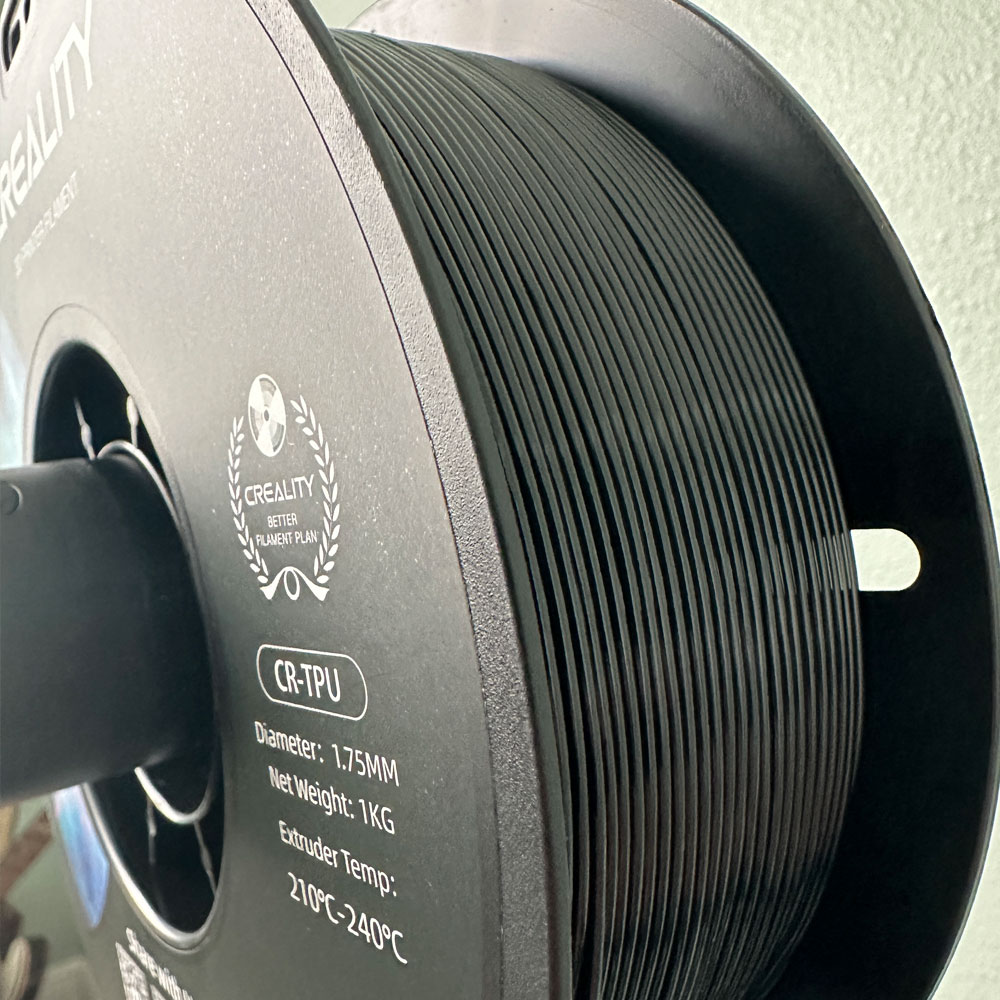
Creality TPU
OEM TPU
Labwork – Various Filaments
Filament types, brands etc. a nightmare of a problem to have. Which filament to purchase, what works best on the 3d printer I own? What to do when you’re just starting out? Cut to the point, purchase, use what you can in context, however, when push comes to shove… Ender Series, Prusa, Makerbot all great choices for novices or beginners. Start with an eBay ‘parts’ printer, this might help cut down cost or refurb’ed. In time, as you learn the in’s and out’s of 3d printing, overcoming fine-tuning issues and filament extrusion/application will be key.
Regardless of product make/structure, the fine-tuning the nozzles, stability of the machine, drive system, adhesion and filament… Filament might be the easiest to swap out, may be the nozzle (noting various nozzle sizes, most default include .4mm) and for those hobbyist, the drive mechanism, bed/build plates etc. Filament might just be an easy swap with a catch.
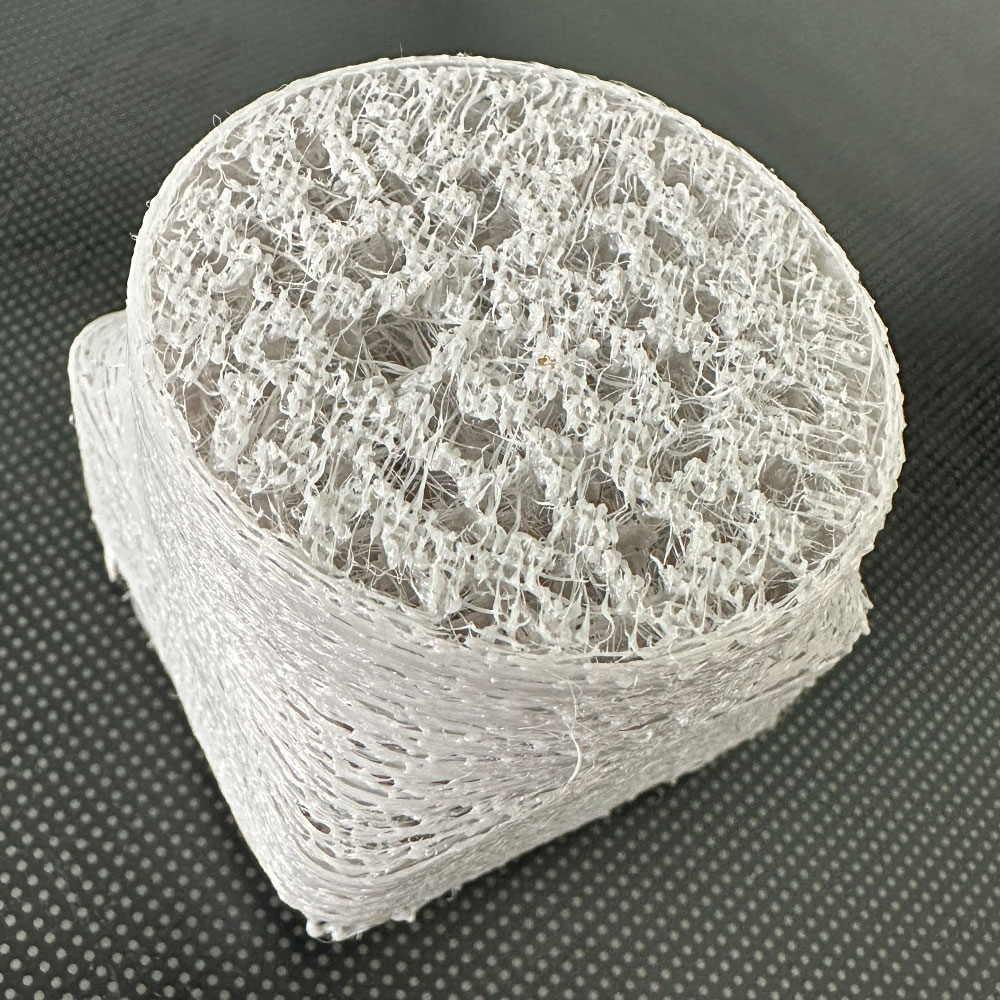
Like most things, filament comes with it’s own issues – additional research is required, fine tuning and testing depending on choice of 3d printer. Let’s talk shop, filaments… retraction (later, future post). Listen, if purchase power is a problem, meaning if you have the money, first, buy what you can afford, especially those starting out in the 3d printing hobby… Do what you can to make ‘it work’. Making it work, meaning so that you can test, test, and retest. It’s a process of elimination, elimination of problems over time. Better filaments, better results. There have been many times when testing, in fact, I might venture to say, problems are related to cost of filament and the length of time it takes the user to move from the cheap ‘stuff’ to the final working filament. After all, at least in my filament finding (tersting) days, more often than not, filament testing became cost to throw-away, ‘what not to do’. So, yes, a healthy dose of testing is needed; failure as well. That said, I would be remise not to shine a spotlight on the value of the article; which is saving you money on filaments, pieces, parts and cost to print etc. The punchline, buy and match OEM (Original Equipment Manufacturing) filaments. I have a Creality ‘shop’, thus, I use Creality filaments – Creality TPU (Thermoplastic Polyurethane) Filament.
Lately, we’ve been looking branch out a bit, as we’ve recently added the Prusa’s i3 MK3S+ 3D Printer kit to the mix. Again, there are many options, printers, upgrades, filaments… choose wisely.
Let’s move onto what works, finding something that works for your printer, or future printer. I’ve maintained more of a ‘happy path’ as a hobbyist, less venturous and sticking to the PLA’s (Polylactic Acid) and TPU’s. Again, MatterHackers does a great job sharing what’s on the market – types of filament, sizes, brand, color. Dive in! Or maybe, expansion is on your mind, and you want to setup your own print farm – @ShopNation might be a great research to check out. Have options, which might be the biggest take away beyond testing or OEM/OEM filaments. Hey, as a hobbyist, saving some cash is good thing, there are thousands of upgrades on the market, same for the number of printers, filaments, parts, boards etc. What I’ve found through various testing methods, settings, set ups, printers and more, has been more about what works, the ‘success’ metric here. Consistency, fit/finish – quality over flash, speed – quantity. Take for example, and why perhaps I’m writing to you now, Duramic 3D TPU is just not working in the Ender 3 Neo Max rebuild. Teardown, rebuild all updated, same result, so, again, time to make a switch.
The switch, I’m referring to here (moving from generics to OEM) worked on the PLA side of the equation, may be a correlation perhaps, and not causation. I believe that’s the value here. A handy lesson here, might be to continue to test where it makes sense – remembering “correlation does not imply/mean causation” ((Shout Out)) Find more about Mr. Glickman on his personal website or faculty website, Mark Glickman – Senior Lecturer in Statistics, Director of Masters Study.
If you want to learn more about filaments, do your research, please do look into – MatterHackers, All3dp – Filament Finds and/or @ShopNation…
I’ll leave you with this, try what you can afford… what you can afford to discard, test and worked to fine tune your printer. Words of encouragement ‘leave no product stone unturned’. The goal is to produce high quality, consistent and clean prints. Find something that works 80% of the time, the old 80/20 rule. PLA is a bear to tweak and maintain, so is TPU and the ~14 other materials including metals, carbon fiber, wood, nylon. The application is endless, from starter to full forge, high-strength, commercial production. Focus in on settings, adhesion, extrusion temp, nozzle temp, surface tension, drives – pushers… And so it goes, testing is our motto/mantra, testing has become a constant when finding something that works, good over bad outcomes… so, test them all. Checkin from time to time, new posts are created daily, we will cover the Prusa tests, Creality TPU, Polycarbonate and PVA (Polyvinyl Alcohol).
Have fun, cheers
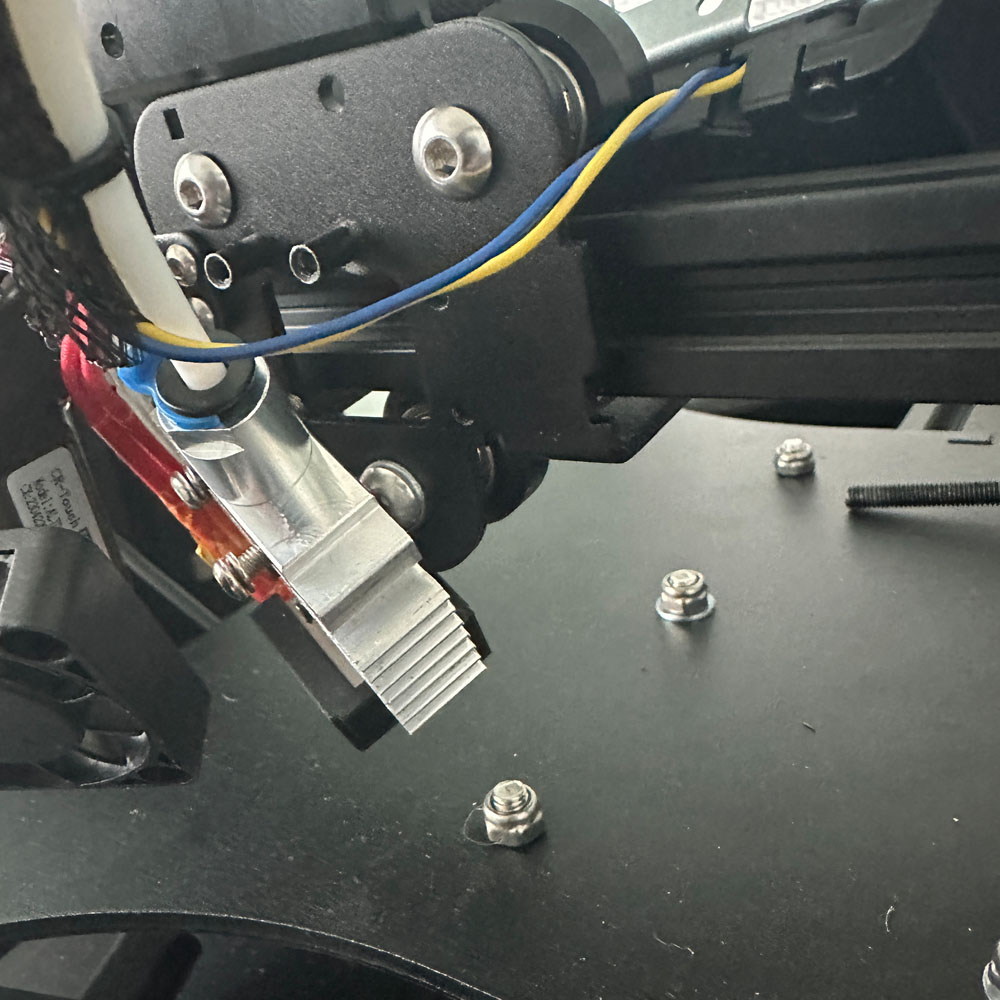
Rebuild – In Progress, 2
Assembly & Direct Drive Rebuild, 2
Labwork – Rebuild Part 2
A few steps forward now, we pick up with the bold on extruder assembly and assembly backplate here in part 2.
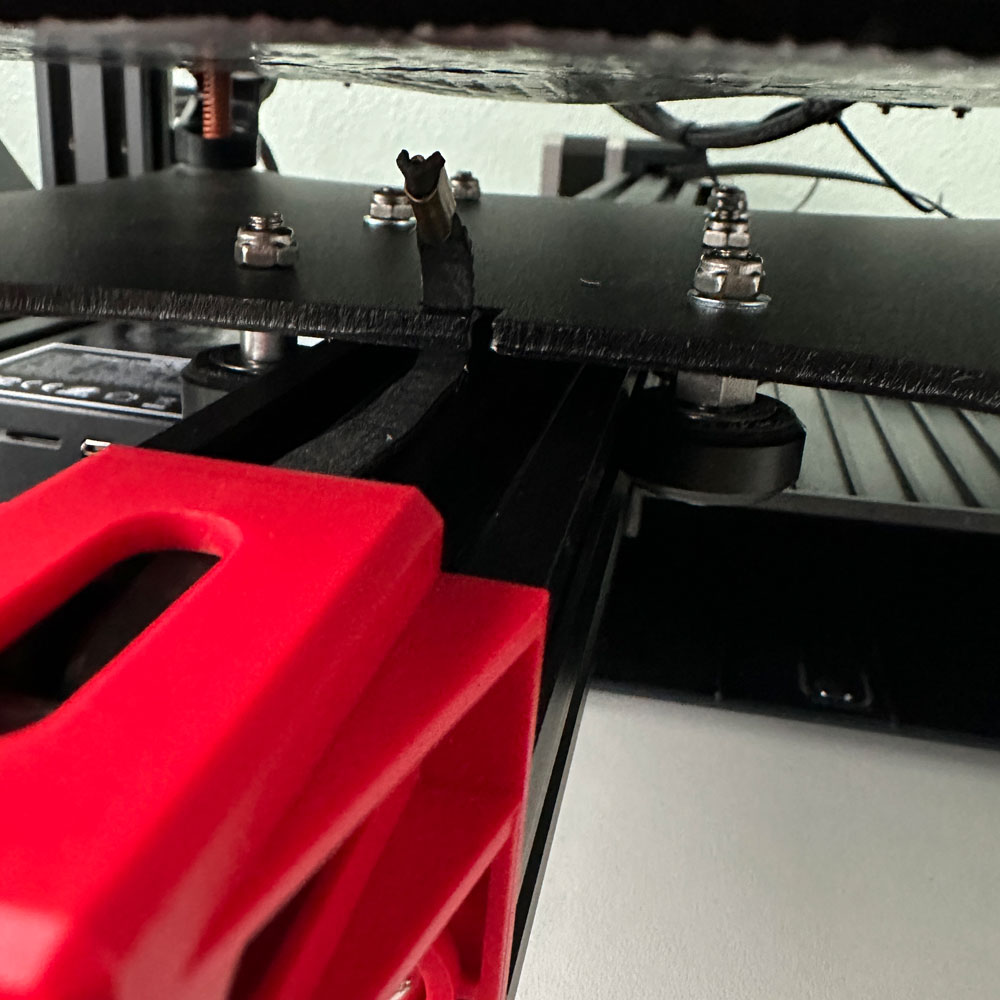
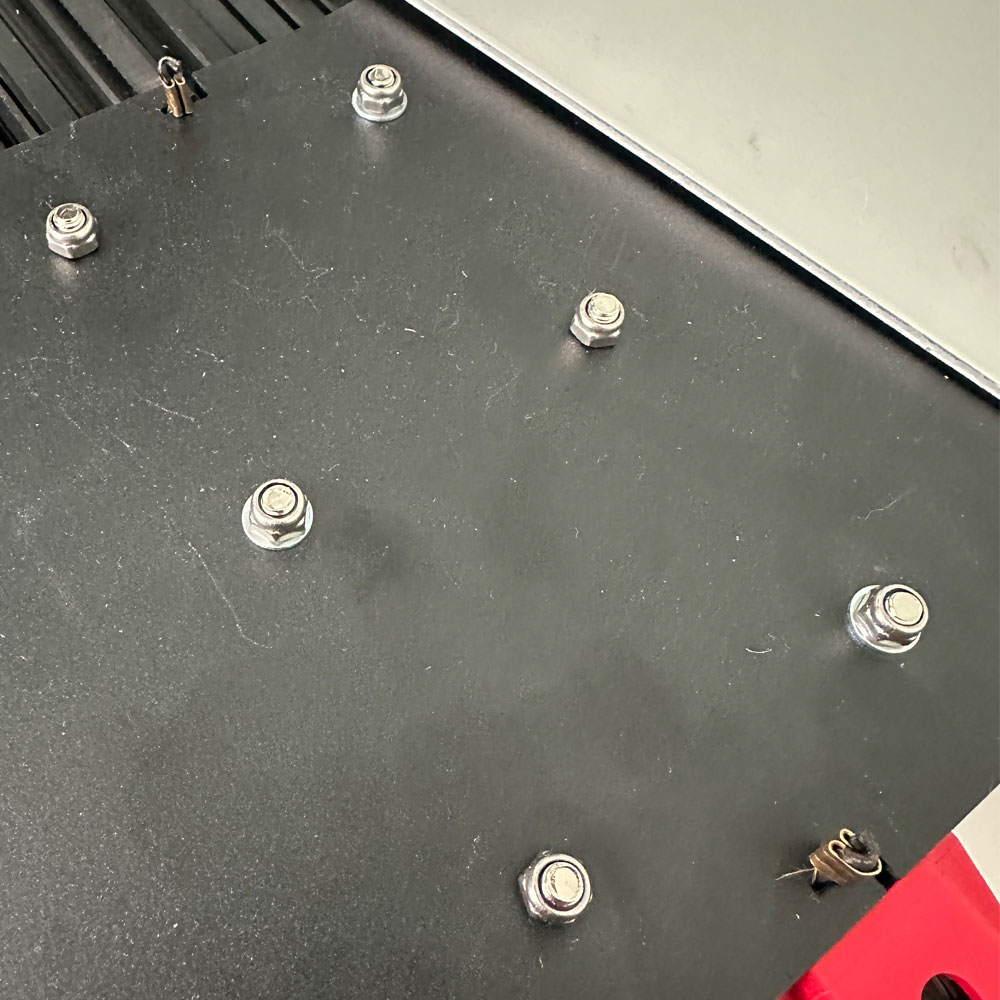
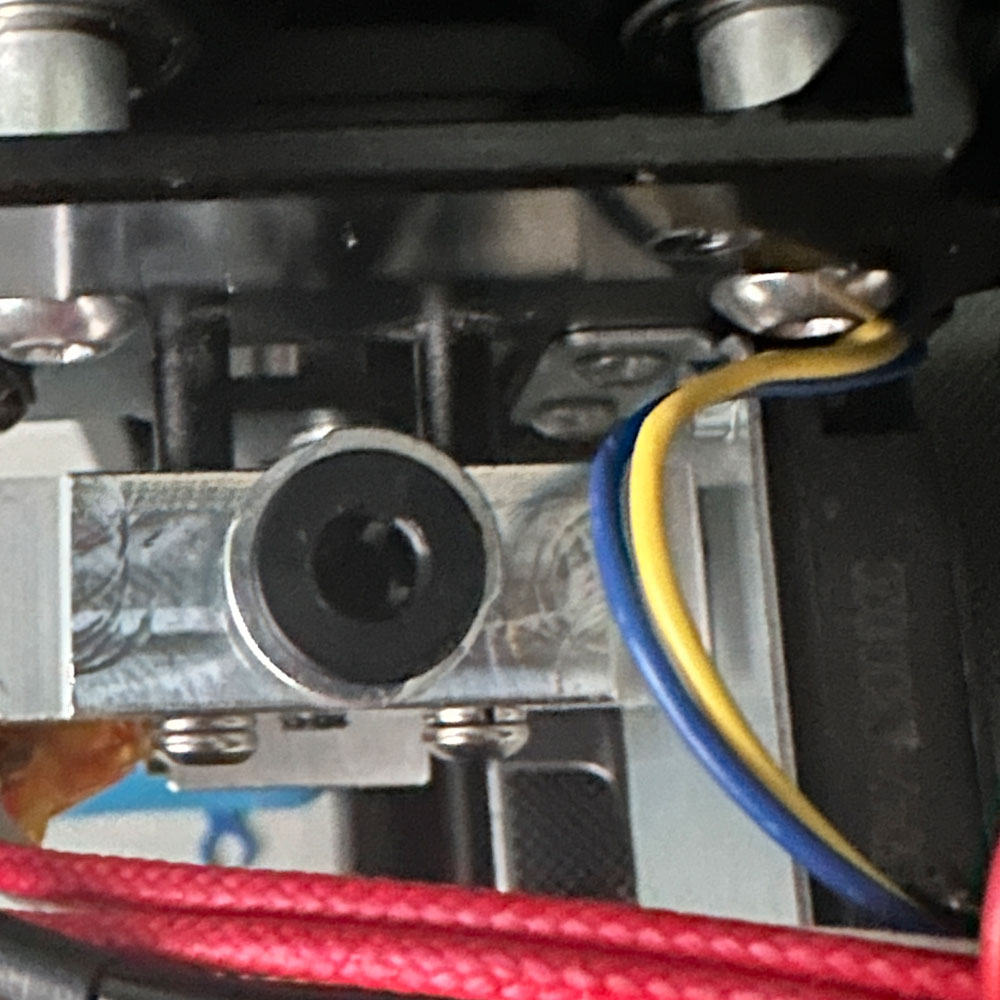
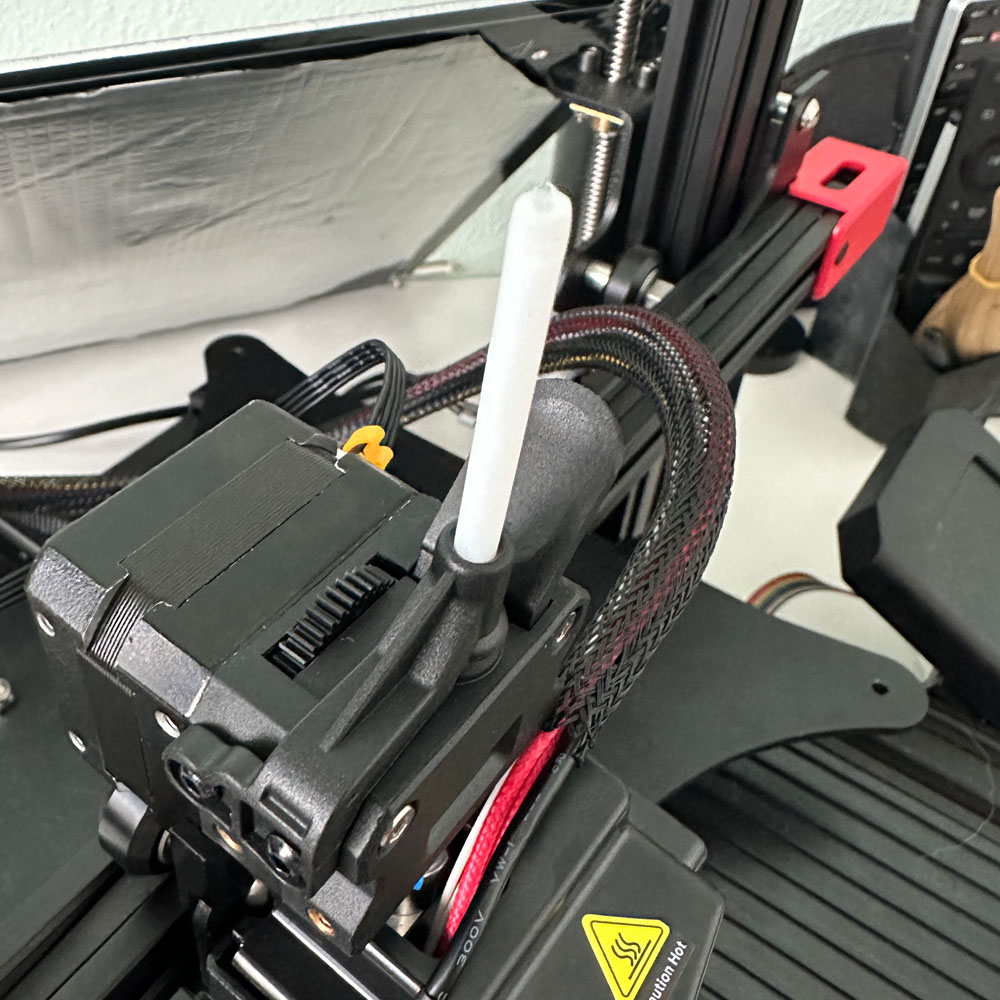
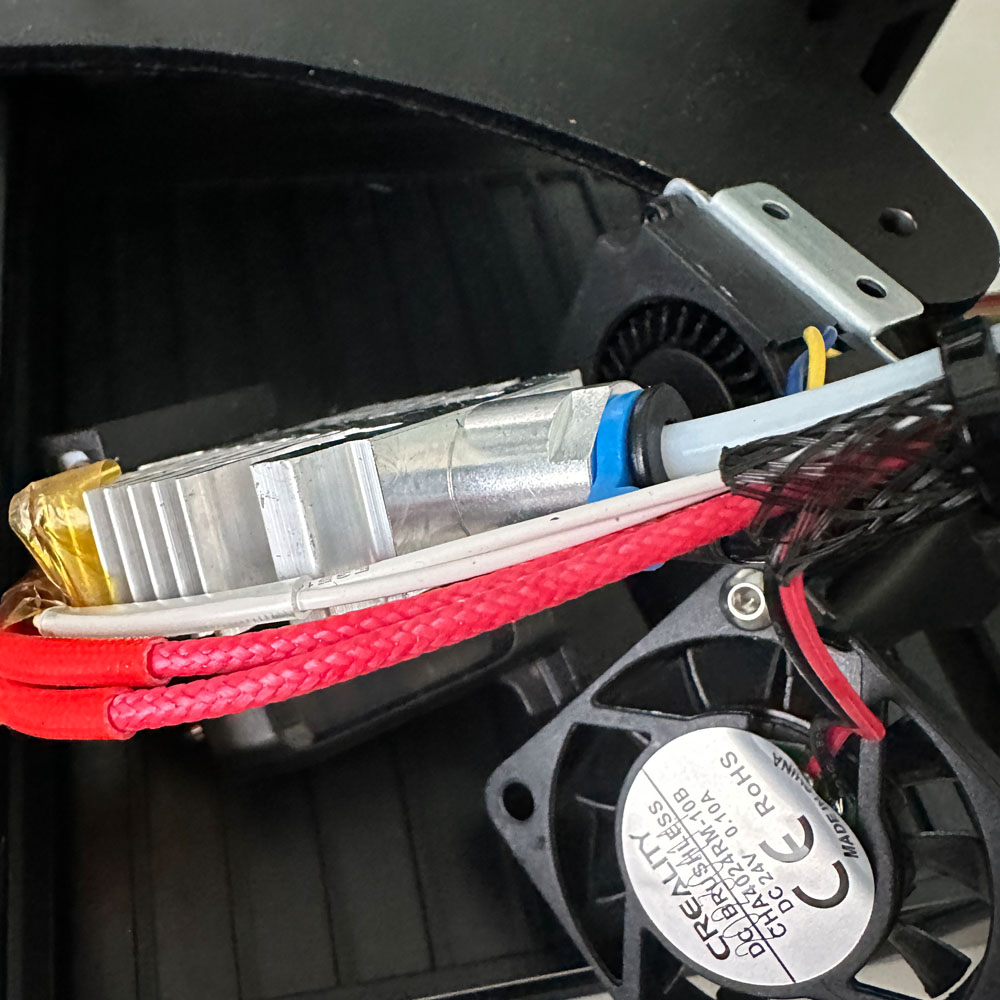
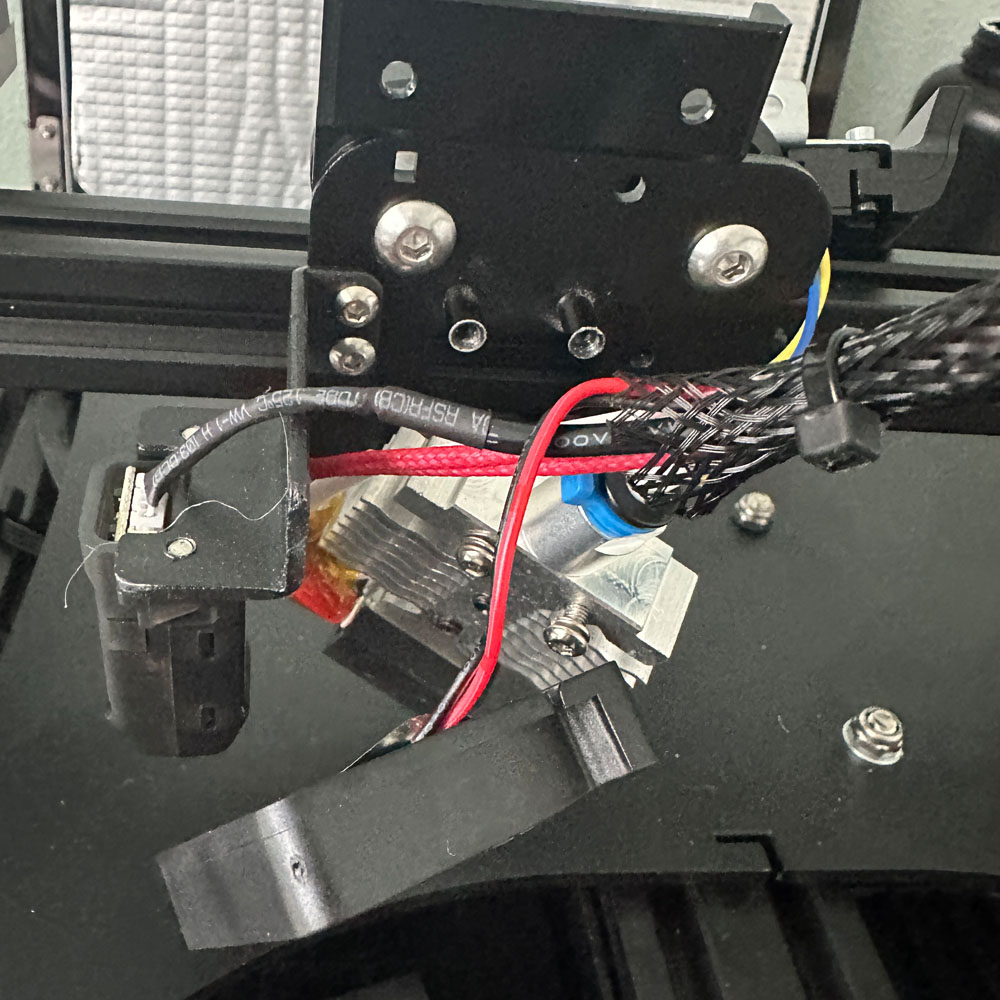
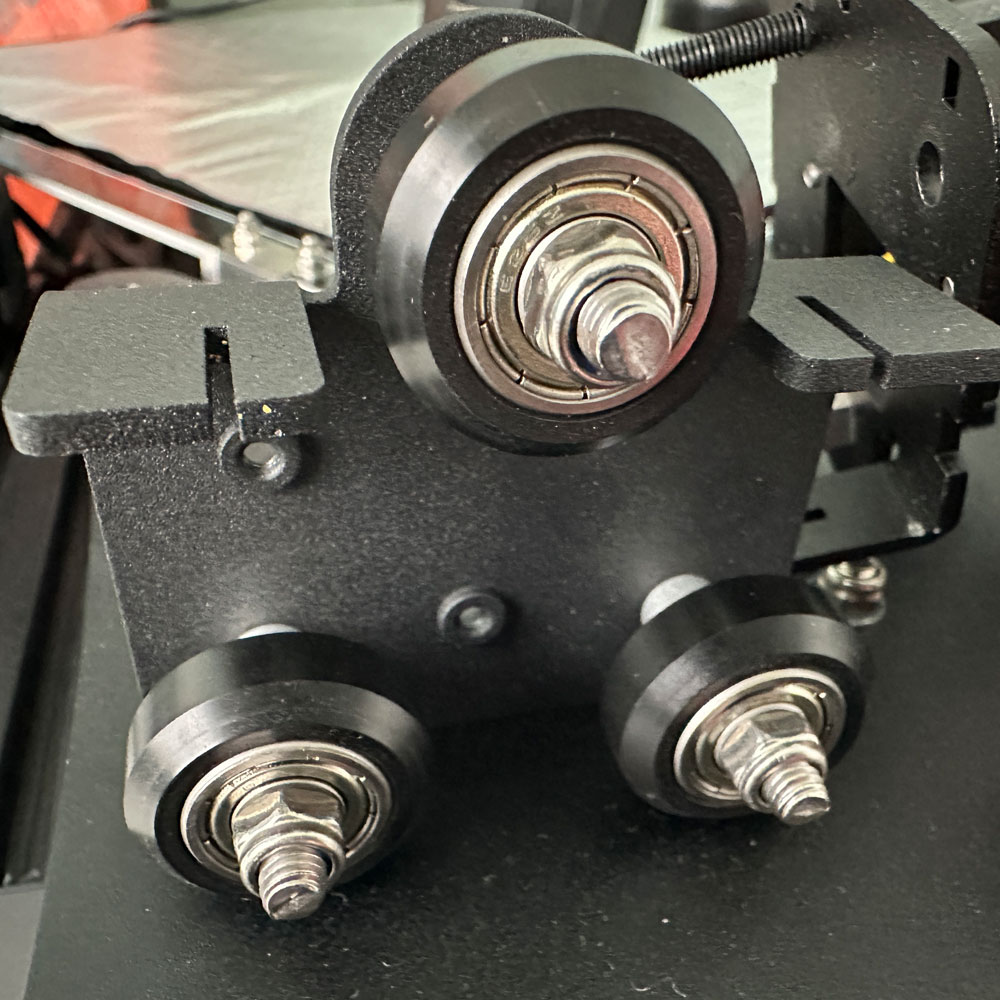
As noted in the previous build article, part 1, we pick up with the orginal backplate, reusing the backplate while adding in the new assembly hardware. Unfortunately, the new OEM plate was incompatible with the setup I have, so, we’ll harvest the new wheels, screws/tightening washers, bolts and spacers where I can. A quick fit, a dryfit of all the screws, spacers and wheels, placement of the bracket, probe (black, narrow plastic with probe), side fans (yellow and blue wires) and heating element (heater, heat sink and extruder).
The final fit, be sure to tighten down the wheel screws, fan, drive belts and extruder prior to placing the heating element. Order will matter here, same with the removal of the Bowden drive, brackets and extruder tube. We will harvest some of the old tube to help direct TPU filament into the new direct drive extruder. Finally, we place the extruder fan (red and black wires). At this point, you can unscrew the two top wheels in order to place the new direct drive platform, tighten down and snap in the carriage case (caution hot should be on top).
Next, the direct drive, clip on the tube provided, snip tube after a fitting or two. Do make sure, the fit is proper. The direct drive platform is screwed in from the backside of the plate, installed on the last step. Following a screw down action, you’ll need to connect the direct drive motor to the main ‘line’ by passing the frame platform where the old extruder motor lived (see last couple of images) and place the harvested tube for filament.
Easy right? Part 3 coming shortly, we will cover that tomorrow, we’ve got to replace the heating plate, power on the machine and change the step movement.
WiFi For Legacy Creality Devices
Creality WiFi Box
Tech | Tools – Creality WiFi Box 2
Need a boost, WiFi or Bluetooth connection for your Creality printer? How about the Creality WiFi Cloud Box 2.0?
Those of you who might be use to the idea of ‘airprint’, or print-over-wifi or can print on a WiFi/Bluetooth ready 3d printer, know how easy it is. It’s easy to sit down, run through your sketch or drawing export, send the slices to a printer via WiFi/Bluetooth, kick off a print via wifi/bluetooth sketch and print.
Before I go into the best case scenario, let’s cover the old school models. Like me, those of you, who utilize old printers, nano sd cards, usb 2 cords and swap nano SD cards and usb sticks. Those of you who might want to skip ‘the chair slide back-and-forth, switching usb dongles and nano cards’… again, it’s old school, it works, manual; yes…
Please note, we haven’t set up the Creality WiFi Box just yet. We will get something up here shortly, once the rebuild is complete ~give or take a week or two to wrap up the build. Rebuild pt 1 – Rebuild, install new drive, assembly and back plate. can be found here. While we are currently reconnecting the new assembly housing, heating element etc. Rebuild pt 2. start today or tomorrow.
With that being said, we’ll cover the Creality solution for older 3d printers, more specifically the Creality WiFi Box with the Ender 3 Neo Max.
Rebuild – Start
Ender Teardown, Rebuild

Labwork – Teardown Part 1
A few steps to crack open the Ender housing, replace extruder wires, internal fan wires, jumpers etc.
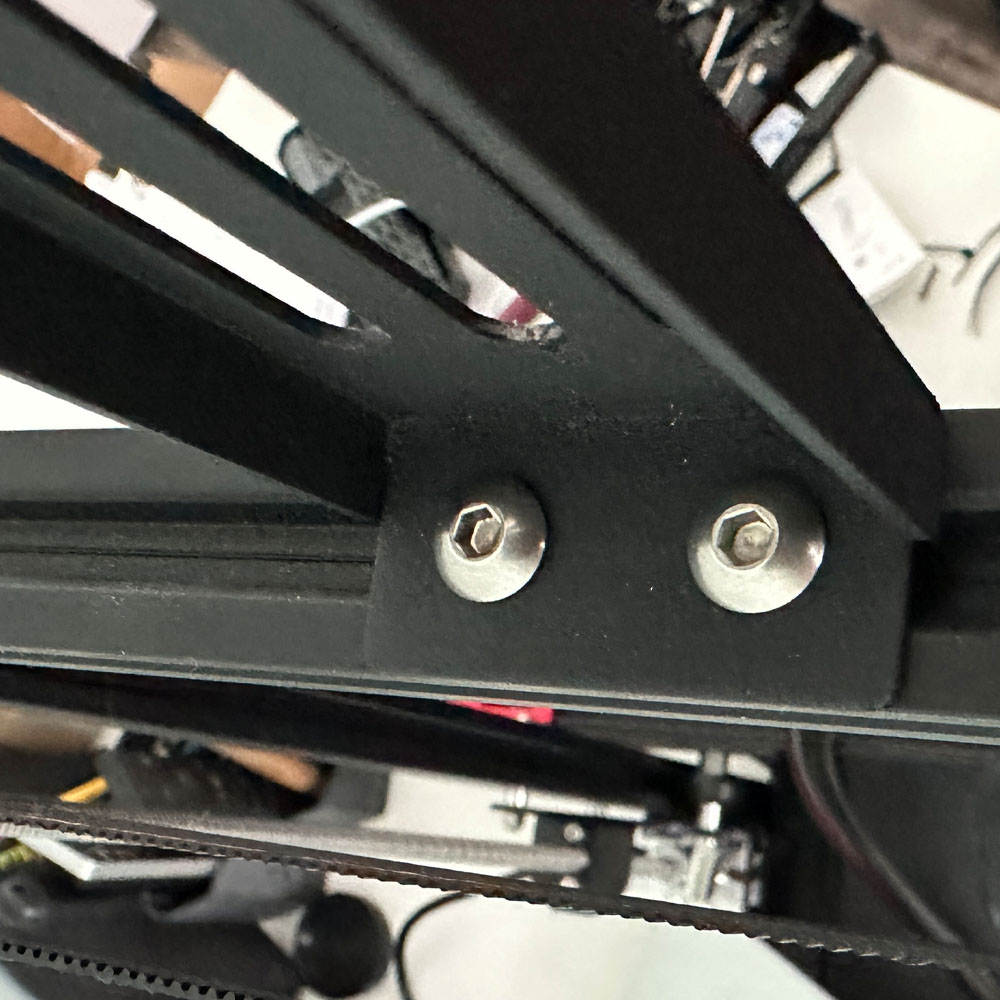
Check out the timeline below, quick editorial: Case removal, wires, replace section by section… replace covers. Voila! Step 2, coming shortly, the more difficult portion of the build as we are swapping extruders Bowden to Direct Drive, and back plate swap. Back plates don’t match, we will proceed with a salvaged plate (existing), harvest the plate, add new hardware… shouldn’t be to difficult.
I’ll post another update on the tool set I’ve recently added, Klein driver set… handy multitool to go with the new-ish Tekprem Torx set. Check back shortly as there is more to come in round two!
Downloads – Boards, Slicing & More
Creality – Ender 3 Max Neo, Halot Sky & Prusa Boards, Slicing and More
Tech | Tools – Software Support
For future usage*, specifically those of you who are running an Creality Ender 3 Max Neo 3D Printer, you need the following software, yes, *already used in various parts of the rebuild effort.
Here is the list:
Creality Halot Sky – Firmware or Slicing (bottom)
Ender 3 – Neo Max – Firmware or Slicing (bottom).
Also, included:
Prusa I3 MK3S+ Kit – Firmware, Drivers and more
Capo
Replaced: D’Addario Capo

Gear – Capo (Capotasto)
20 mins a day, now includes a capo.
I’ve checked all around the shop, the office, the home etc. everywhere… as you know by the post title, I had to find a replacement… Sweetwater – D’Addario Capo arrives and we are back in business. For those who are not on board, capo, or clamp, a clamp which can be placed on a desired fret to ‘shorten’ the fretboard. Bringing the nut to the higher number frets. Ideally, we picked this one up, for both acoustic and 6-string electric guitars.
Quickly, I’d like to note the missing capo, the original capo around the house – the Sweetwater – Kyser Capo. Great capo, black… easy to use for those of you who might want to start practicing with a capo. Both great capo options the Sweetwater – D’Addario Capo or Sweetwater – Kyser Capo, get yourself one today…
Switch
Artwork – Switch (acrylics)

Lab Work – Switches
Back At It Again, The Light Switch Series is now underway, in Progress
It’s a start, got to get something down on canvas… it’s been awhile since I put paintbrush to canvas. These days, I’ve been spending more time on the sketchpad, a year or two back now, I sketched out a few smaller ideas on light swithces before moving to stretched canvas around the office… Honestly, I’m not fawned of or painting on smaller canvas.
It’s a start. This will probably be a 5 to 6 part series, same subject, in this case an old light switch. Who knows, I might scale the sketches up at some point, once the direction is set and subject matter gets ironed out.
Have a look, kind of hard to tell at this point what it is, but it’s there… Check back for updates in the next few months.
Navigating Challenges
Challenges, Issues and Blockers

Adverts – Working Around Challenges, Solutions Ahead
Finding new trails, blazing new paths; navigating trail challenges.
Keep your goals top of mind, keep them simple… understand the trail (business), other trails criss-crossing over and under, through and through, the undulations, water/no water, hazards etc. Eyes ahead, work quickly and diligently to find new paths. Keep it simple.
Assembly Plate
OEM Back Plate
Tech | Tools – Back Plate
Back plate on the bench…
Quick update, assembly back plate is in hand… unfortunately, I had to push the build back a few days, OEM parts ‘the Achilles heal’. Look for an update this week/weekend as all parts/harvestable parts are in and on the bench. Let the rebuild begin! Questions, comments, may be a little encouragement… leave a comment below. Cheers
Clean Up URLs
URLs Shortener Cleanup
Tech | Tools – Shorternening URLs
Confirmed, URLs out…
An update on URLs (shortener); out. For time sake, we’ve Dropped the shortener code from production. If you want to use such a service, look into Tinyurl… the apps been around for awhile, those of you sharing links, swapping links etc, know most companies have some form of url ‘shortening’, whether that is Amazon or YouTube. Check out this short code via Amazon, scenario: College Kid, lookinhg for a tablet, tablet has been found and would like to share the finds with someone – a.co/d/dBwmxaK, pretty handy link… This is a sliver of the short code game, with a massive ecommerce site such as Amazon. Same for the YouTube share links… Anyhow, at some point, we will circle back to this topic and see if there is something worth investing in…
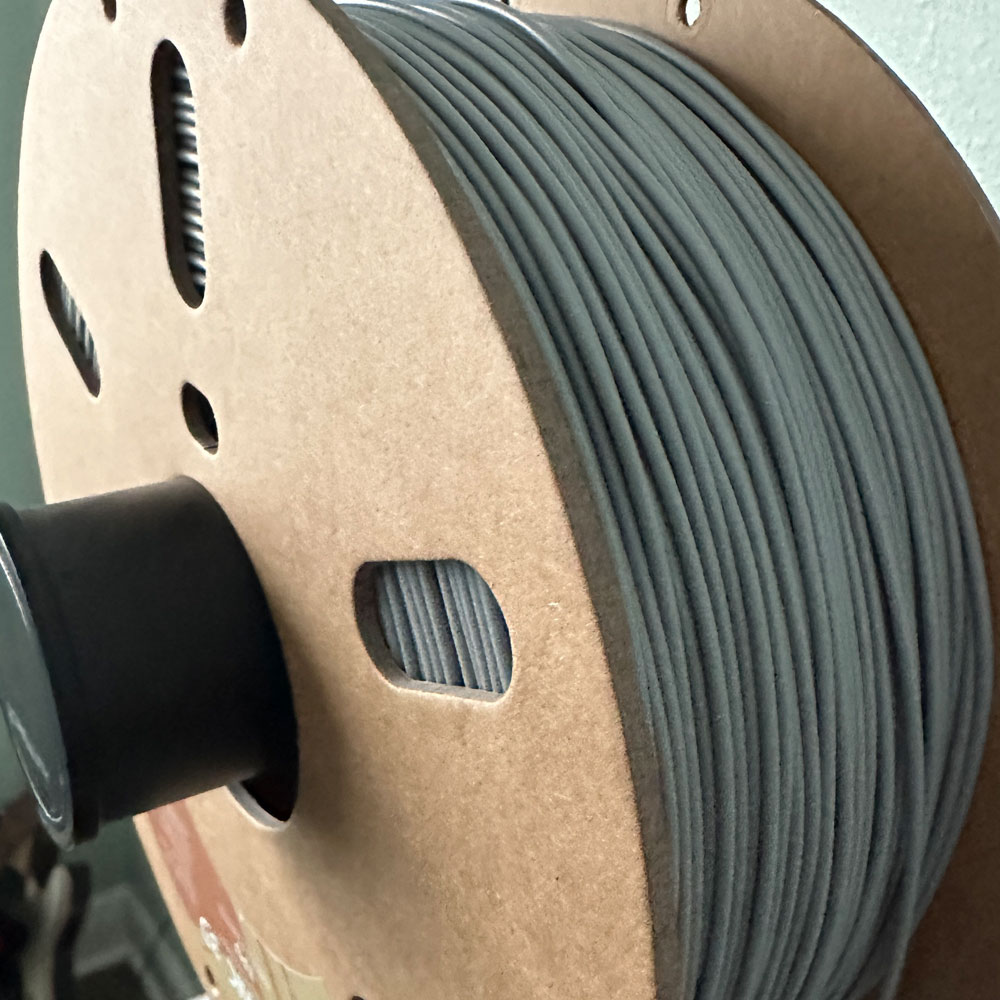
Filament Spool Update
Creality Digital Spool Rack

Gear – Filament Rack
Needed an additional part/piece, this Creality Spool Rack.
Today, we should have our final, final piece* for the build… the last item being an overhead rack, specifically the Creality Digital Spool Rack which will sit upon the top brace/cross-bracket. The spool rack will allow for multiple filament types (PLA/ABS/Nylon/Wood/TPU), TPU specifically to unwind down from the top cross-brace, directly into to the new direct drive/extruder. Handy little rack, replacing the OEM side mounted rack, this one an OEM rack, has a digital scale and a great option while the printer is down. Otherwise, I’d print yourself a rack for the top brace… go with something you can create on your own. Note, I’ll still print up our own, once the printer comes back online and both the TPU, ABS, Nylon, Wood and/or PLA. All material come into scope once the direct drive is up and functioning as expected.
Gadget Backlog Update
Klein Screwdriver Set, Shure MV7 Podcasting Kit, and Aupus Air Duster

Gear – Backlog
Quick update on the Gadget Backlog, SHURE MV7 Microphone Podcast Kit, Air Duster (A.K.A Air “Cannon”) and Klein Tools Precision Screwdriver Set.
Both positive and negatives, the Klein set is a big win, those of you needing a sleek, high-quality, tech/electronics platform; Klein is the way to go. Same for the Aupus Air Duster… a handy, handheld, to blast away dust and debris… And the Shure MV7, same on quality, and crip sound quality, the best with Shure.
Let’s start with the ‘good’ vs the ‘bad’ or ‘ugly’ movie reference “The Good, The Bad, The Ugly – Clint Eastwood”. Let’s cover the precision screwdriver set and air duster. First, the Klein All-In-One Precision Screwdriver Set. If you’re working with smaller appliances – coffee/espresso machines, vacuums, toys, gaming equipment, computers, phones or tablets (Apple specifically). You’re gonna need an elevated, array of tech gear and tools such as – glues, adhesives, adhesive ‘strippers’, grounding elements or bands, gloves, fans, schims or prying tools, same for hex/Torx bit heads… Just to name a few. In many cases, if one was to change out a generic computer battery (Apple MBP) you might need – micro Phillips-head/Torx, pry tool, schims, glue stripper, gloves, heating elements, grounding band, adhesives and then the micro Philips-head and Torx to secure the updated battery array and shell Hopefully you can understand here, the Klein All-In-One covers the range of electronic screws and bolts used in the latest gear. Just want to spend a few mins on the screwdriver set which comes in a sturdy, rugged, hard plastic box (tough box)… with what Klein calls a stay-shut latching mechanism, again, handy to have when your carrying mini-bits/drivers around. The case is great for indoor/outdoor, ‘shop-like conditions’ which may not be pristine per say. Contained within the tough outer shell, a magnetic hand screwdriver base or platform for ‘finger tightening/loosing’, a preformed bit section for 39 extra-long driver set which includes – flatheads, hex, Torx, square, star and Phillips-head bits. Those of you needing Apple specific driver bits, check out this set and pick yourself up a set(not a paid advertisement). High quality stuff, easy to use and magnetic. Always nice and handy to have magnetic tools for very small applications, those of you who require small tools for small screws, clips and bolts. Great set for those who need one, pick one up a Klein Tools.
Moving along now, staying with the ‘Good’. No cans, no more air canisters, missing straws, cold hands and/or the storage space for air cans. Nope, the Aupus Air Duster is a win for two reasons, space and strength. No need to save space for 5 or more cans of compressed air. We are talking desktop or storage space for those of you working in tight office spaces; the DIY(do-it-yourself). The Aupus purchased has two settings of air pressure or strength, both will help push dust and debris out and away from it’s intended target. Sound is constant, no shuddering or sputtering, no power loss or surging. The air duster is made of rigid plastics, great for many applications around the shop – featuring a friendly grip, multi-speed selector, filtered intake and a set of cleaning tools – brushes, extension tube, additional filters and fine funnels for more precise air distribution. No batteries, just an old-fashioned plug and play, so, plenty of power where and when you need it when comparing the Aupus Air Duster to a generic can of air.
Let’s transition to the ‘bad’ or mixed review now. The ‘bad’, might be a little harsh.. When sticking to the theme of “The Good, The Bad and The Ugly” perhaps the final product covers the bad and ugly. For the sake of the argument, let’s just use a ‘soft pass’ on the Shure MV7. Specifically due to it’s reliance on additional software. That’s the rub for this article. Which is where we feel it fails to meet expectations, so, a mixed review of sorts. The positives, sure SHURE (SHURE MV7 – Podcast Kit) makes a great product, excellent sound quality, nicely packaged for various applications – live-streaming, home recording, podcasting and more. Hardware is what you would expect from the legendary Chicago, IL – Sidney SHURE founded audio/electronics and hardware manufacturer, for nearly 100+ years, producing some of the highest quality audio (electronic gear/hardware)… it’s tough to give this one a mixed review. Honestly, I think this is why we might merge the ‘ugly’ with the ‘bad’. What ‘smokes out the deal’ for us, is the reliance on a secondary application called MOTIV. I get it, the software a need, a must. How else would you use the microphone? The software helps the user fine tune the collection of sound, amplification, distance of sound travel, and hardware recognition. Again, the rub, it’s yet another app/window chewing up space, floating desktop application cluttering up an already densely populated screen – browsers, live-streaming apps, video software, editing software and so on. You get the picture, an ugly one. Although, you may not agree, that’s fine… this is where I think the experience falls short. If there ever was a time where hardware doesn’t need an ‘application’ requirement and perhaps an additional piece of hardware, I think we would have a winner. Again, great kit, includes all the connections one would expect these days, USB-C, XLR, a desktop mount for local sound collection, and crisp sound recording.
The product was built and sold as a podcasting kit, targeting those v-logs, the interweb adventurers, the tubers, the gamers, the podcasters and/or home/office applications. All is well, until you understand, an application is required to download and run the physical hardware. The MOTIV app can be downloaded here, found on either App Store or Google Play Store. Caveat, multiple OS platforms, MacOS, Windows and Ubuntu… honestly, I was open to new gear and not said proprietary software running to manage external hardware. Takeaway, give it a shot, the microphone is fantastic, sound quality is top notch. A home-run, if I might use a sports analogy as well. ‘Ugly’ or ‘Bad’ perhaps, however, if you’re looking for a reliable microphone, sound quality bar-none, limited OS movement, well, this might just be your winning ticket. For us, however, we will pass for now.
More on the next one, cheers
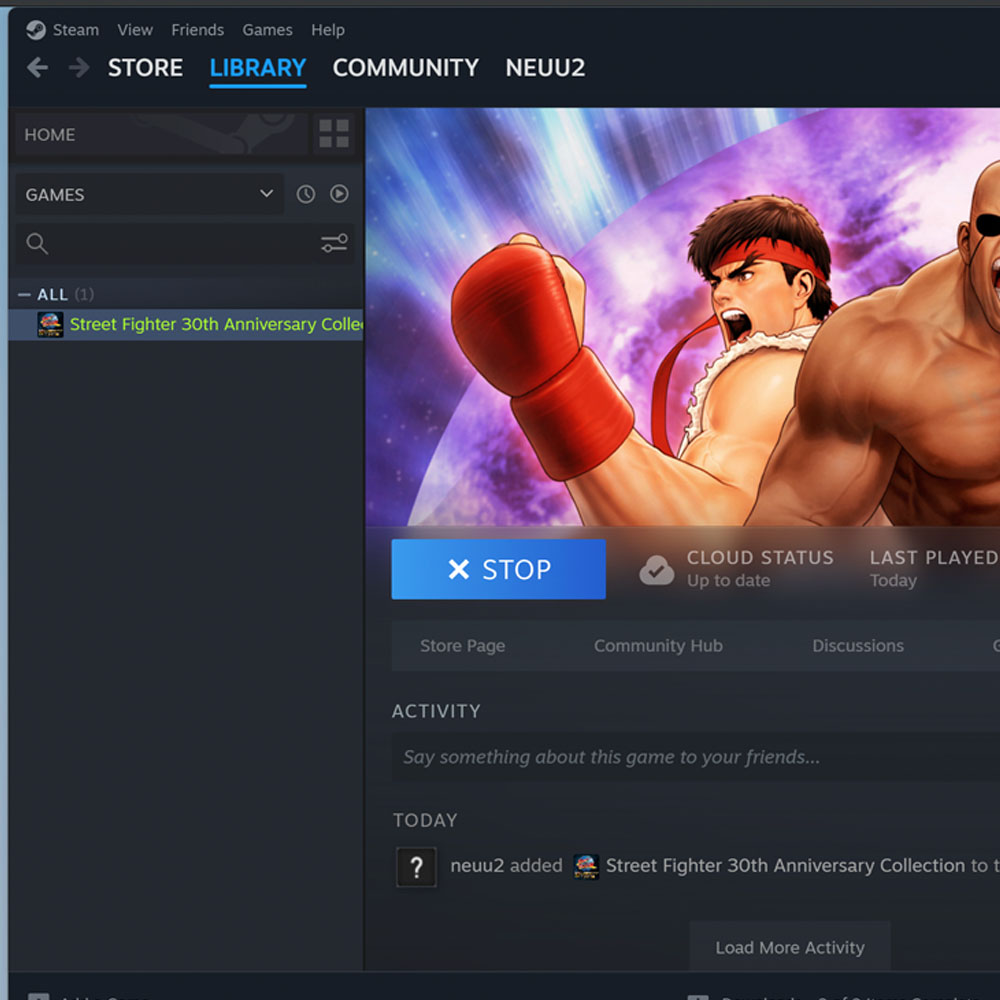
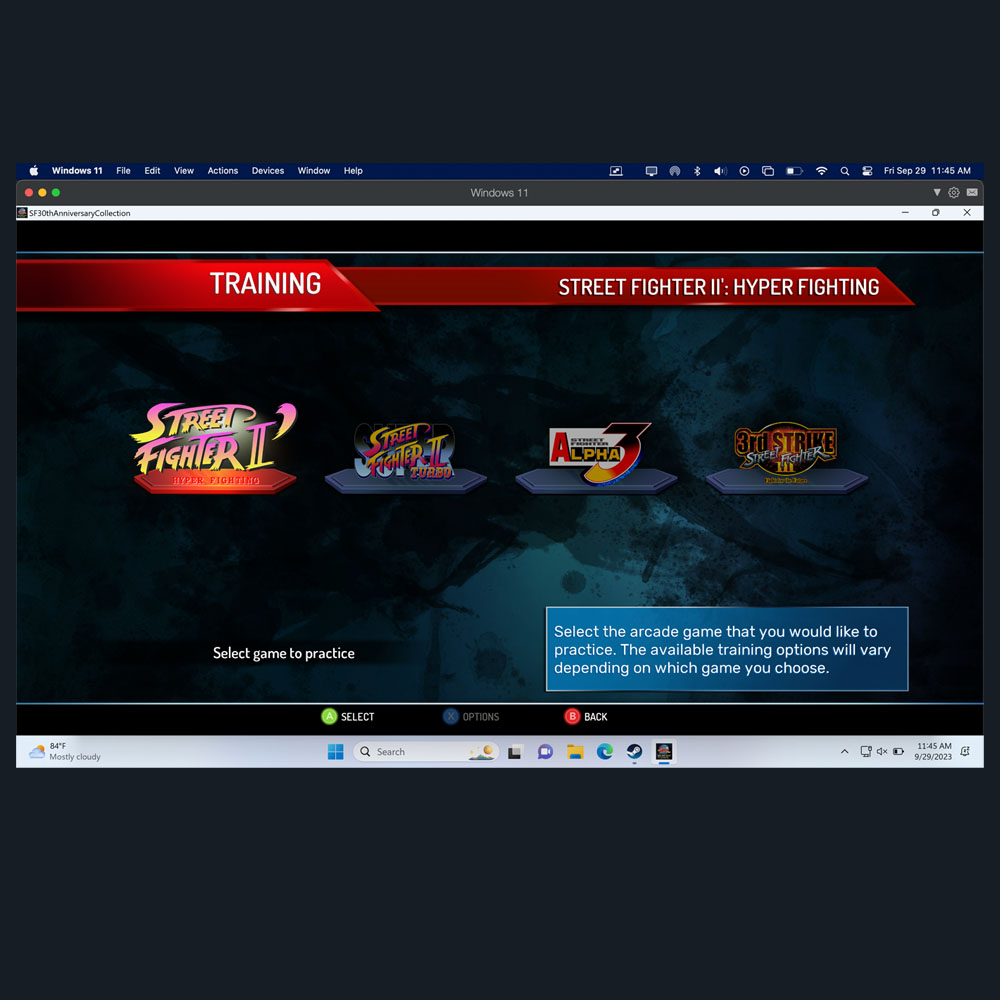
Street Fighter Returns
Street Fighter 6(XBox/PC)
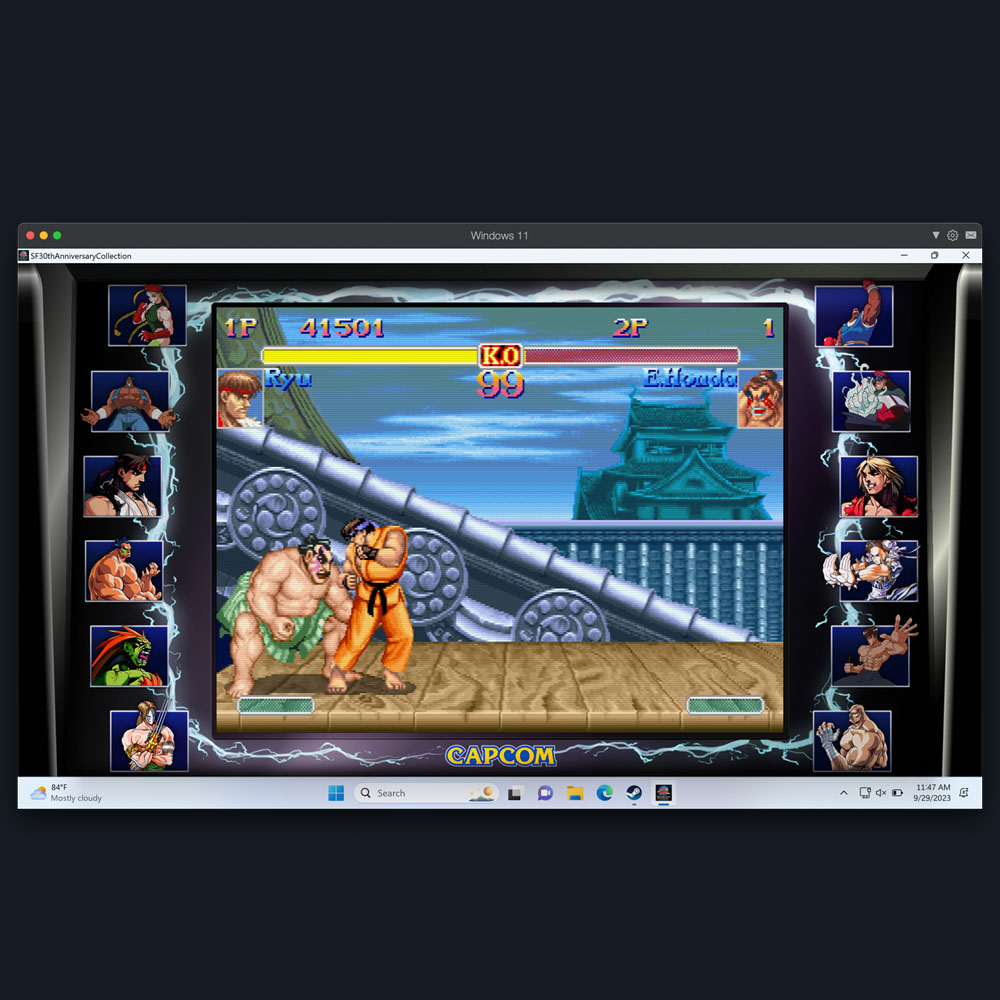
Lab Work – Steam, XBox, VM Software, Street Fighter And More
It’s time… it’s time we embark on a new adventure, Street Fighter… Parallels (check), Windows 11 (check), Steam (check), Street Fighter… Street Fighter is up and running, first boot, and full go come Monday or Tuesday. It’s been some 20 years since my last go… Emulation and Steam are requirements today. Wayback when, I think it was Street Fighter – Capcom vs SNK; undergrad work. I think we are looking at Street Fighter 6… I’m sure it will be brilliant. We will run the game on Xbox/PC (Asus Mini or MacOS Parallels {Win11 or Linux distro}). Whatever runs better than the other or visa versa.
The point here, I’ll get to it. It’s been 20 plus years since I played my favorite game of all time, the first few were of the ‘all-time variety’, first as a button smasher, to novice, to skilled gamer… I don’t know that I would say gamer, but for purposes of the post, I was the closest thing to the ‘idea of a ST gamer’… perhaps more nostalgia than the least practical ‘legendary’ status.
Anyhow, I think we will tune up the Asus mini, and have a go over the next few days/weeks. We’ve got guitar, printer, ‘on the bench’ fixes and more coming soon… Why not add a college favorite to the mix. We can cover the Asus mini, MacOS Parallels (running Win11 and Linux) while we are at it as well.


Solitaire Wins Vs. Tosses
Play Solitaire, Wins (Standar/Vegas Style) vs Tosses (Losses)

Lab Work – Solitaire
Wins Vs. Tosses, Vegas or Standard, Solitaire is a great game to cover. We will cover this in depth in a future post. However for the sake of the ‘tease’ I recorded 4 weeks or more of Solitaire games, noting tosses to wins. In some future sessions I’ll cover Vegas (3 card draw/flip) vs standard (single card draw/flip). It’s interesting, results so far, numbers are starting to even out, wins +2 over tosses. Yes, I call it tosses, yes, they are losses… The point is to speed up the game, switch decks, and number of shuffles – 3 to 7, the closer to 7 ruffles the better the results. Want to note, I do reset the card deck after so many tosses. Those numbers might be added in a future post as well.
Good luck, don’t forget, tosses over losses, wins over tosses.


Max Neo Back Plate
Back Plate and Rail Wheels
Lab Work – Working Through The Challenges Associated With 3d Printers, Printing, Upgrades and More
Long awaited parts are on the truck this morning, should get the final pieces by 2pm or so.
Quick update, all the parts to update the Ender 3 Neo Max to run TPU should be in hand by roughly ~2pm today. Ultimately, I’d like to get the rebuild out on the interwebs by the end of the week. I’ll post the tear down pics today, below. Just a few, to help you understand what needs to be removed, replaced and rebuilt. If for some reason the parts are delayed, Friday should still be a reasonable goal.
If you’re new to the site, check out the Max Neo challenges in the Output archives… for those who just want to see the rebuild, just understand this – we had a few prints that went sideways, by sideways, extruder was found buried in filament, grinding away at the build plate. Ultimately causing a meltdown, plate parts thrown out of the machine etc… prior to the blow out, we had a few successful TPU test builds go to term, however, the standard build (Ender 3 Neo Max Bowden Extruder setup, standard build from the factory) wasn’t working. Please note, sometimes you’ve got to ‘break’ things to truly figure out the right path; change paths per say. Anyhow, not to belabor the point here, but, we should have all the necessary parts to finally rebuild this machine with the correct parts and extruder to build more ‘things’ with an array of filaments.
20 Mins A Day
Nose To The Grind – 20mins A Day
Lab Work – Grinding Out Practice Time, Self-Improvement
Today, I added strumming the guitar ‘guitar grind’ back in the mix. Grind you say? Yes, the grind. I’ve never been musically inclined, nor formally taught, trained or had a significant amount of time to dedicate to the craft. So, in order to chip away at this theory of the ‘grind’… today, I’ve found 20/30 mins (per day) to pick up the guitar and learn something; anything – lessons, chord progression, song practice, music theory, finger position, scales, strumming and more. Like I said, just trying to chip away at the rust, if there was rust built up over the years.
Check out my recent post on the D’Addario medium celluloid picks, I’ve found them to be useful when dealing with finger slippage, sweat mostly. While also adding Vincent’s post on 50+ Easy Guitar Songs for Every Beginner… a beginner, novice I am. Not horrible might be away to describe the journey.
The lessons and songs plays nicely in the sandbox, guitar in hand, song, 20 – 30 mins… covering “I Wanna Be There” – Blessed Union Of Souls, “Three Little Birds – Bob Marley, “3am” – Matchbox 20, “Learning To Fly” – Tom Petty and “Comfortably Numb” – Pink Floyd… By no means would I say this was easy for me, as a struggling novice. Furthermore, Vincent’s collection adds other online talent with distinction – a quick search, and you too can play along – @Guitar Zoom – Chord Work via Steve Stine, @Marty Music – 3am lesson via Marty Swartz, @Learning To Fly via Lauren Bateman…
So, what am I getting at here? What’s the catch? I’ll leave you with this: Whether it’s learning the guitar outright, formal music lessons, finger position etc. from a music perspective, or general reading, Toastmasters (speech improvement), welding, community stewardship etc… whatever it may be, try it for 20/30 mins a day. Dedicate the time to developing this habit, a new habit. Good habits are hard to find, and the value in what we are targeting here in this post. Yes, this post being specific to guitar, and may be more about ‘writing’ for me as well but deep down writing might be it’s own blocker, fatigue mostly. I’m a firm believer in finding new skills, making new connections and pushing myself further than the day prior. Also, and final note, I’ve had access to a guitar sometime in my life since college, 20+ years, time to pick it up, tune it, and start learning today.
Good luck with your own activity to start today, grind away
Gadget Backlog
Shipping Soon, BobsCNC, Magnet Switches, Extra (Shop) Batteries, Bodum Mini Whisk, SHURE MV7 Mic, Aupus Electronic Air Duster, Klein Tools 32717 Precision Screwdriver Set with Case, Med. Daddario Celluloid Guitar Picks and CnC (BobsCNC) Machines.
Gear – More Gear On The Chopping Block
What’s that in the box, ((shake)) ((shake)) what might that be? A new shipment, what is in ‘the box’ and on the bench.
Let’s first share this, BobsCNC is in the works, as space is somewhat limited at the moment. More on that soon. Batteries, I’ve got a few Optima Red Tops ready to go, a little outback welding where applicable. Fitting when discussing magnetic ‘tools’ and switches… yes, a super strong magnet that can be switched on and off with swift turn of the hand or lightswitch type mechanism. Very cool item to have around the house, shop, offroad etc. I’m curious to know (sans cost perhaps) if the welding community has a preference on ‘welding square/angle holders, clamps or plunger/light switch type, magnetic holders etc. Obviously, if you’re out on the trail, off roading – trail breakfix – integrity/rigidity might overrule OEM specs on angles or manufacture measurements. It’s time to getting your offroad rig off the trail, would something like this help to bring your efforts in line with those manufacture specs per say. Anyhow, these switch magnets might be handy to have around the shop. Various types – Angle Clamps, Magswitch Clamp, Stackable Magnets or Adjustable Angle Magnetic Welding Square.
So, let’s cover what has been unboxed… The Bloom Frother, as you know, the hand mixer had to be ‘adjusted’… a few screws, new batteries, some isopropyl alcohol… and we are back in business. You all know I’m big coffee and tea guy, if not, that’s ok too. I take my coffee and tea with a few pinches of Sugar in the Raw, and depending on the time of day; half-half just to take down the temp a step. There are few handheld ‘frothers’ out there of various color and materials… the Bloom is back to life, new batteries and ready to mix. So, happy with the purchase for now. I’ll post an update on the longterm usage of the Bloom fix. Admittedly, an alternative might be the Bodum Schimuna Whisk which has peaked my interest. Those of you in the market for micro whisk/frother, the Bodum Schimuna might be a good client gift at some point.
Moving along, the SHURE MV7 usb mic! Initial thoughts – great sound, crisp dynamic tones and easy to use, another step forward toward audio/video experiences. The microphone includes a desktop friendly microphone stand. MacOS users will need to download Shure Application to mix and control the external accessory. A little more work to get around the need to purchase additional cables, XLR adapters or fittings. Look for a deep dive, and pictures to accompany the post.
Next, we can cover ditching the air duster can for a powerful, corded air duster in the Aupus APAD15BL Air Duster. Air cans have worked for many years, great pairing with electrical friendly wipes. This plug and play air cannon has variable speeds, cleaning tools, and filters. This small, office friendly tool is a handy little gadget to have in and around the shop as well. While we are on gadgets and tools around the shop/office, we are beefing up the ole’ Makey tech tool set, specifically by adding a set of Torx screwdrivers (T3 – T10) – Tekprem Torx Screwdrivers. One downfall I’d like to call out, is the star/torx bit integrity… you got to be careful with nano screws, give it time… or you might have to replace your bits with a set like these. What I’m seeing is screw lock.. being more beneficial here, good or bad, it takes a toll on the micro-bits used to drive in or unwind electronics. I’ll push out more feedback and comments on the Torx set and air cannon as we use those items on the bench.
Finally, we put picked up a new guitar pick. Most are similar, all have smooth or textured, etc. the main problem I’m having is grip. After a few mins, grip is becoming an issue… might be the ‘player’, but slippage is a problem. Sweat being the culprit. Odd huh? So, I’ve added a mix bag of D’Addario Celluloid picks to the mix. The goal was to switch it up a bit, trying something new. Still have a few Fender Celluloid Medium picks and DunlopMax-Grip variety.
Through The Clouds, Understand Business Growth
What’s On The Horizon, Learn Something New, Remove Issues, Remove ‘Blockers’, and Reduce the Negative.

Adverts – The Value Of Vision
Aim Small, See Beyond; Eyes On Target.
Keep it simple folks, empower those around you, work to improve each and everyday (foundational change, bolstering true value)… learn to master change.